AR Envelope for Advancedr –Lucky Rabbit
|
Abstract: In this tutorial, I will explain how to create this AR envelope advanced version, and how to use Blockly to create interactive AR project. Introduction: There are increasingly more tools available for quickly and easily creating AR projects. As people become more familiar with this technology, they will want to try out more possibilities, whether in terms of interactivity or functionality. The MAKAR editor has added "logic functions" in recent years, using programming blocks which are easier for beginners to learn compared to traditional text-based programming. Beginners will not make errors due to input mistakes or missing specific symbols, which can cause programs to fail. This project builds upon the AR envelope and focuses more on achieving AR effects through logical programming. It will use effects such as "random sampling" and "model fade-in/fade-out". |
1. Image target
Creating image recognition is like New Year Rabbit tutorial and is done using Midjourney. Therefore, it will not be explained in detail here, and you can refer to the beginner's tutorial for more information.
2. Doodle3d
This is a web-based modeling tool. The left side displays a 2D canvas while the right side shows a 3D space. You can draw any shape or write any text on the canvas on the left and an equivalent 3D model will immediately be generated on the right. The models can be saved in STL and OBJ file formats. Therefore, I will use this tool to create my year's logo. By opening the website on a tablet, I can use a stylus to write in my unique handwriting font.

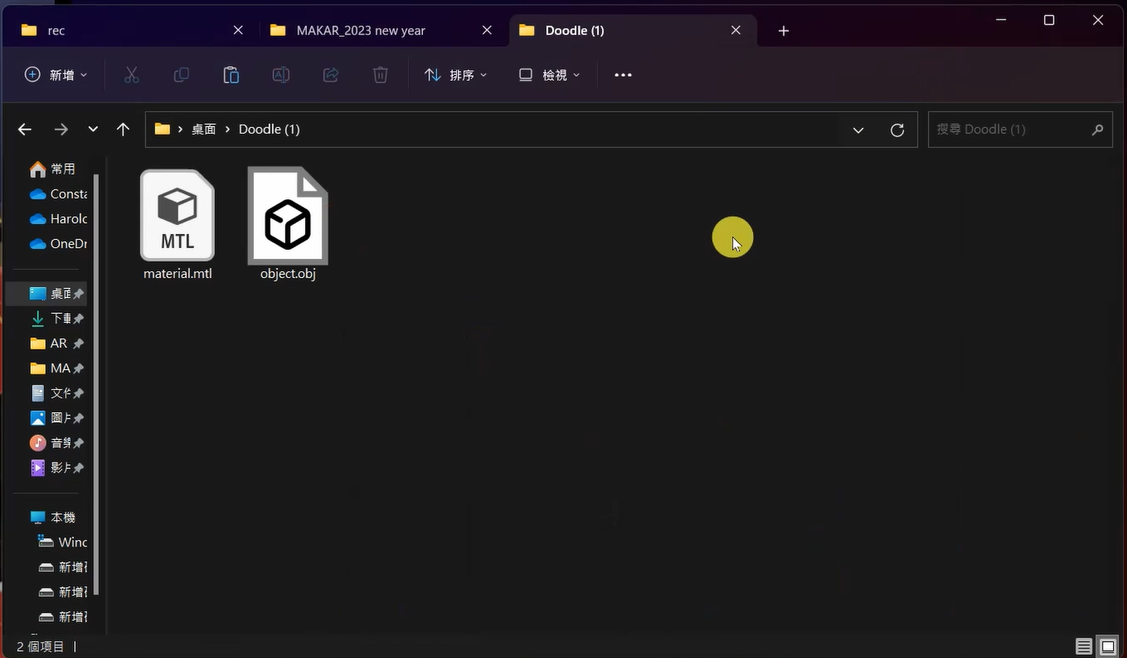
After the creation is complete, export it as an OBJ file format. Once the compressed file is unpacked, two files will be obtained: the MTL file and OBJ file. Simply opening the OBJ file may reveal a colorless model, so we need to use Blender to convert the model.

3. Blender
Blender is a free and open-source modeling software that supports multiple platforms. We are only using Blender to convert the OBJ file into a model file type supported by MAKAR, such as FBX or GLB.
To import the file, go to File 🡪 Import 🡪 Wavefront (OBJ).

Then just export it.
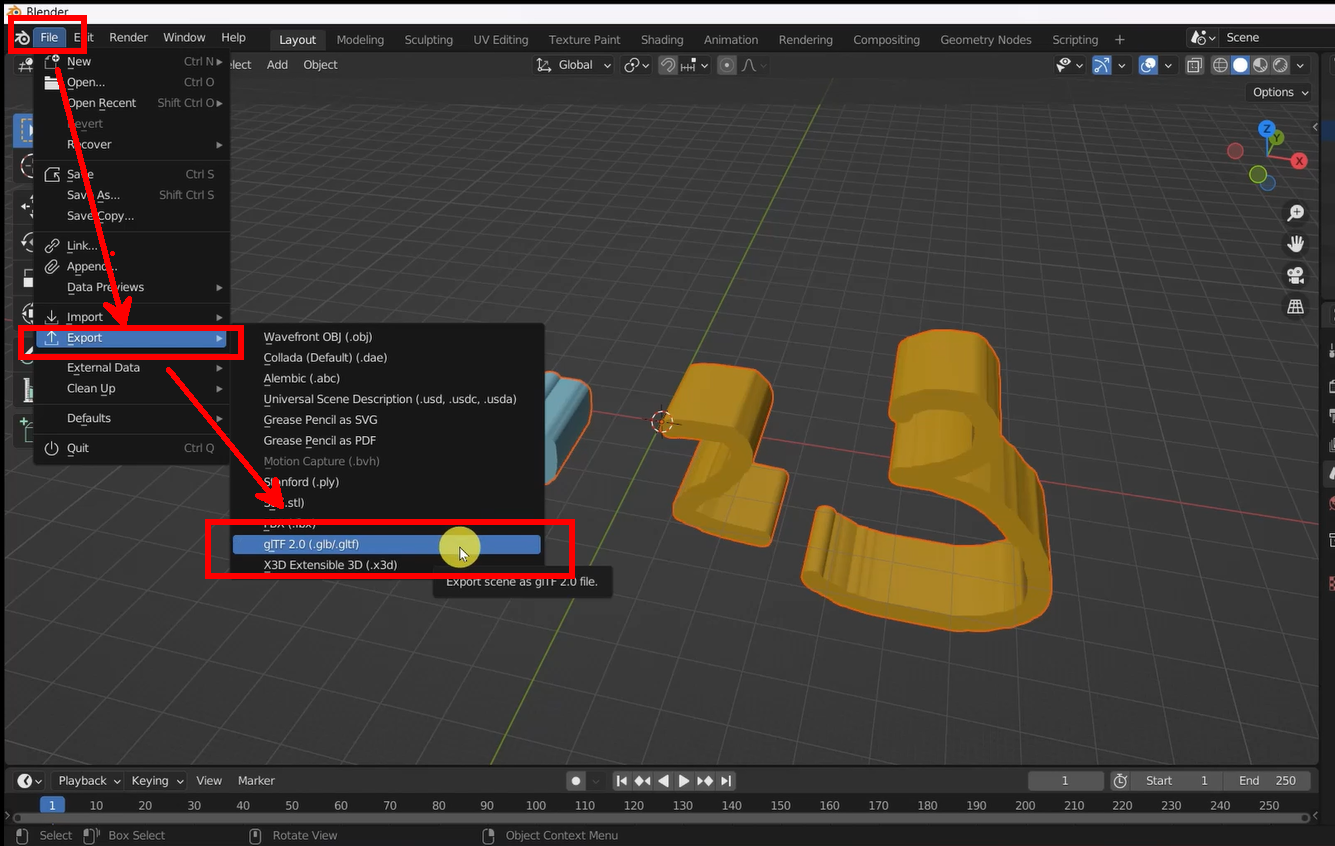
To export the file, go to File 🡪 Export 🡪 glTF 2.0 (GLB/GLTF).
There is no need to change any export settings.
4. MAKAR Editor
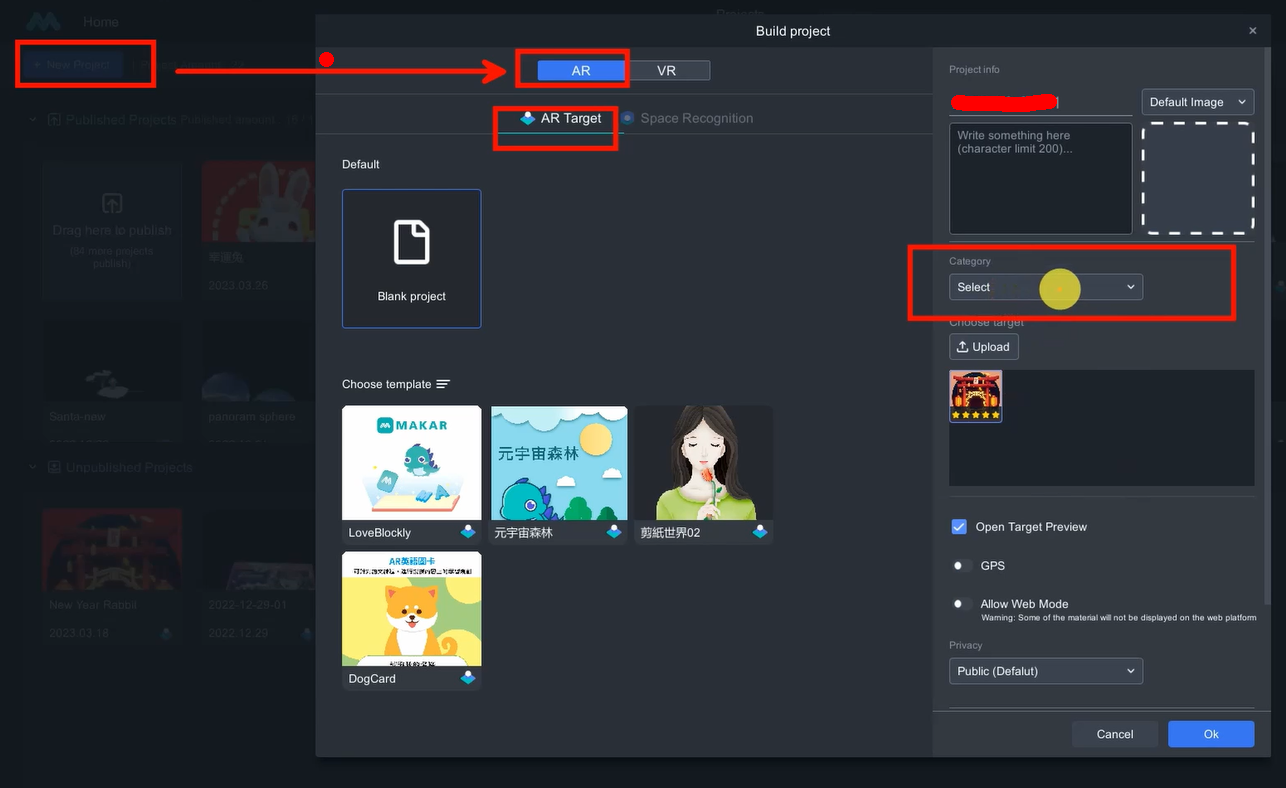
New project 🡪 AR 🡪 AR Target
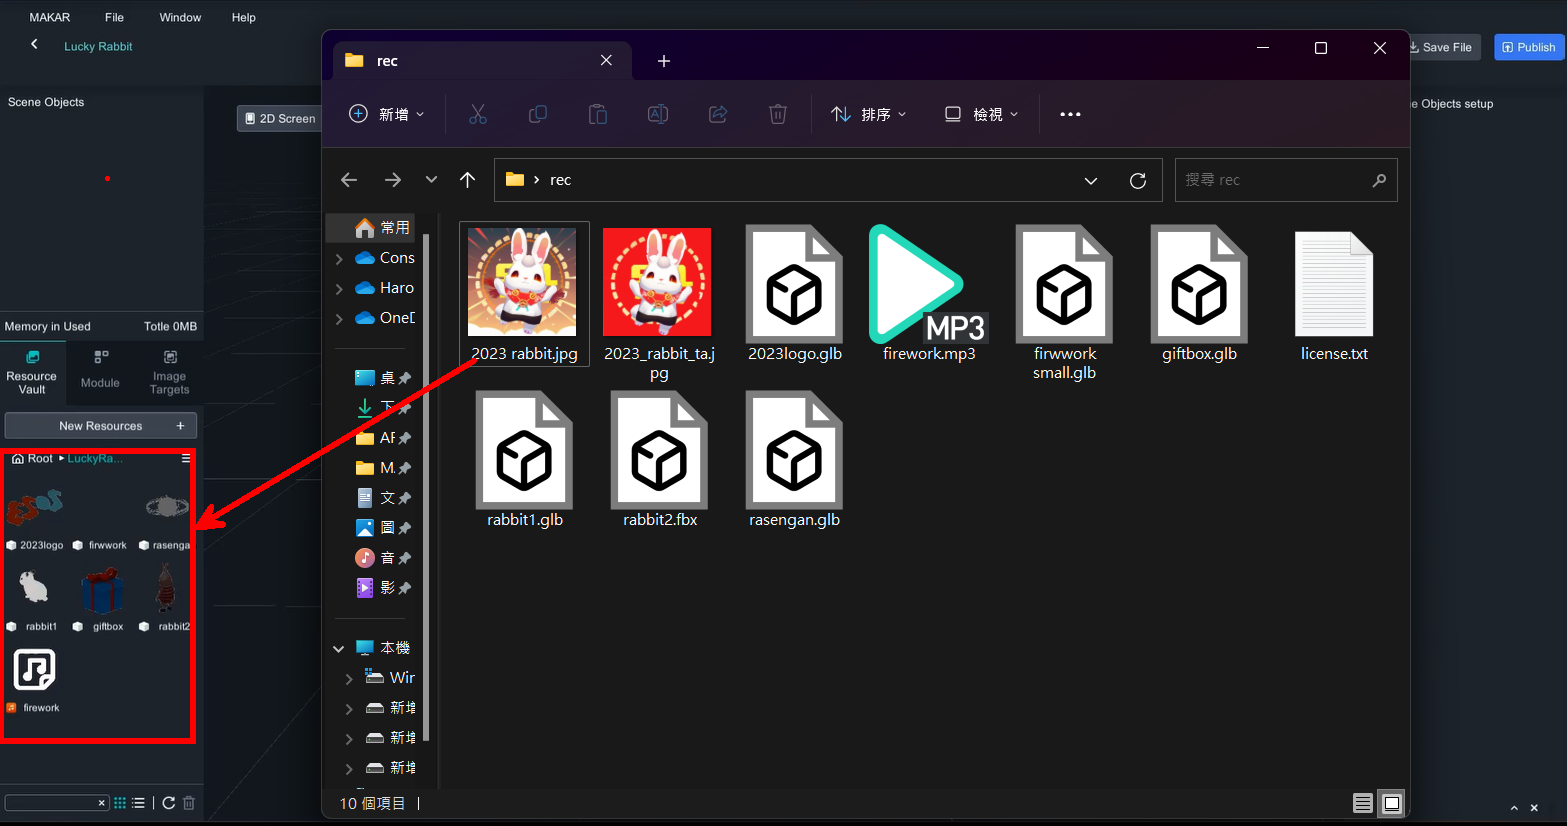
After creating the project, you can import materials, including 3D models, and audio, to the resource vault.
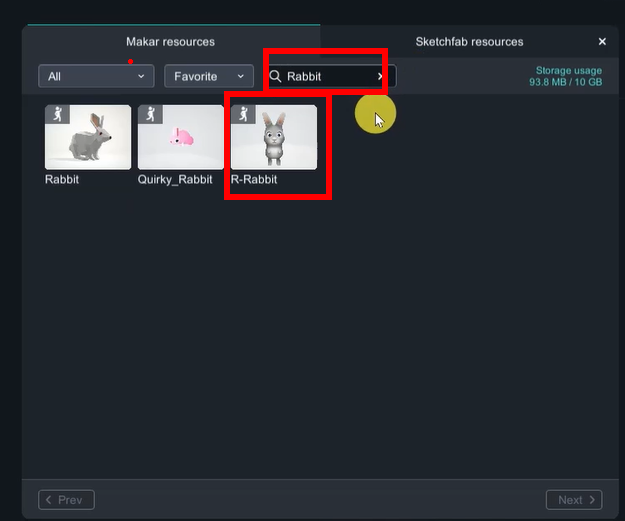
The third rabbit was created using the rabbit material available on MAKAR's online resources.
To add the material, go to New Resources🡪 Online Resources 🡪 MAKAR Resources, and search for "Rabbit". You may not find the rabbit if you typed “rabbit”.
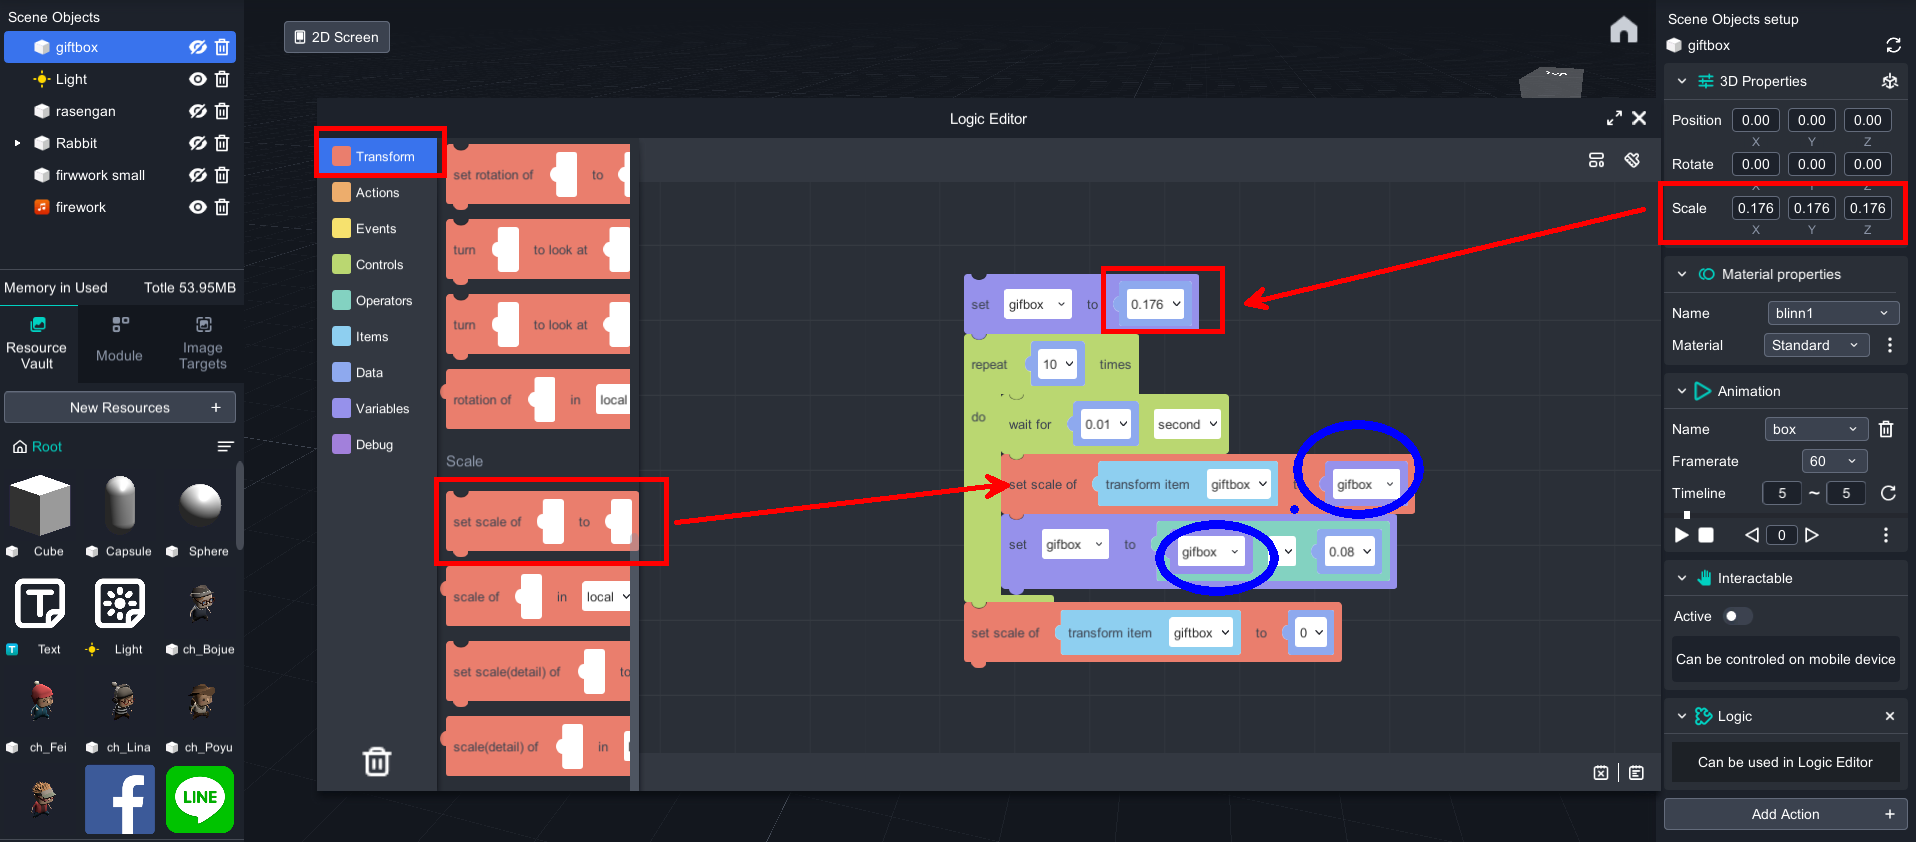
5. Animation segmentation
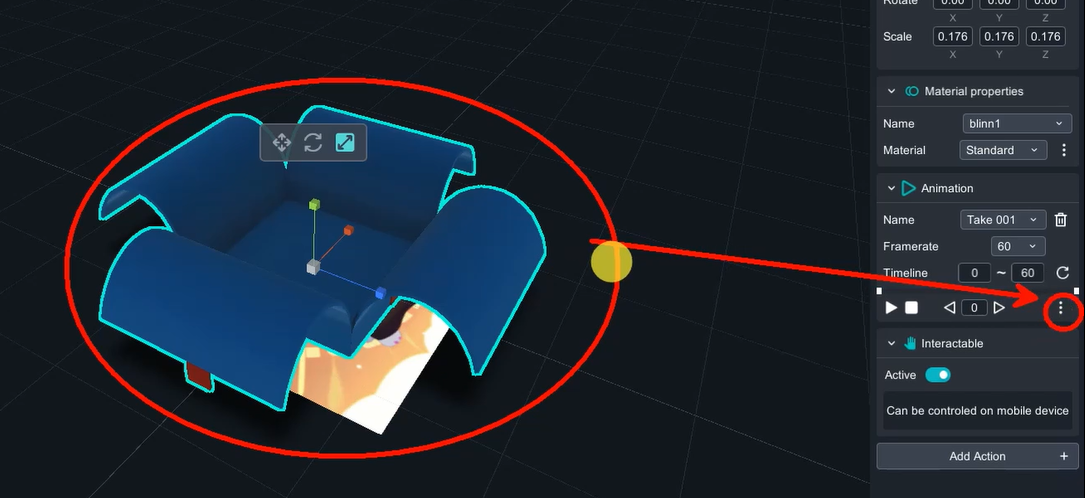
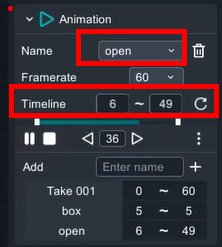
First, you need to separate the animation of the giftbox into two states: the static state (box) and the open state (open). Click the three dots in the bottom right corner of the animation feature for giftbox to create a new animation.
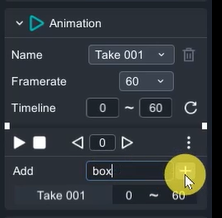
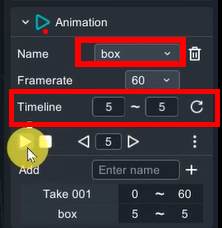
The timeline of box is 5 to 5; and timeline of open is 6 to 49.
6. Color on model
The rasengan in the material can be used to decorate as a magic ball, but this model does not have any material (color) by default. Therefore, through MAKAR's built-in functions, the model can be colored.
Note: The use of material on the model has a time and place. This model can be identified by its different names on the right, which correspond to different parts (multiple model names), making it suitable for this method. If there is only one model name, this method may not be suitable.
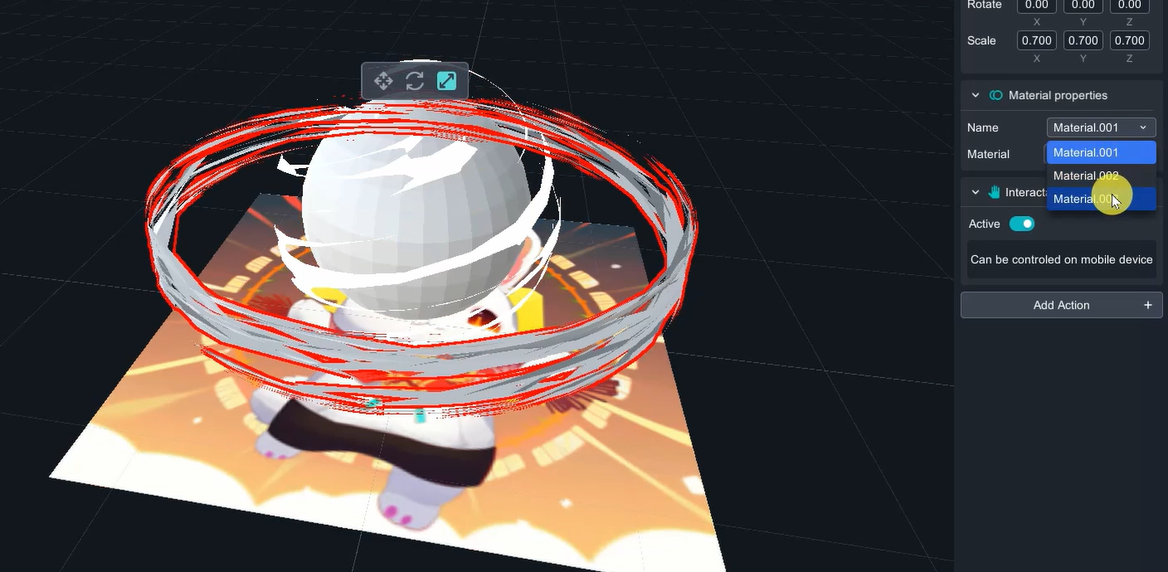
Change the material to " Color" and click on the three dots on the right to open the color options and choose the appropriate color.
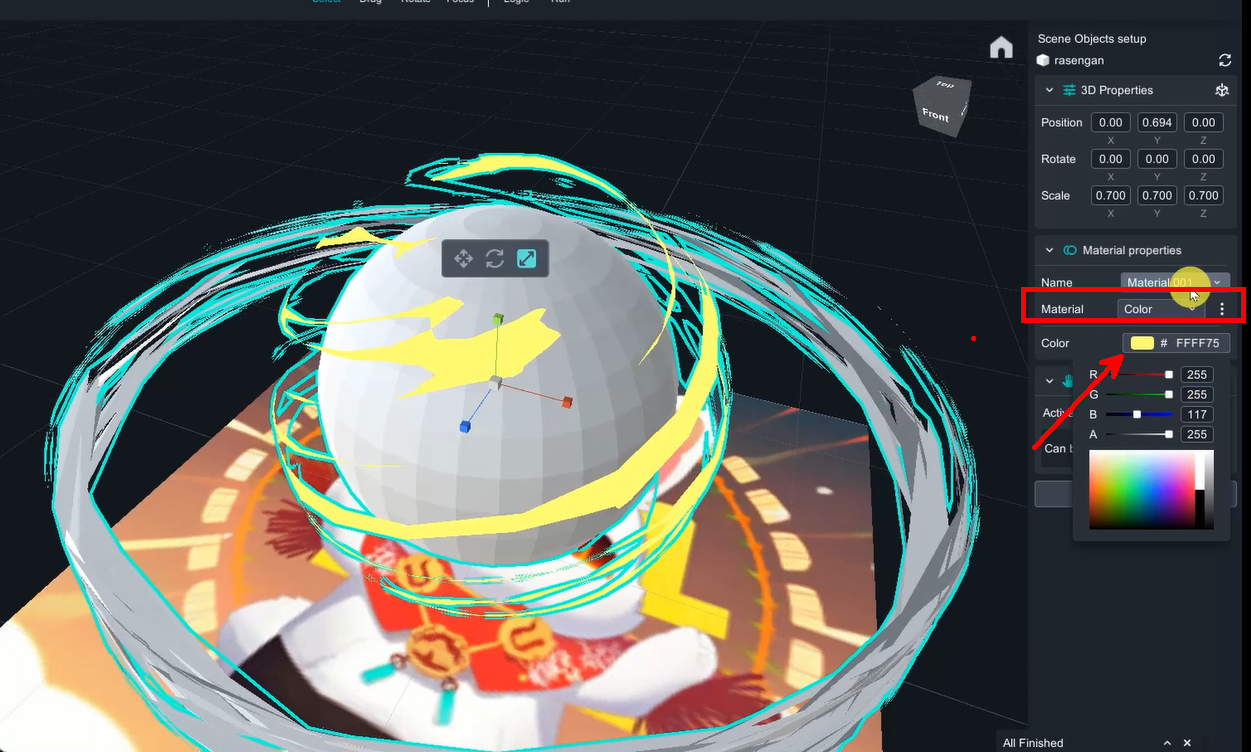
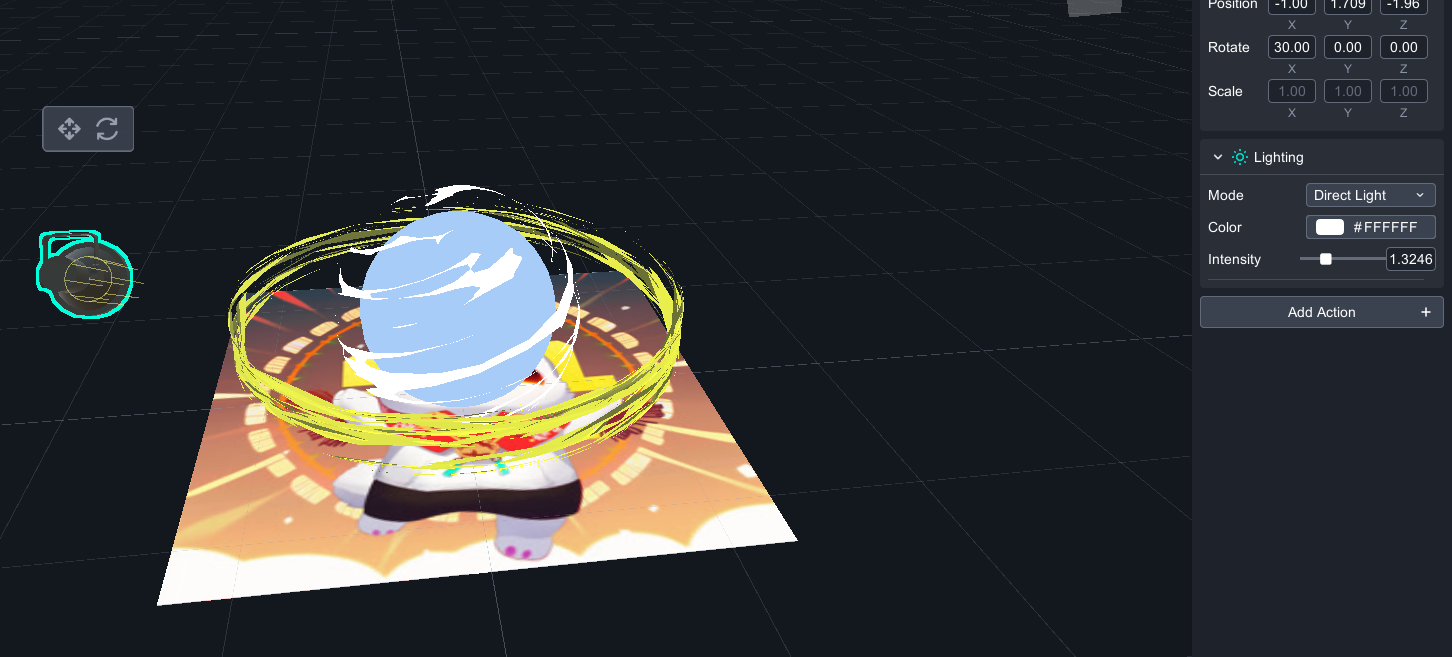
If you find the model too dark, you can add a light source to it. Since the material has been changed into color, you cannot use "mask(alpha)".
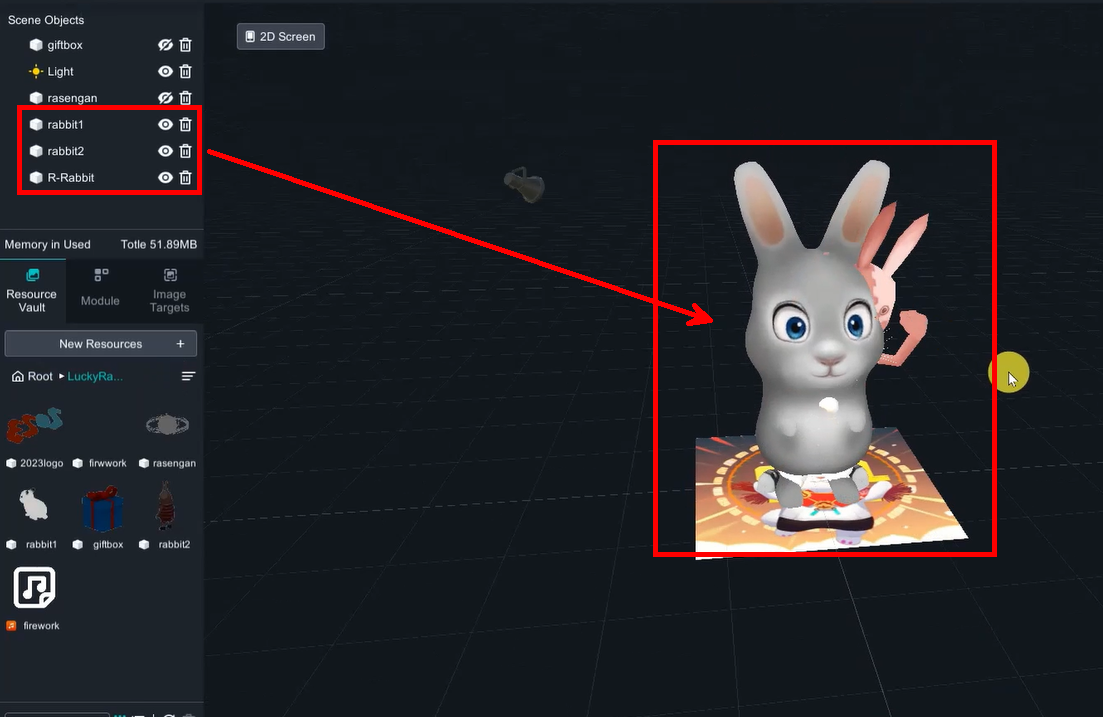
7. Rabbit group
We will be using three rabbits for this project. Place each rabbit in the center of the scene and adjust their sizes to be consistent.
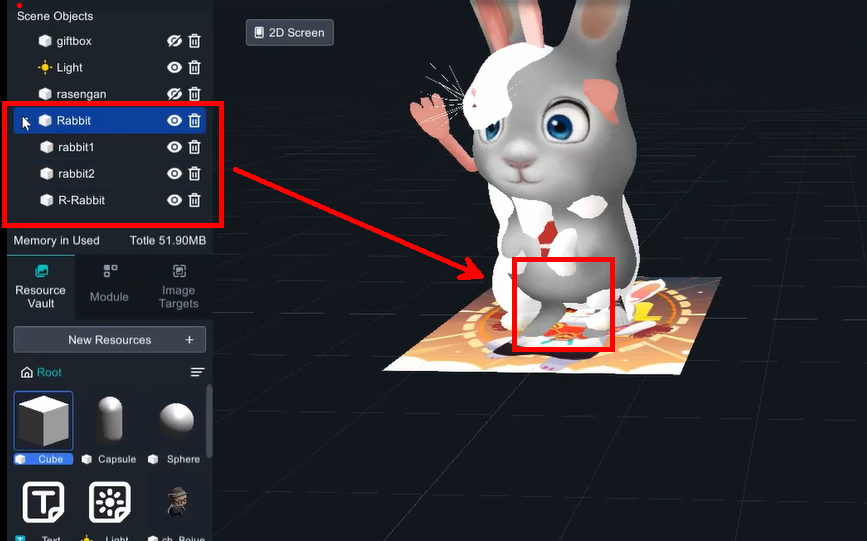
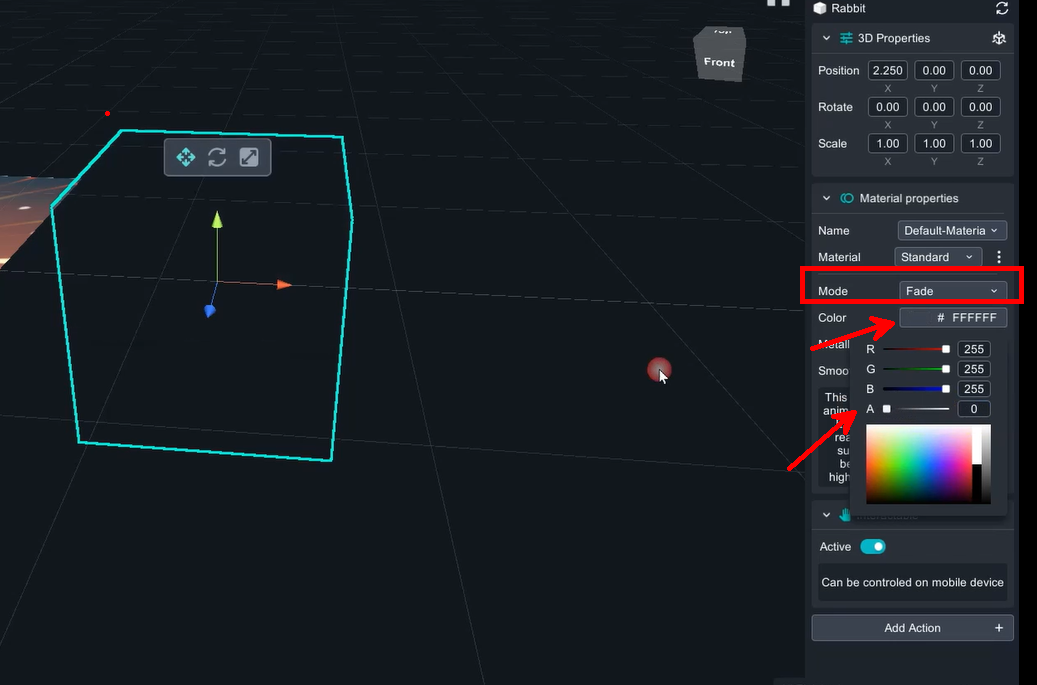
Transparent cube: Click the three dots on the right side of the material ball, change the mode to "Fade”, click on the color, decrease the A (alpha) value to 0.
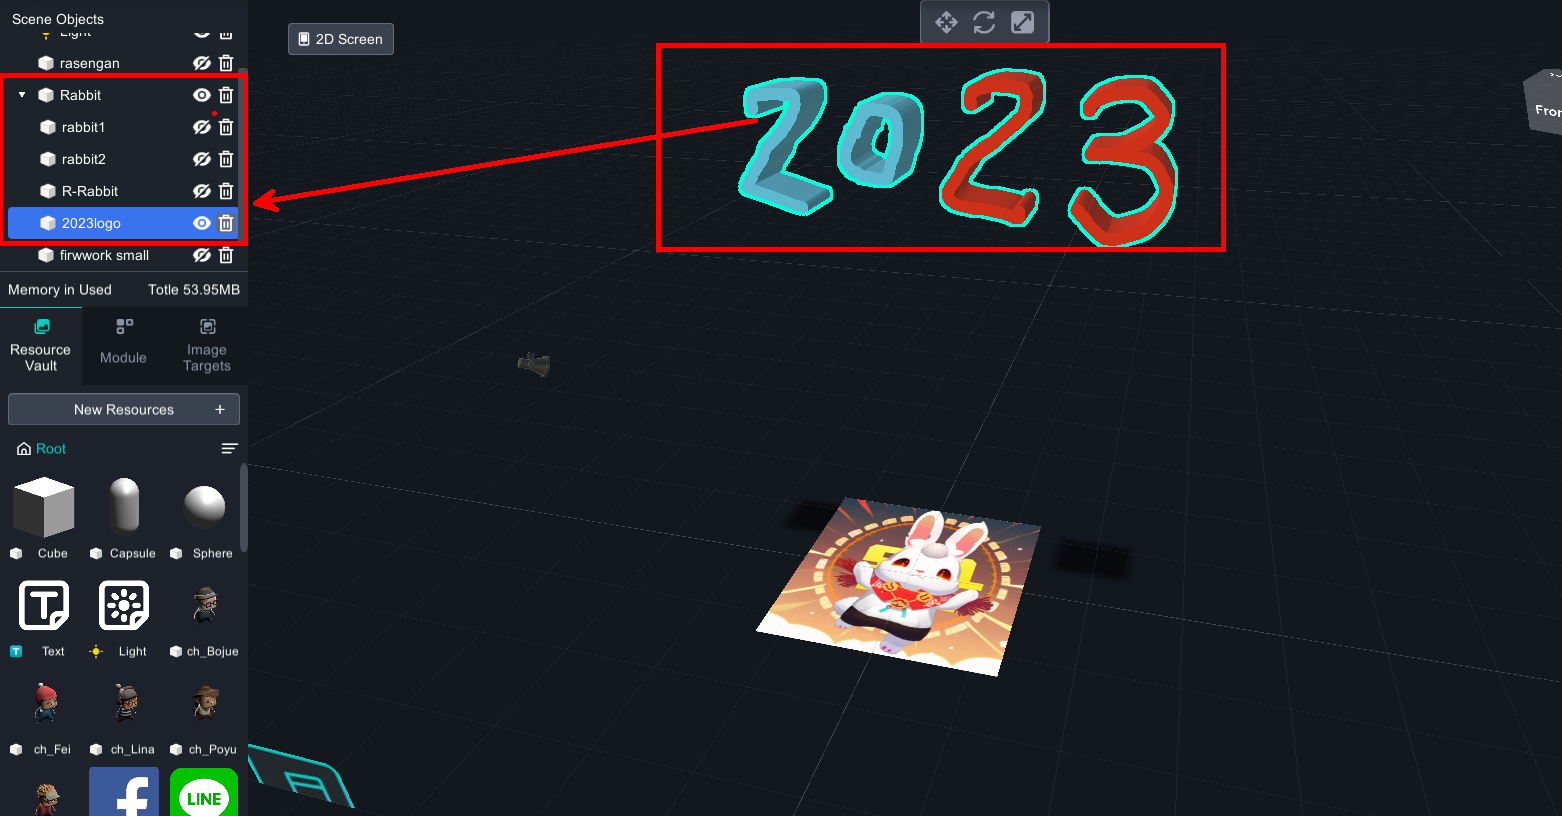
Then drag LOGO into same group as well.
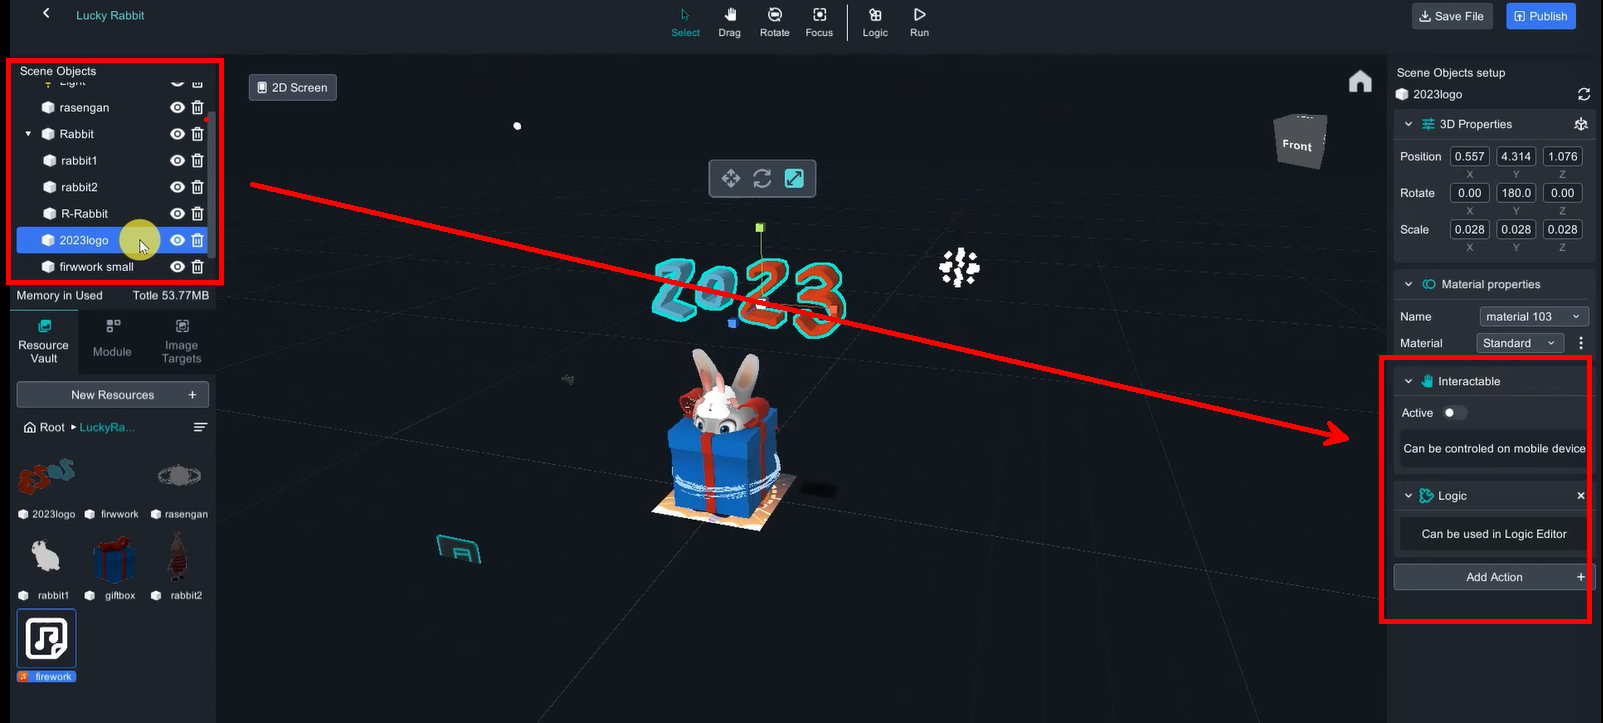
8. De-active interactable function & Add Logic Function
Interactable feature allows users to move, rotate, and scale the augmented objects by hand when they appear on the screen.
Add logic function to all objects in the scene (Add Action -> Logic).
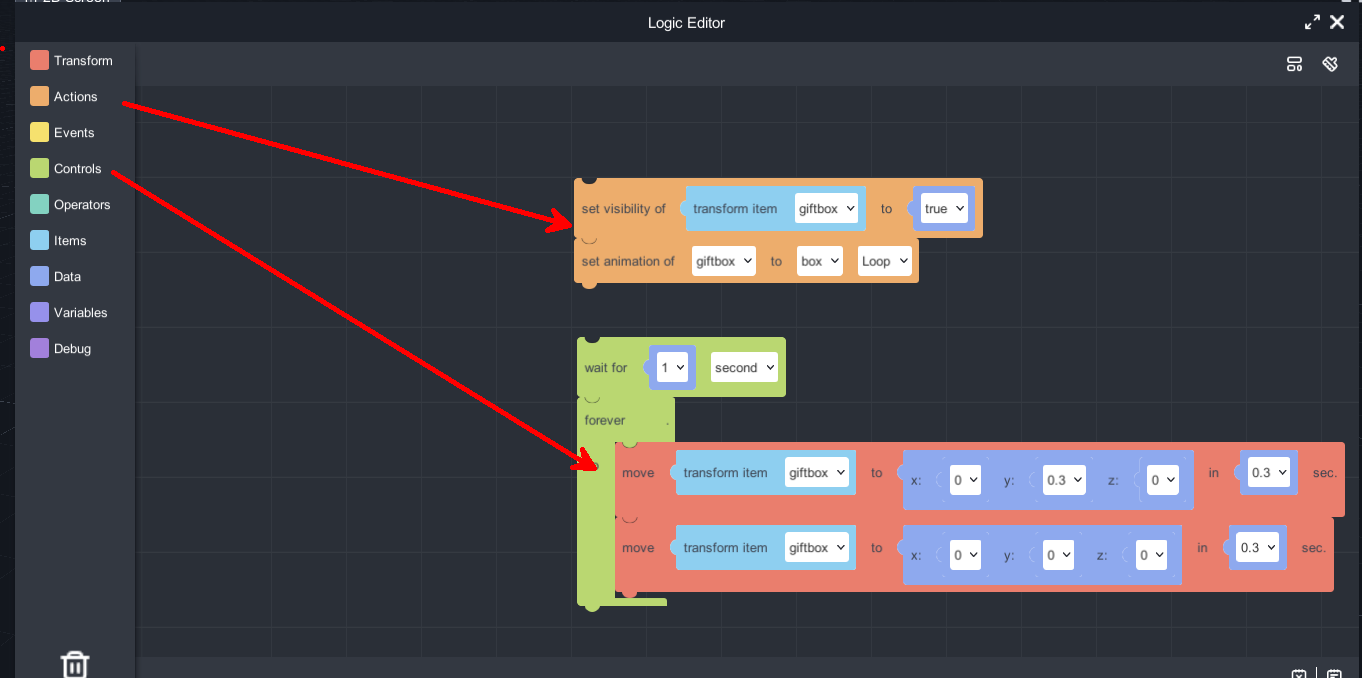
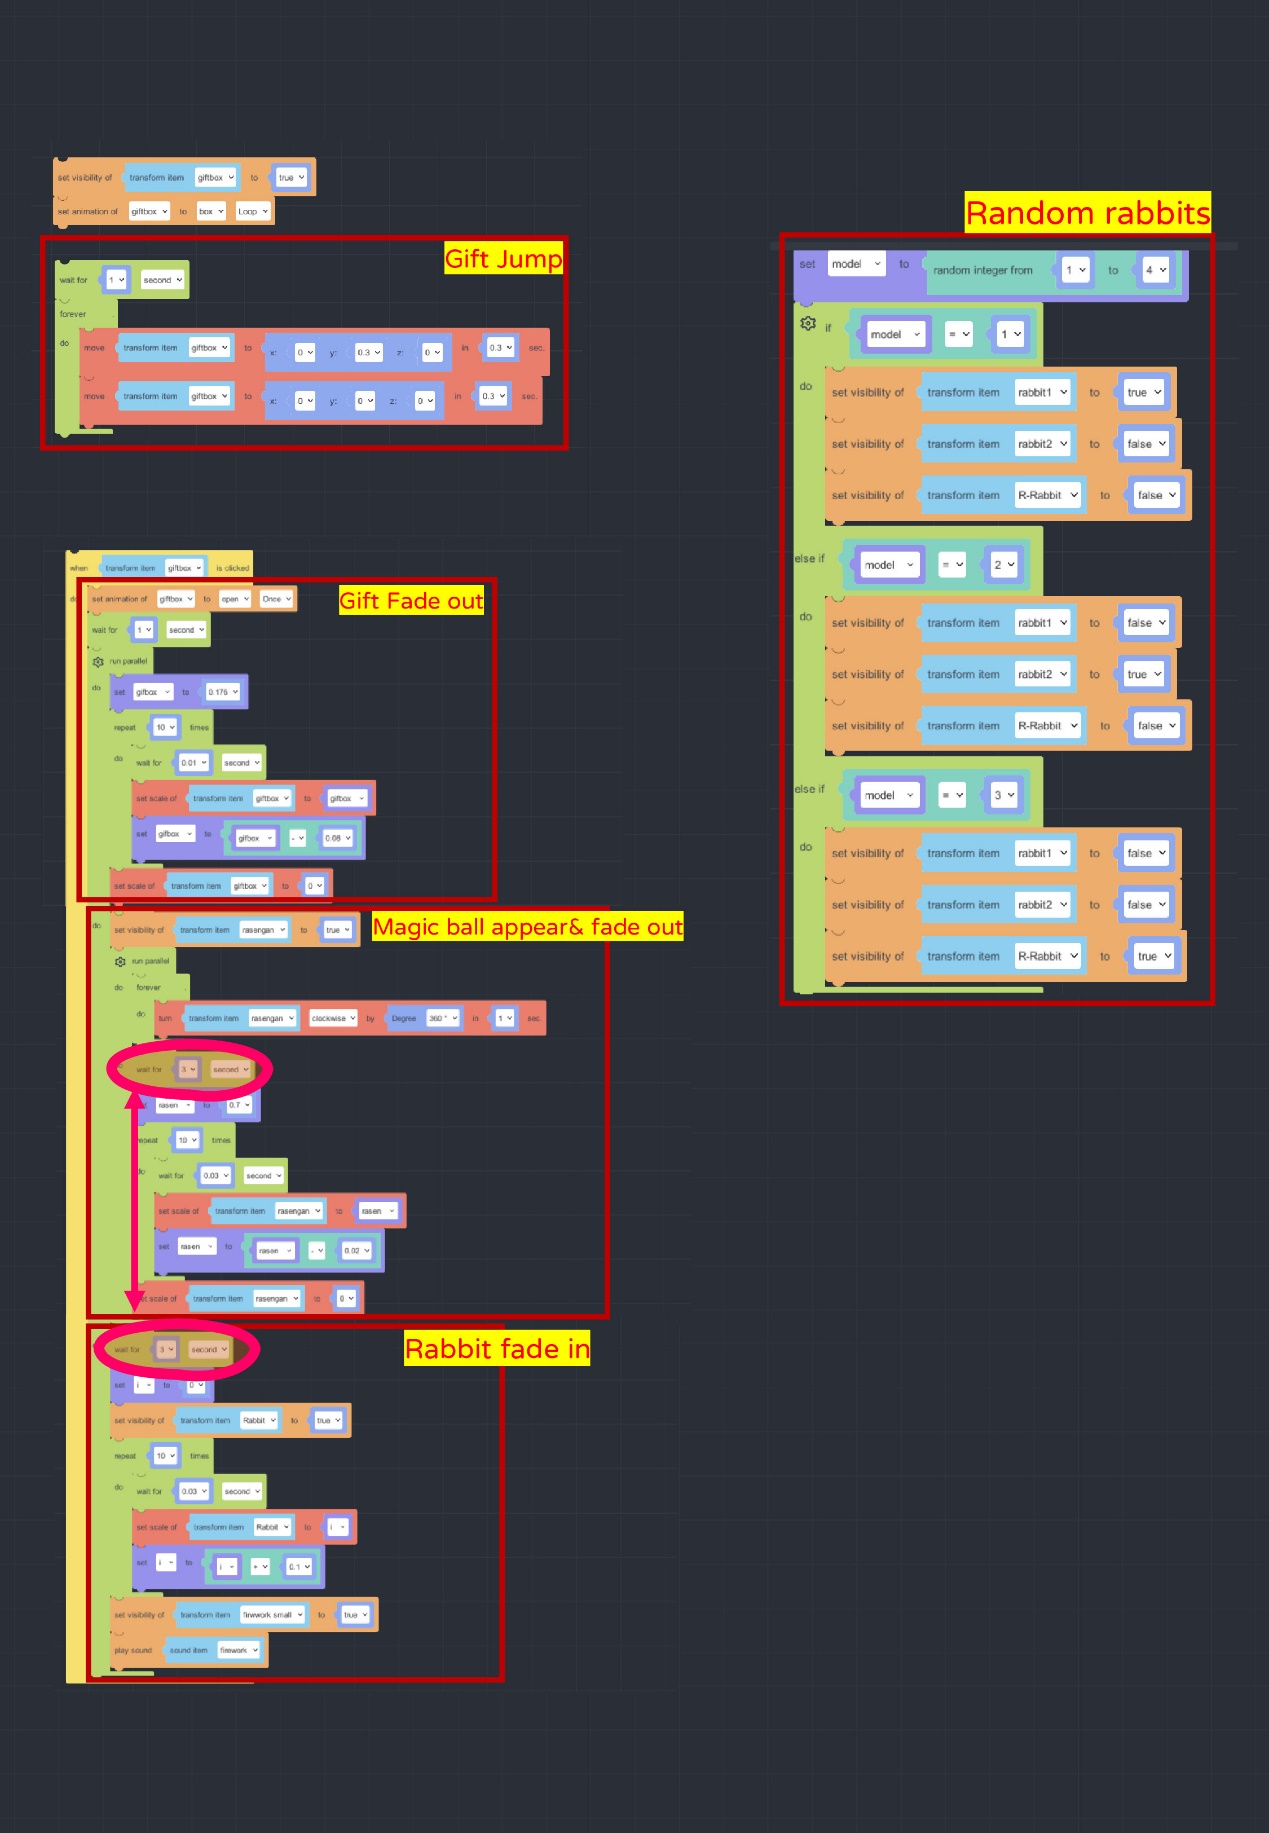
9. Logic function – giftbox jump
Object bouncing can be interpreted as moving up and down repeatedly. By continuously repeating these two actions, it appears as if the object is bouncing.
Blockly code: Transform 🡪Transitions 🡪Second block.
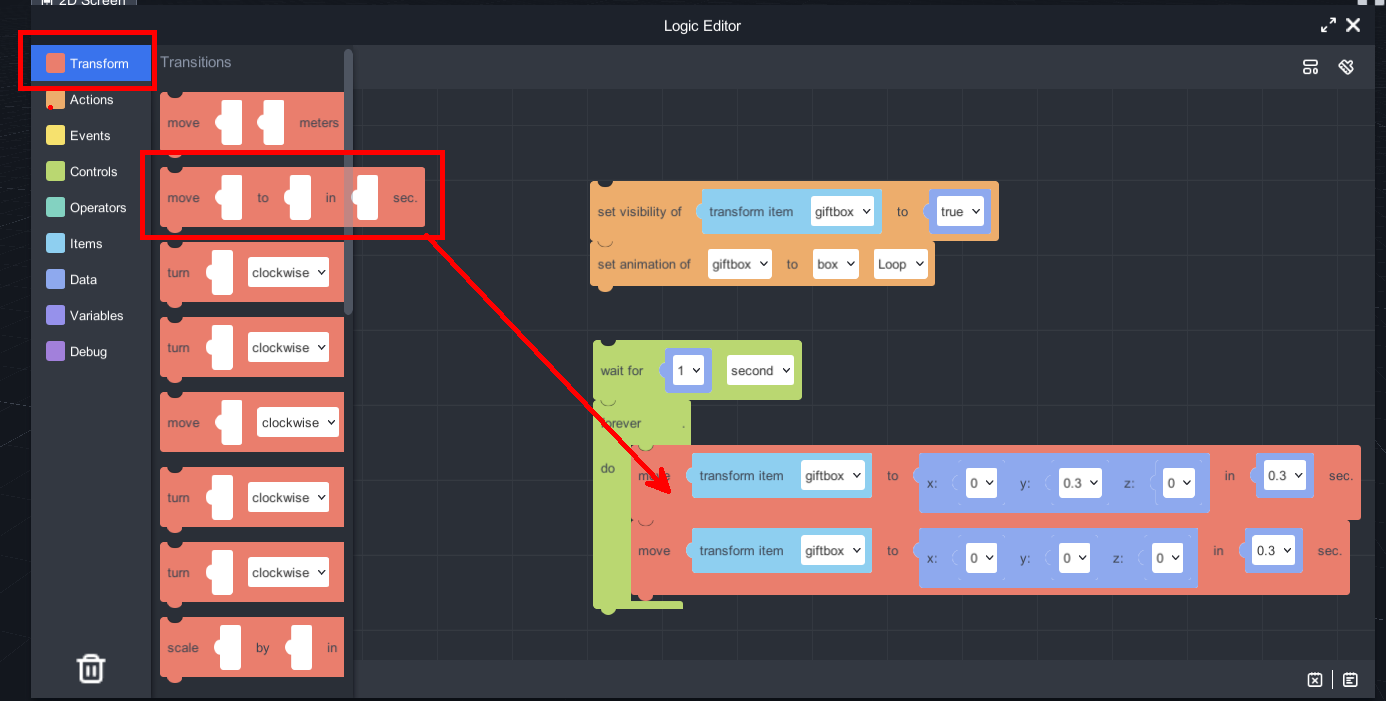
For repeating these two actions, it needs to add “forever do” blockly, and “visibility ” to control it appears only if the target image showed up.
(Forever do)Blockly code: Control🡪Loops🡪First block.
(visibility)Blockly code: Actions 🡪Material 🡪 Second block.
10. Logic function – Fade in/ Fade out
The fade-in/fade-out effect can be achieved by changing the transparency or quickly scaling the object. Here, we will use the quick scaling method.
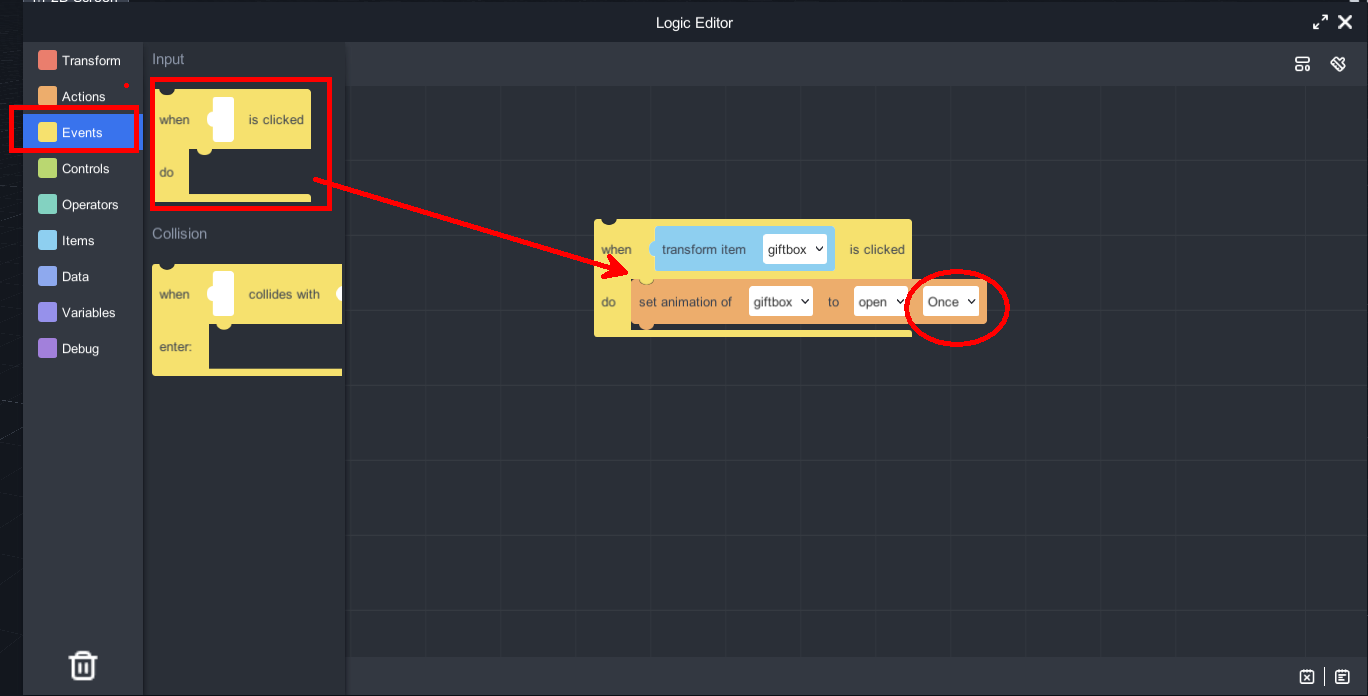
First, we need to create a trigger event, which will be clicking on the giftbox. At this time, the giftbox animation will change from "box" to "open" (this only needs to be executed once).
Blockly code: Events -> Input -> First block.
Next, three things happen simultaneously: the giftbox fades out, the magic ball appears and fades out, and the rabbits fade in. The logic program needs to achieve the fade-out effect (i.e., shrinking to no volume) and the fade-in effect (expanding from no volume to normal volume).
To control the volume scaling, we need to use "variables" here.
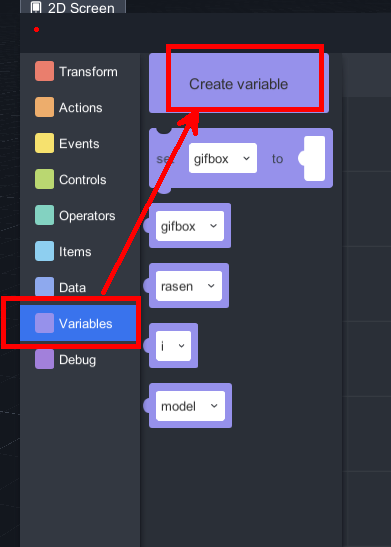
Giftbox fades out:
To achieve fade-out effect of giftbox, we need to set its value as "scale", and repeatedly execute the scaling down process for n times with a time interval of 0.01 seconds between each scaling operation. The scaling effect is achieved by using variable operations in the computer program's logic. Finally, we ensure that the volume is reduced to zero by forcing the giftbox's scale to be set to 0.
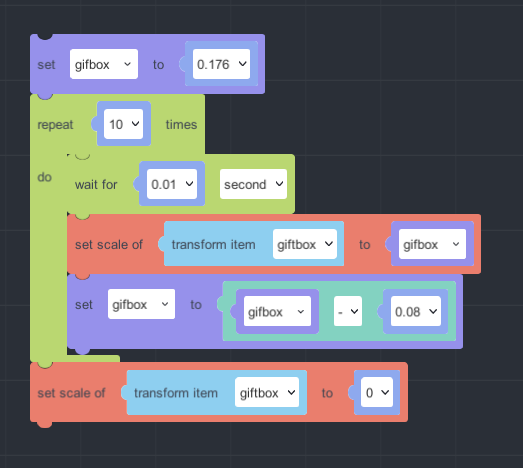
Values may vary depending on the size of your model, so it's important to test your program frequently to ensure it's working correctly.
Magic ball appears and fades out:
After appearing, keep the magic ball rotating and fade it out after 3 seconds. The fade-out module is the same as the giftbox, so it can be copied and used by changing the new variables and scale. In addition, rotation and fade-out are connected using parallel operations.
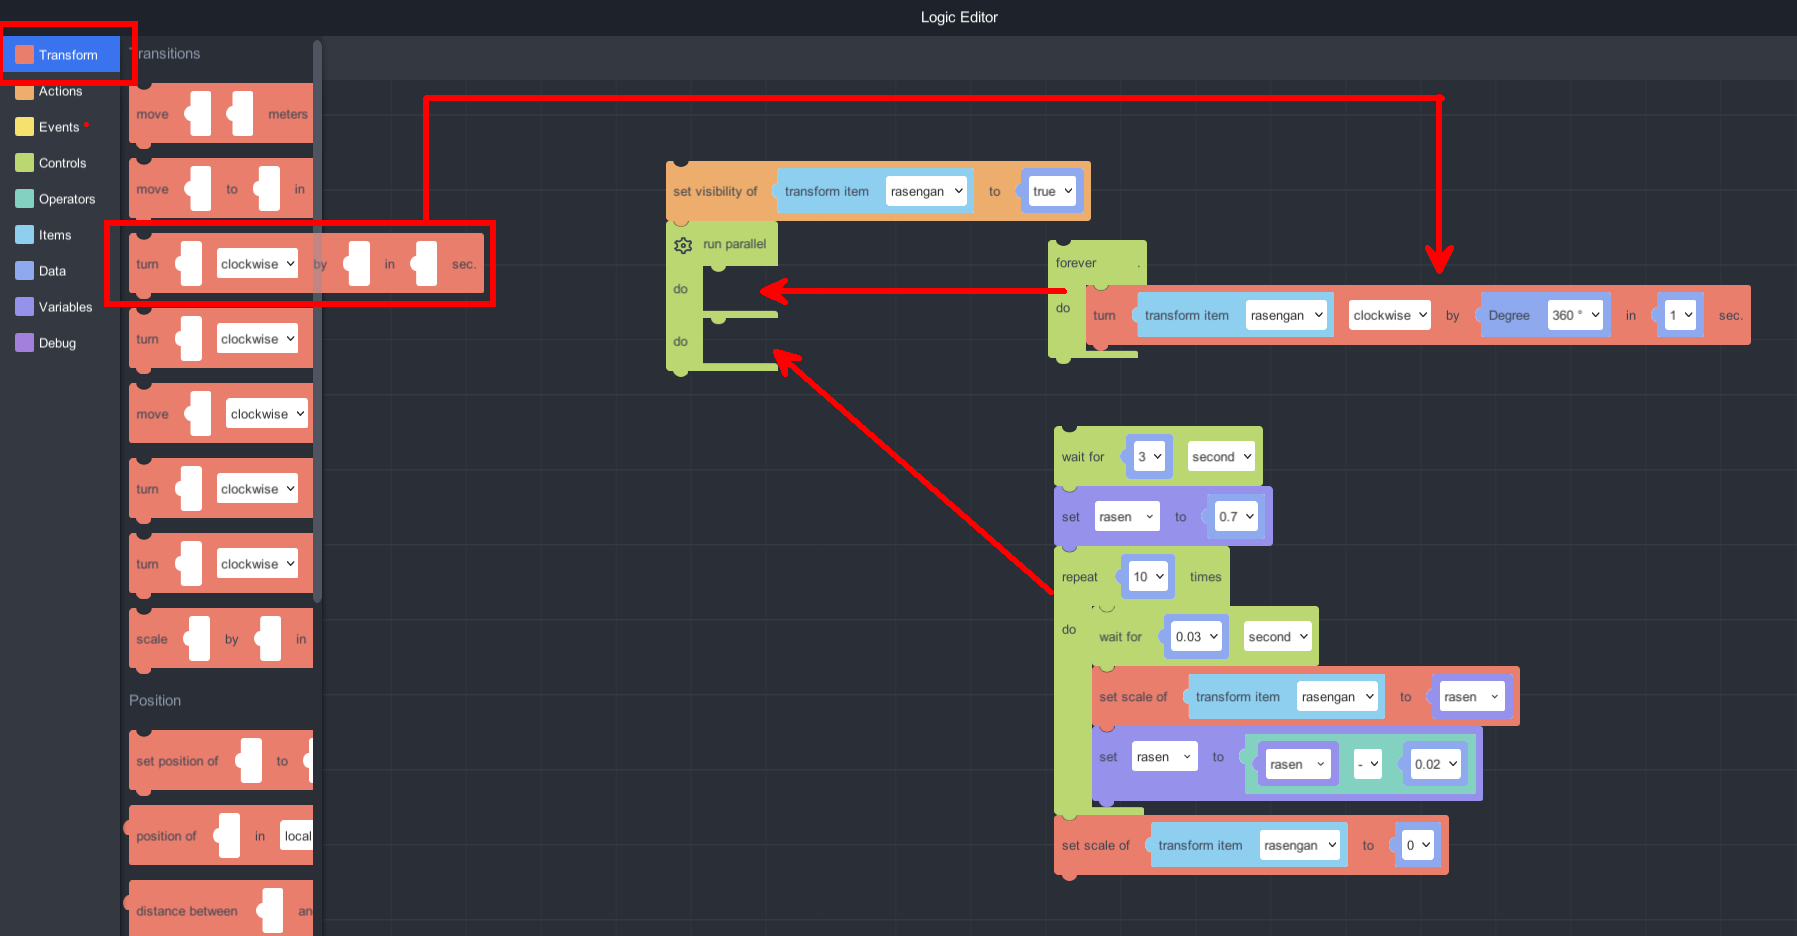
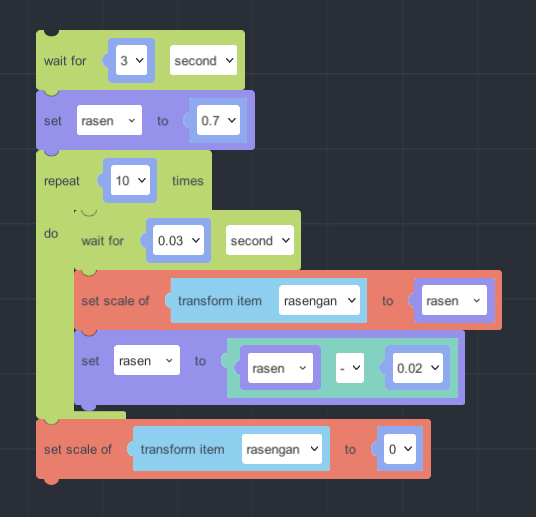
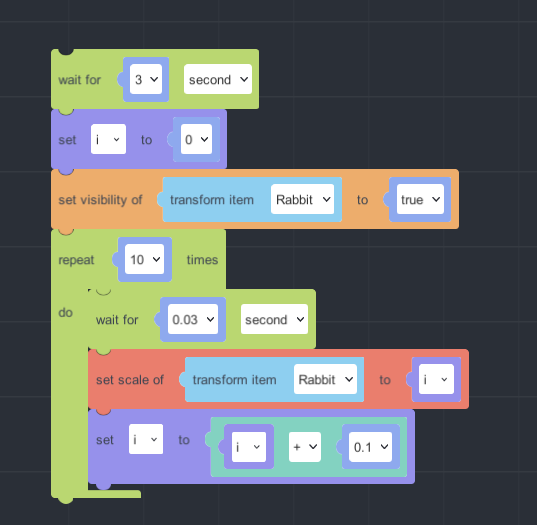
The Rabbits fade in:
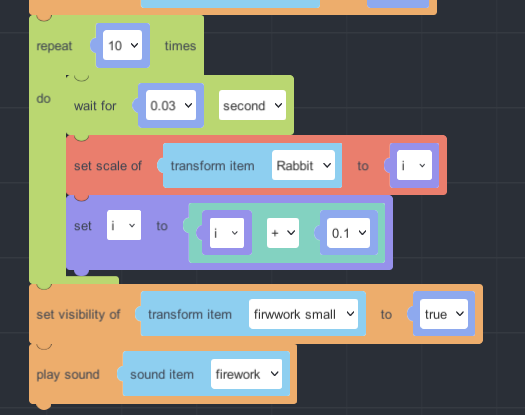
The program for fade-in and fade-out effects is basically the same, except for the difference in arithmetic operations between subtraction and addition. The original scale ratio is set to 0, and then gradually increased to a scale ratio of 1.
Note: The initial pause of 3 seconds in this program is the same as the 3 seconds it takes for the magic ball to fade out, which can achieve the effect of the rabbit appearing when the magic disappears.
Add firework model and sound effect below it.
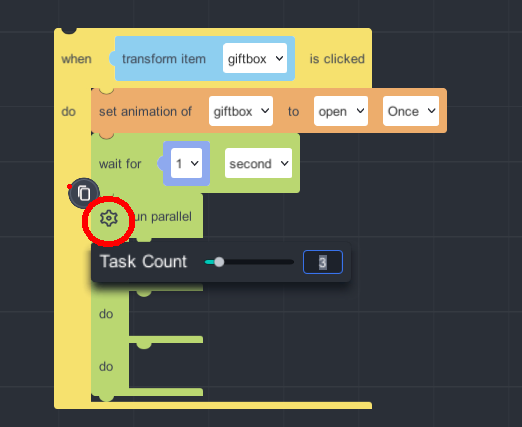
Parallel:
To synchronize the three actions of giftbox fade-out, magic ball appearance & fade-out, and, parallel programming can be used to link the three actions together. By default, parallel programming only has two tasks, but you can click on the gear icon in the upper-left corner to increase the number of tasks.

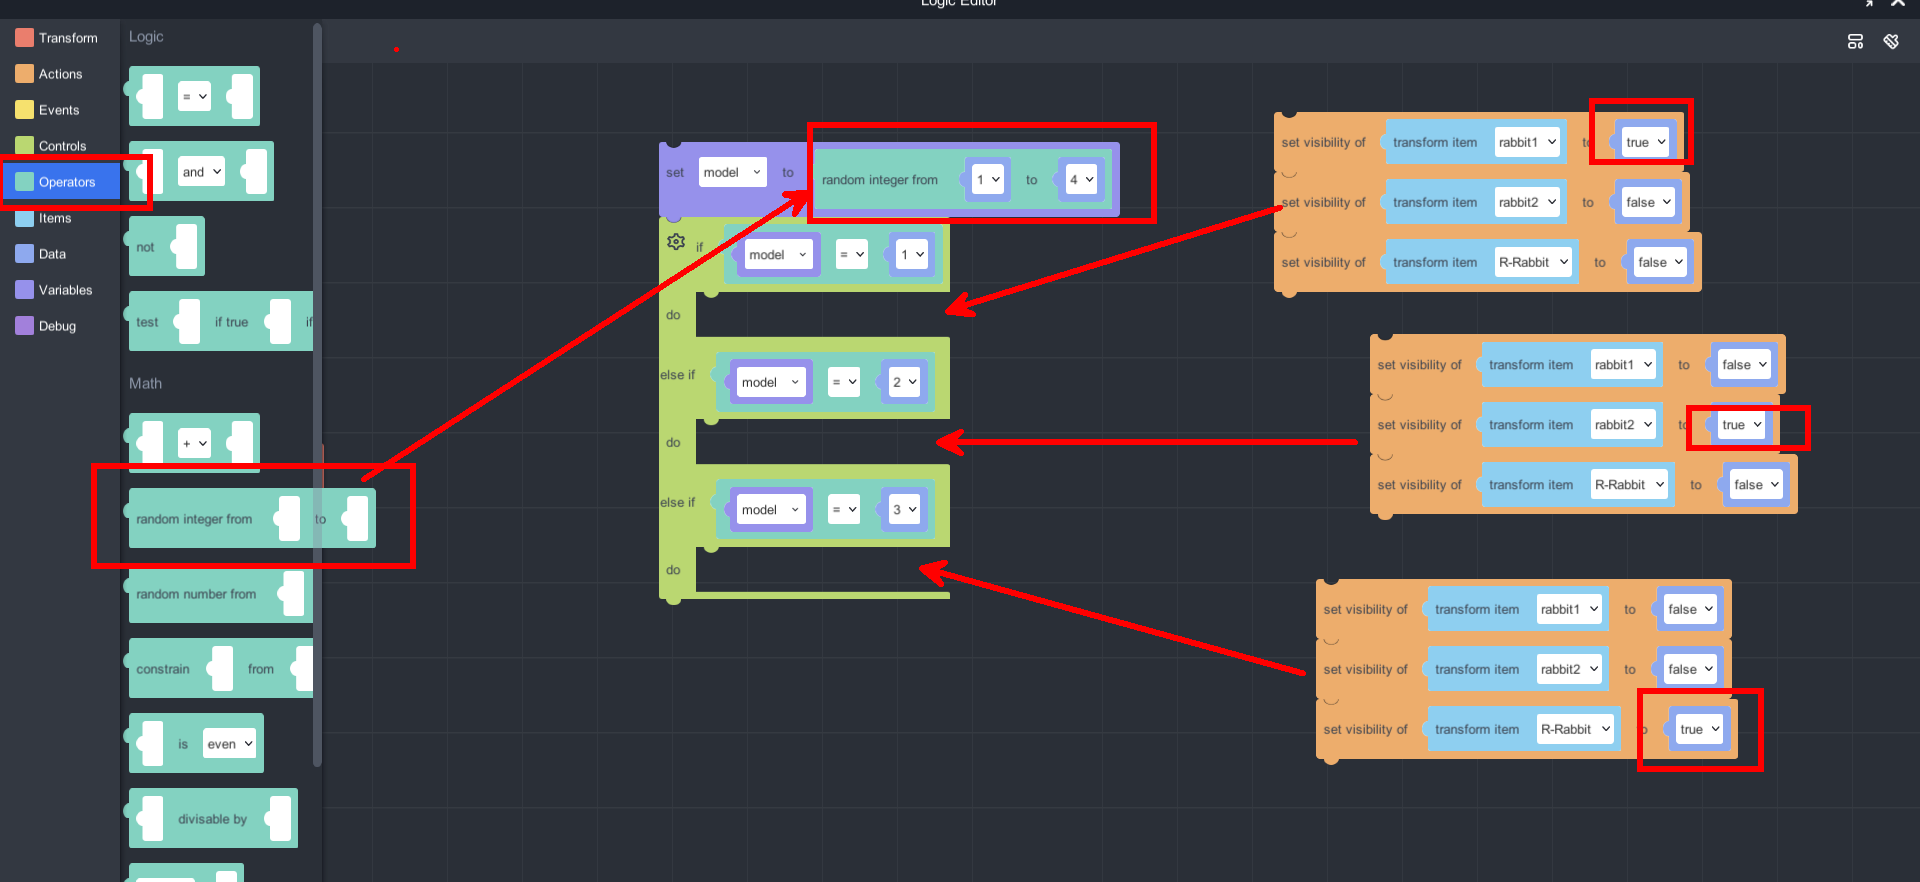
11. Logic function – Random sampling
A random sampling is a mathematical function that uses the operator "random integer between A and B", which is used in conjunction with visibility applications.
To create a random sampling, we need to create a new variable and set it to be a "random integer between A and B". The mathematical range of this variable is A≤variable
Full Blockly Code
How to play
Click the application, type in the ID or scan the QR code to experience the AR/VR !
1. Install MAKAR application
2. Scan QRcodec or search ID: class06


3. Select「幸運兔」project,click「experience」to active and put the camera face forward the poster.