Spring Festival AR Animation Tutorial
Spring Festival AR AnimationAs the year of the Rabbit arrives in 2023, MAKAR has produced an AR interactive experience for Spring Festival.
The process is very simple and does not require complex animation techniques.
By using PPT and MAKAR's new masking function, you can create animation effects for setting off firecrackers and pulling Spring Festival couplets.
You can even change the text on the couplets and send unique New Year's greetings through AR!
Download materials:https://drive.google.com/drive/folders/1njYx6aOkR5U1D6cbf5LfMikc6Gt3IZ6r?usp=sharing
【Creating Animation with PPT】
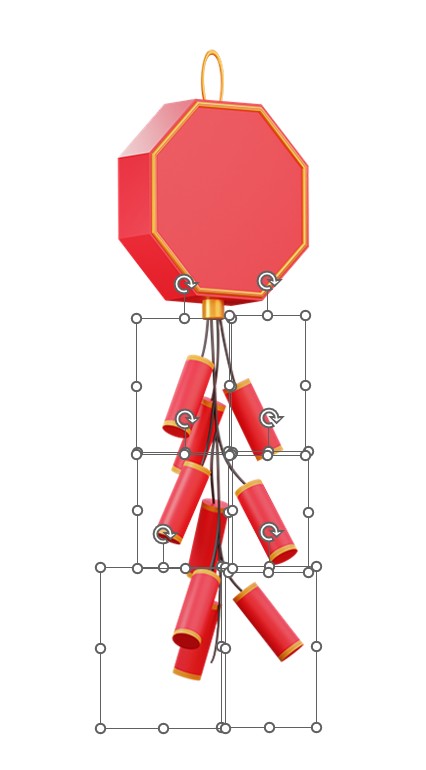
- After importing the 2D firecracker into PPT, use the built-in "crop" function to cut it into six pieces and then reassemble it.
-
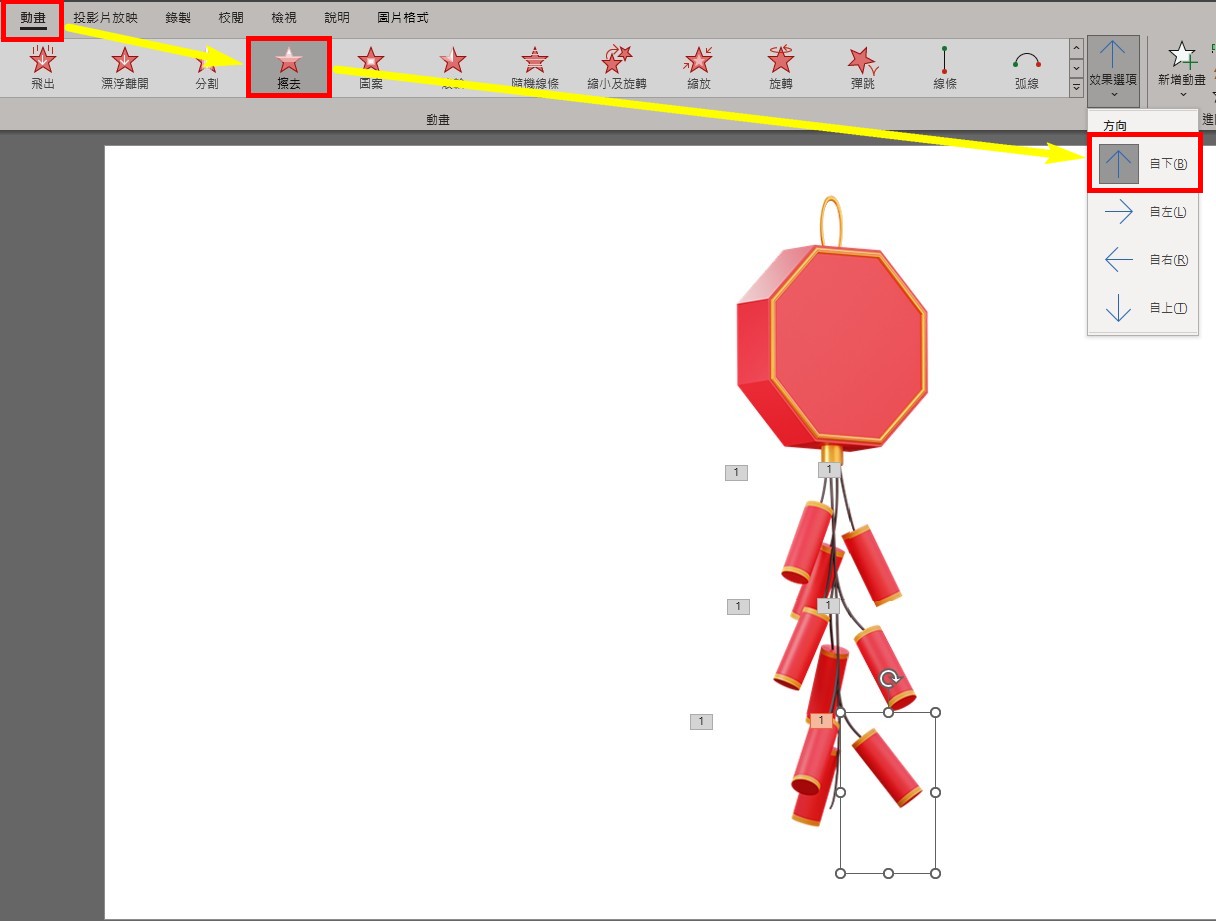
Go to "Animation" > "Wipe" and set the effect option to "From Bottom".
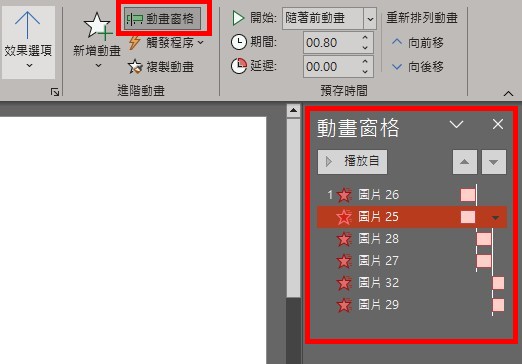
- If you need to adjust the timing of the animation, you can click on the "Animation Pane" to make adjustments.
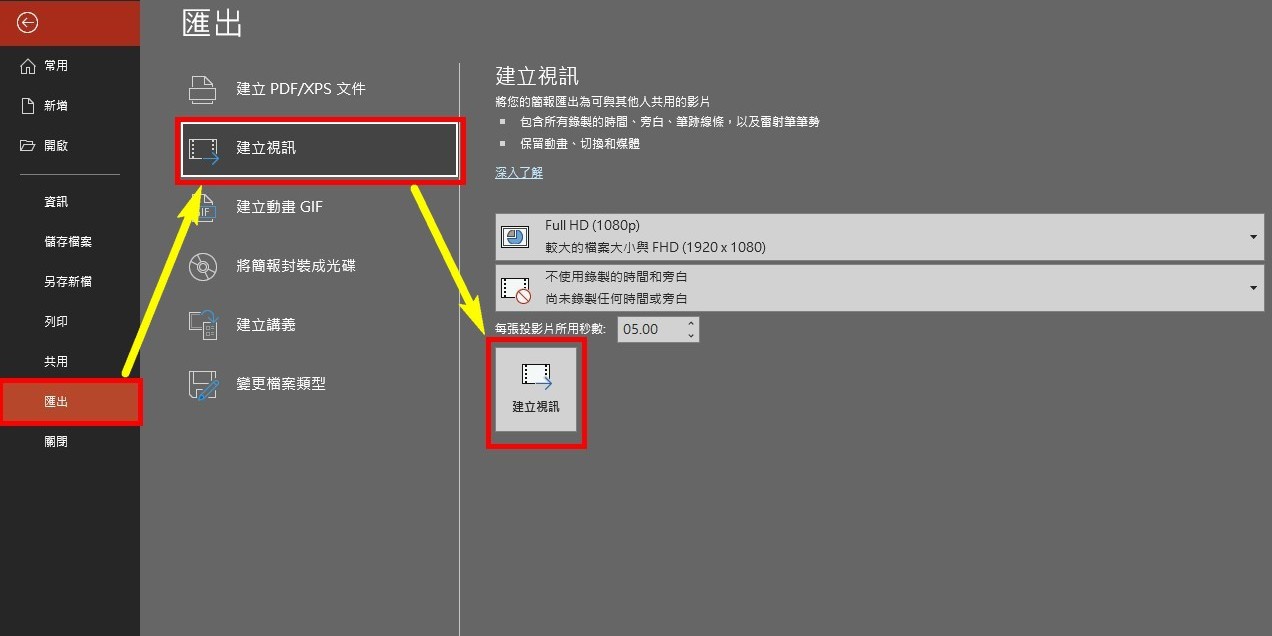
- After completing the process, click on "Export" > "Create a Video" to export the animation as a video file.
【Creating Spring Festival Couplets with PPT】
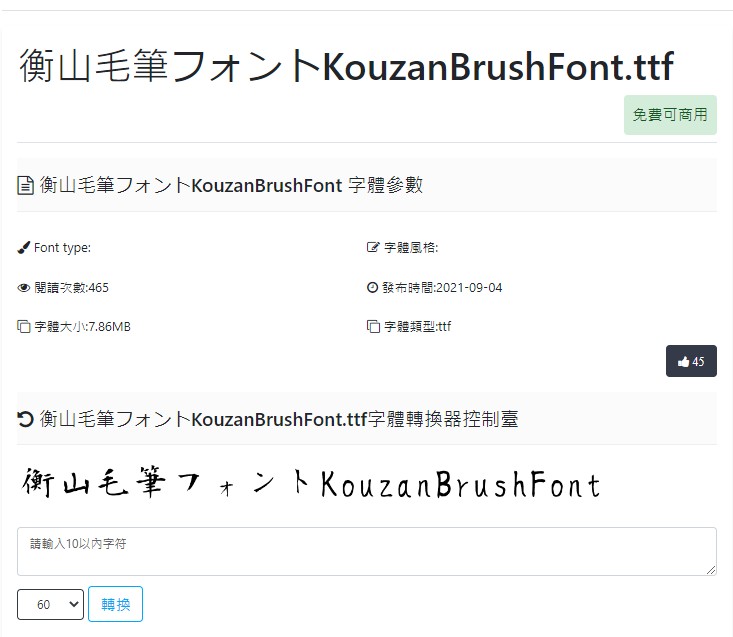
- To make the font look like calligraphy, you can download free commercial fonts from this website:http://www.ziti.net.cn/mianfeiziti/
After downloading, install into your computer.
For this example, we will use "KouzanBrushFont.ttf" font from "Hengshan Brush Font"."
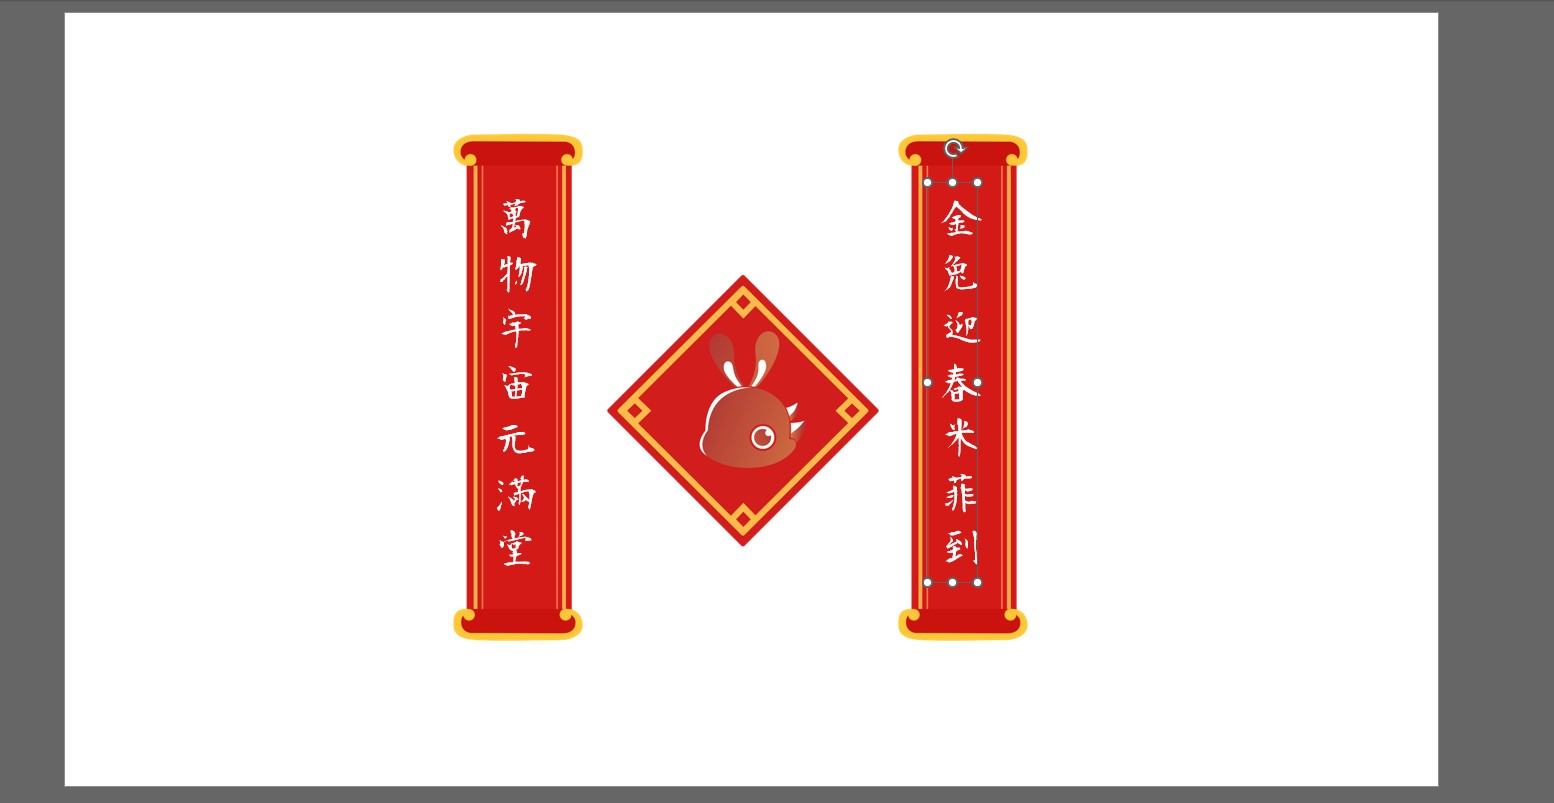
- Import couplet materials into PPT, use downloaded font to add the couplet, and export it as a complete PNG image.
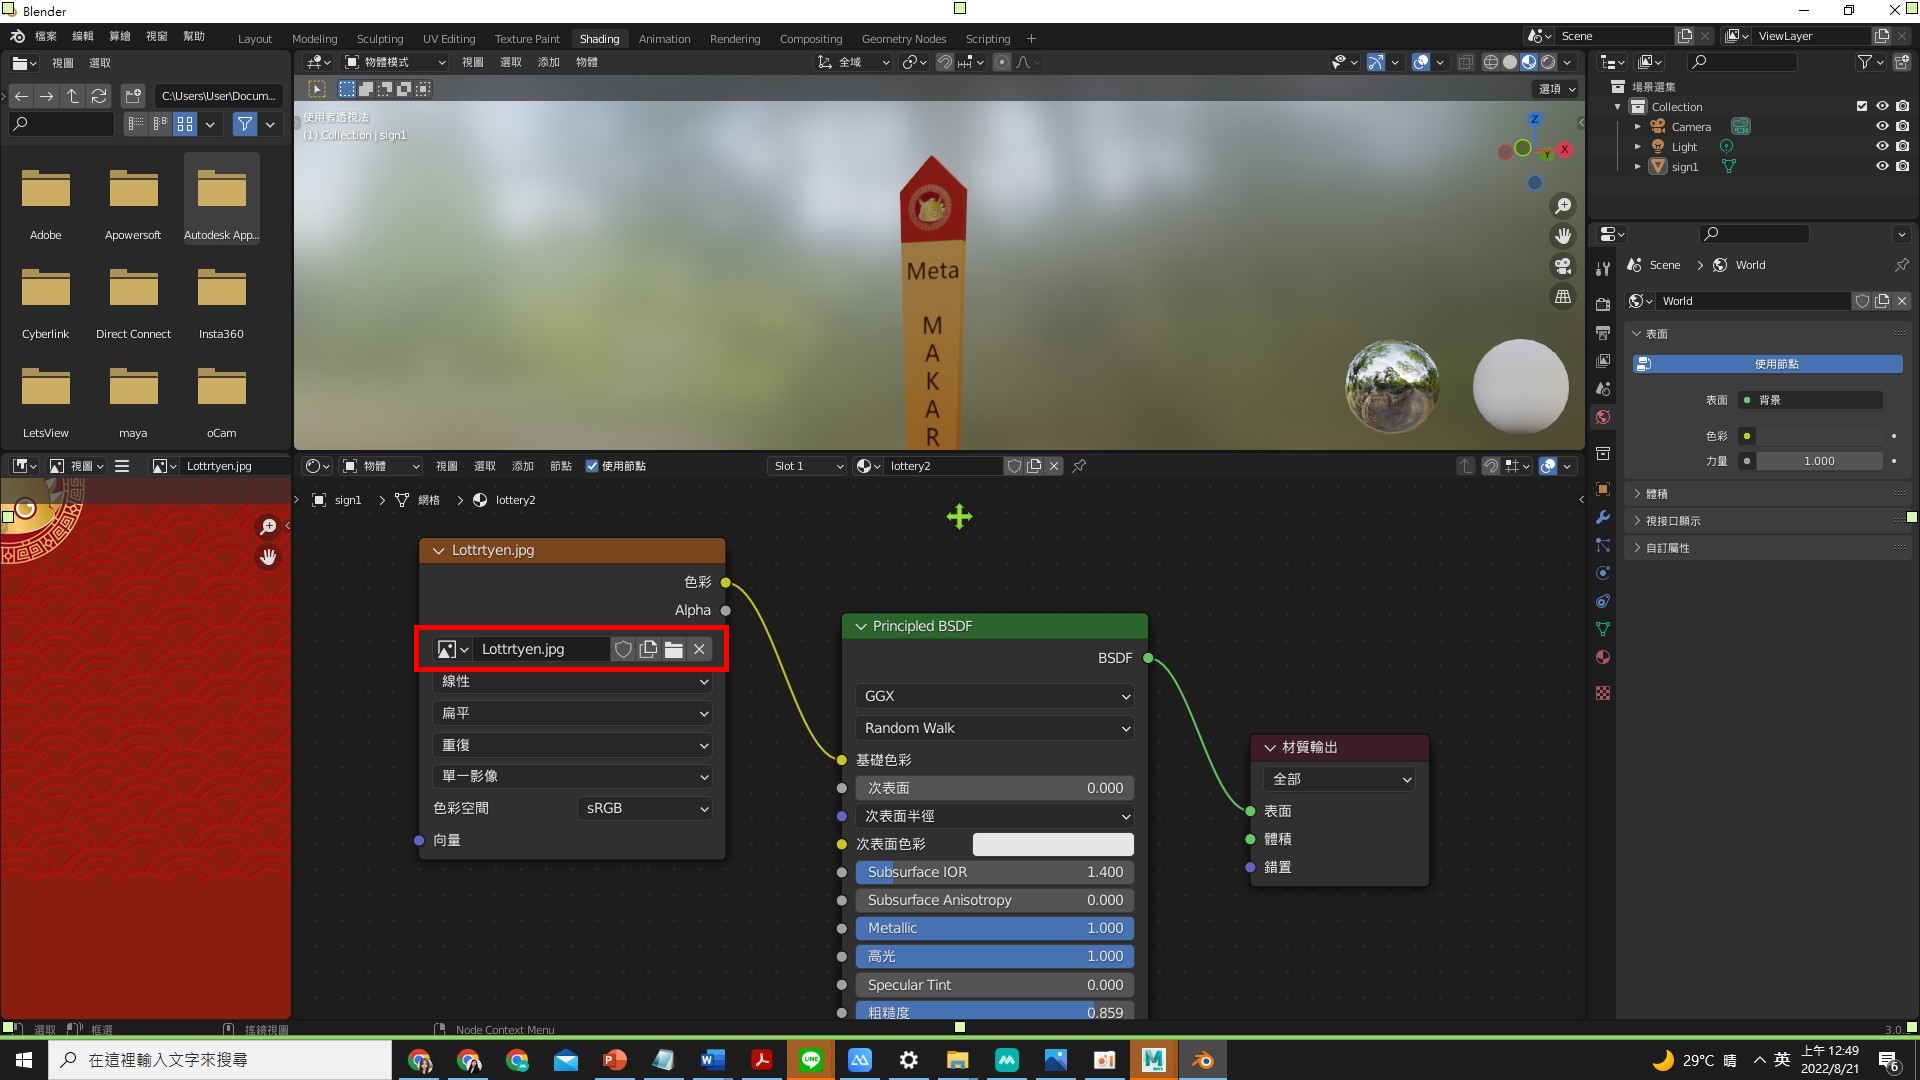
【Enter MAKAR】
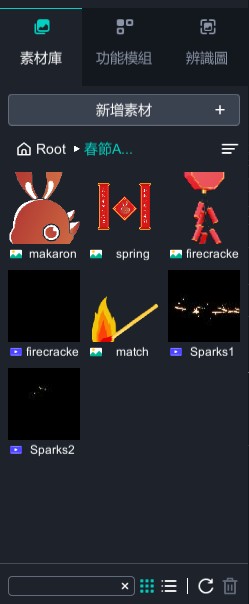
- Import all the materials into MAKAR.
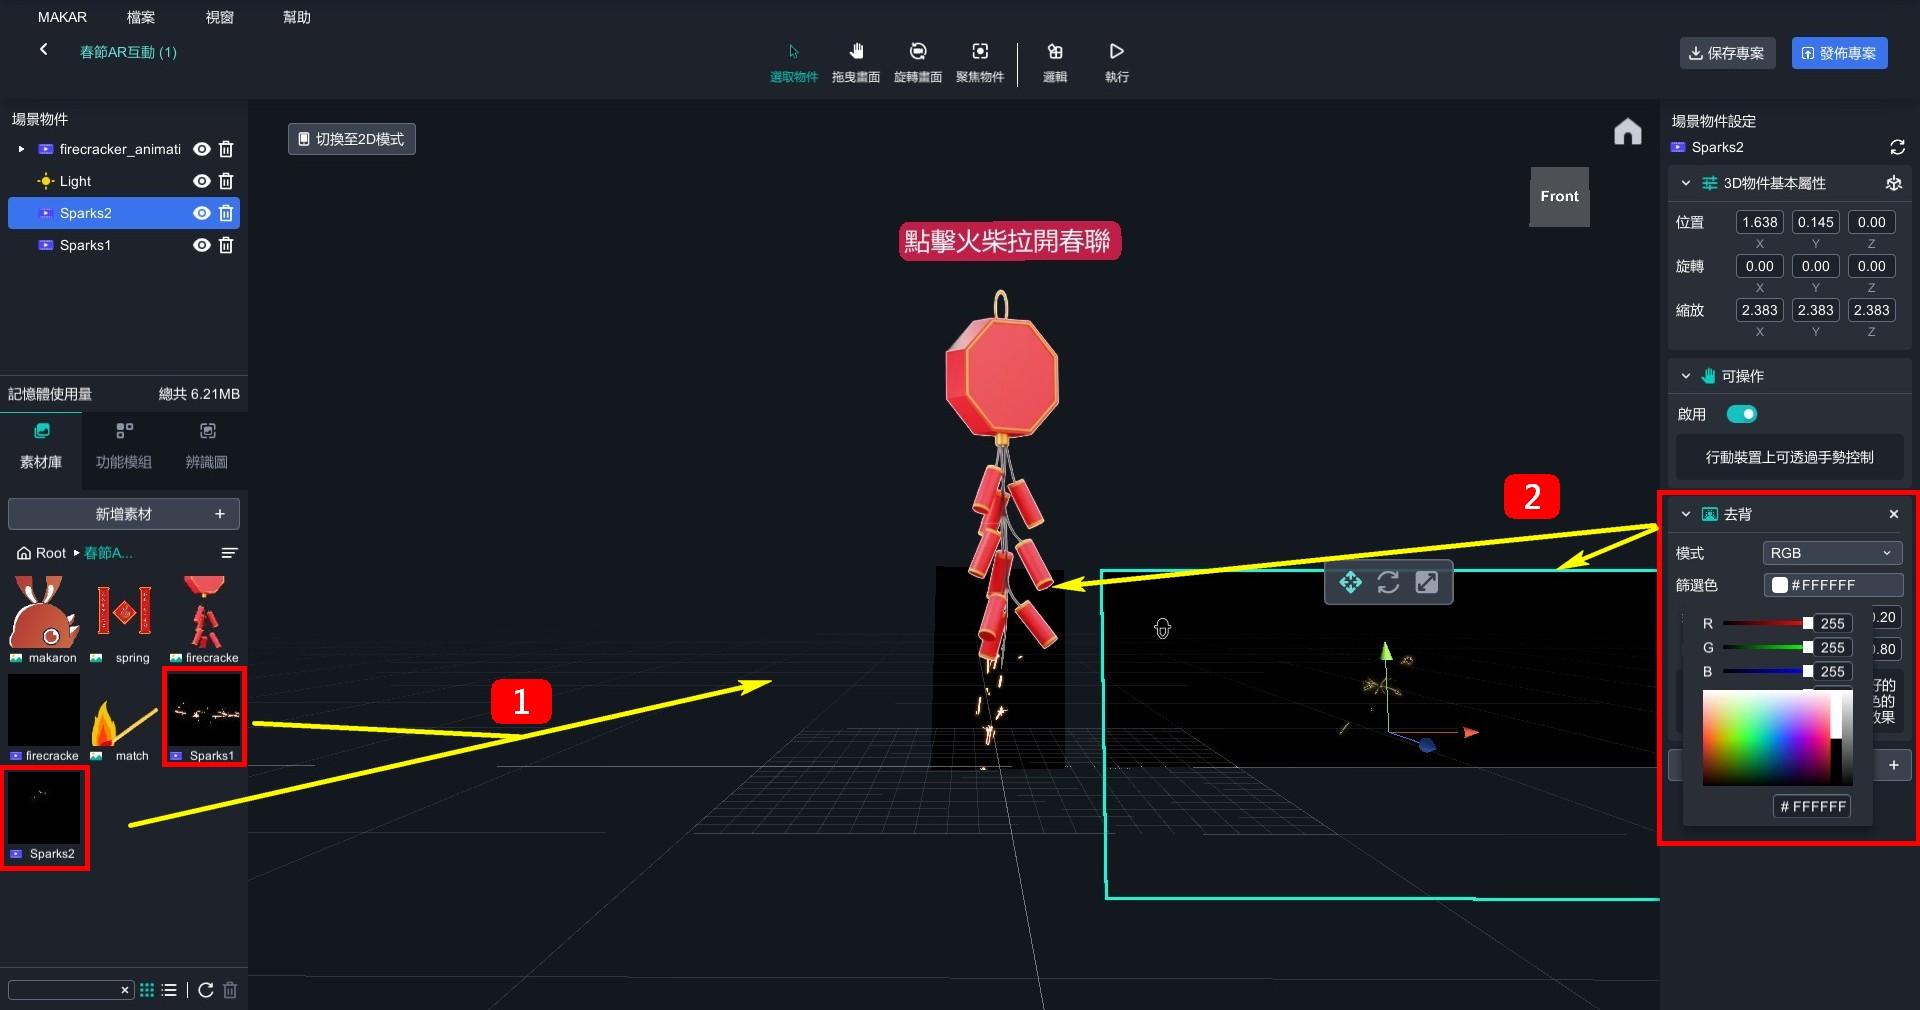
- Drag the firecracker animation into the editor. The background of the video is the white color of the PPT and needs to be removed.
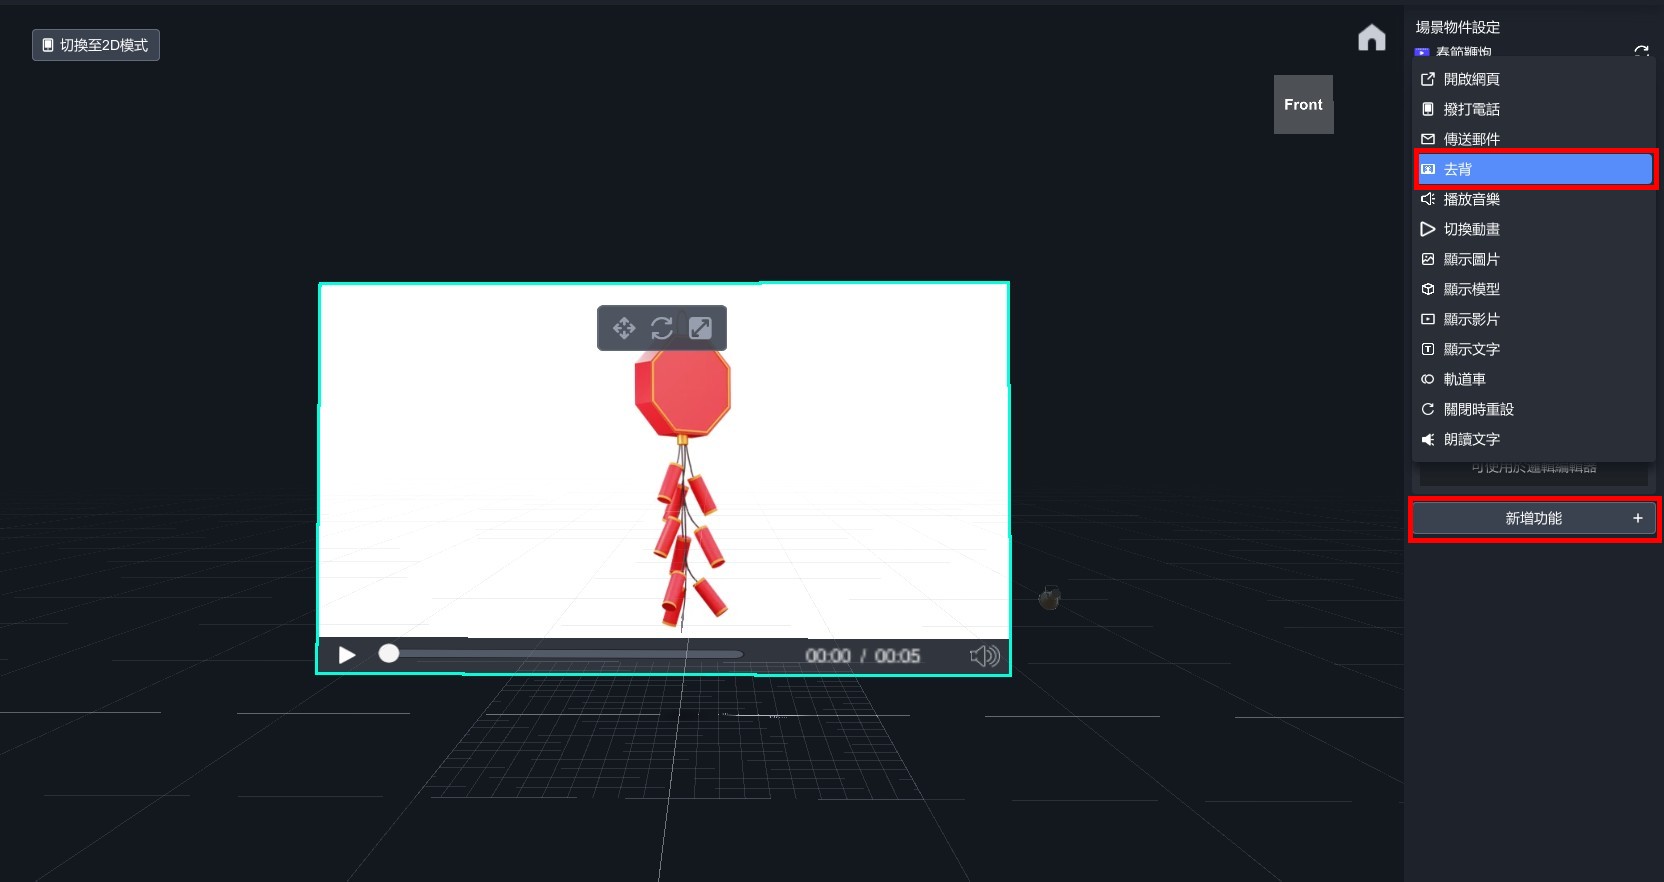
- Use a dropper to pick up the white background.

- Background removal is complete.
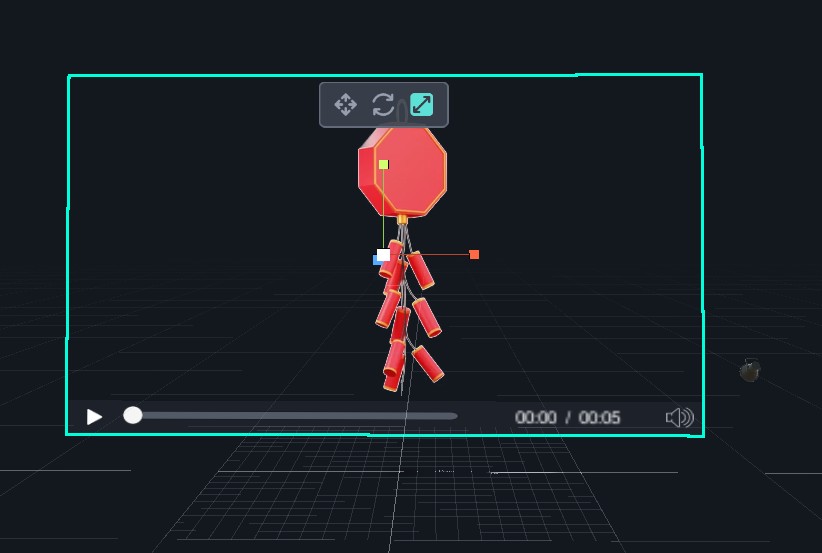
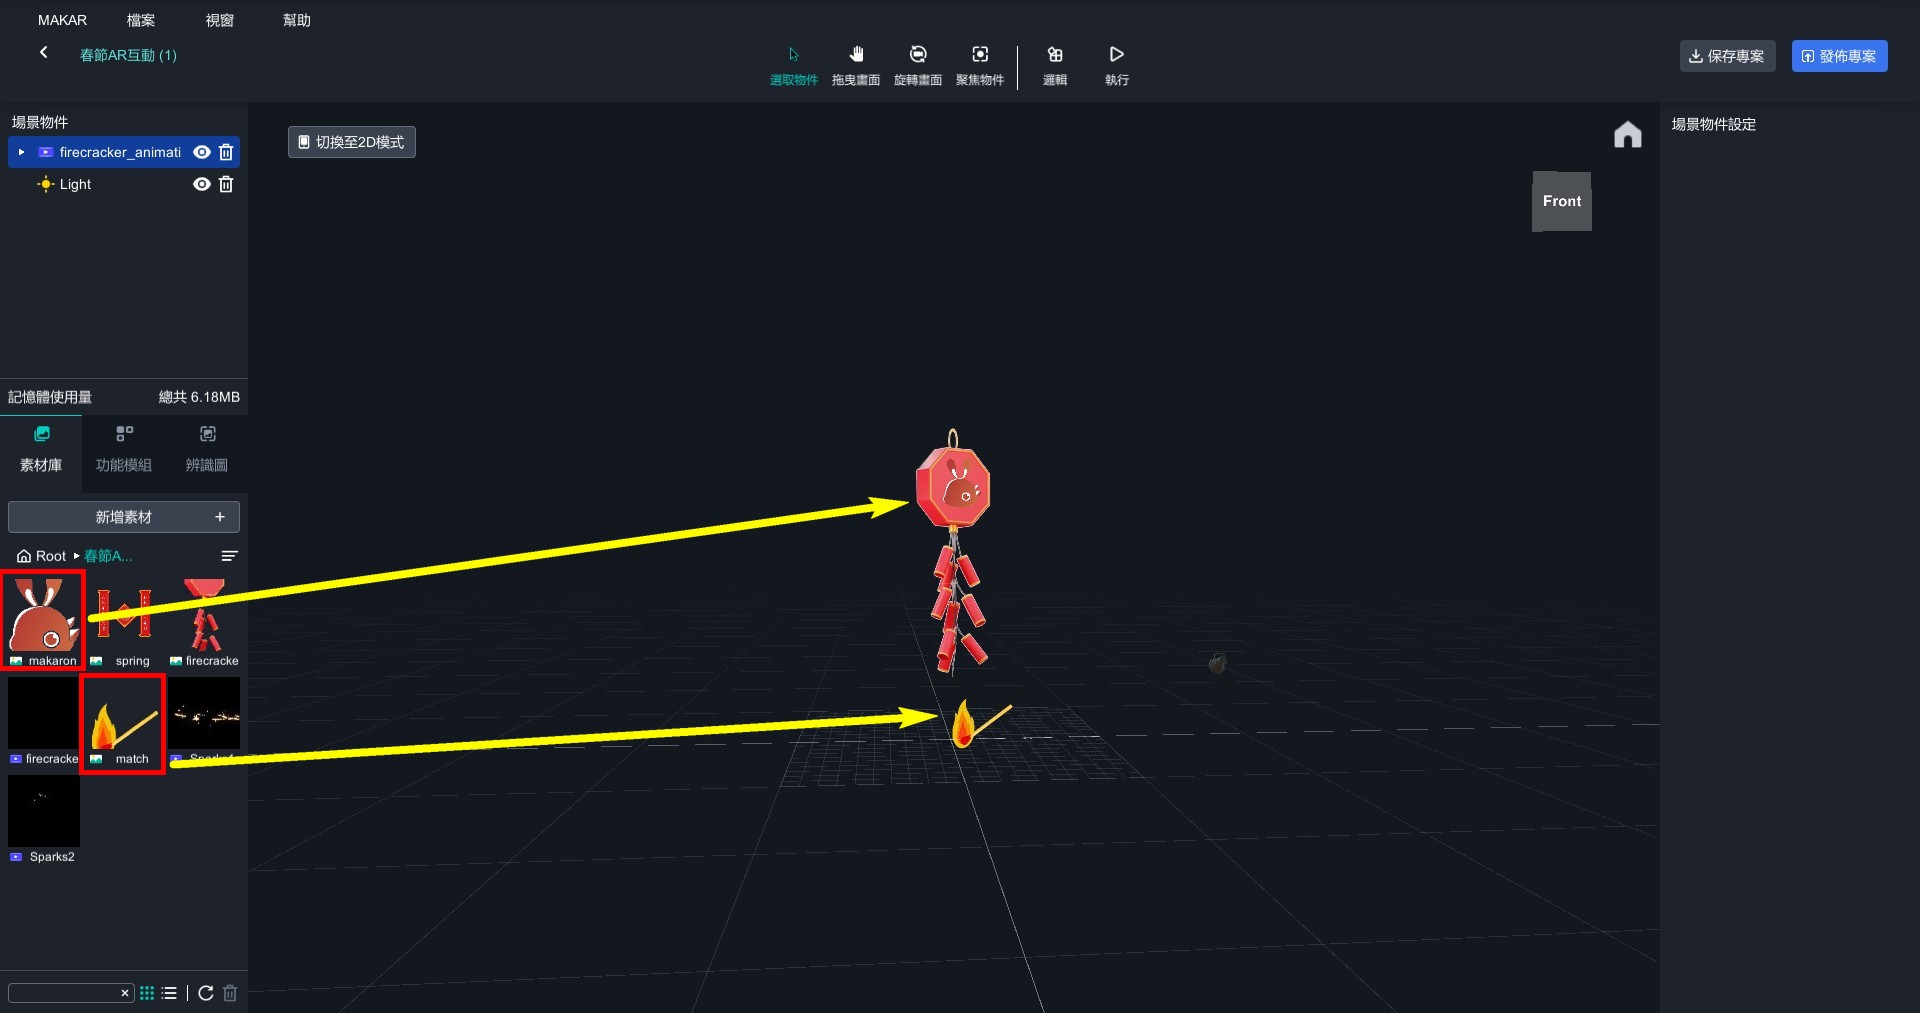
- Put icon and matchstick into the editor and arrange them in the order shown in the image.
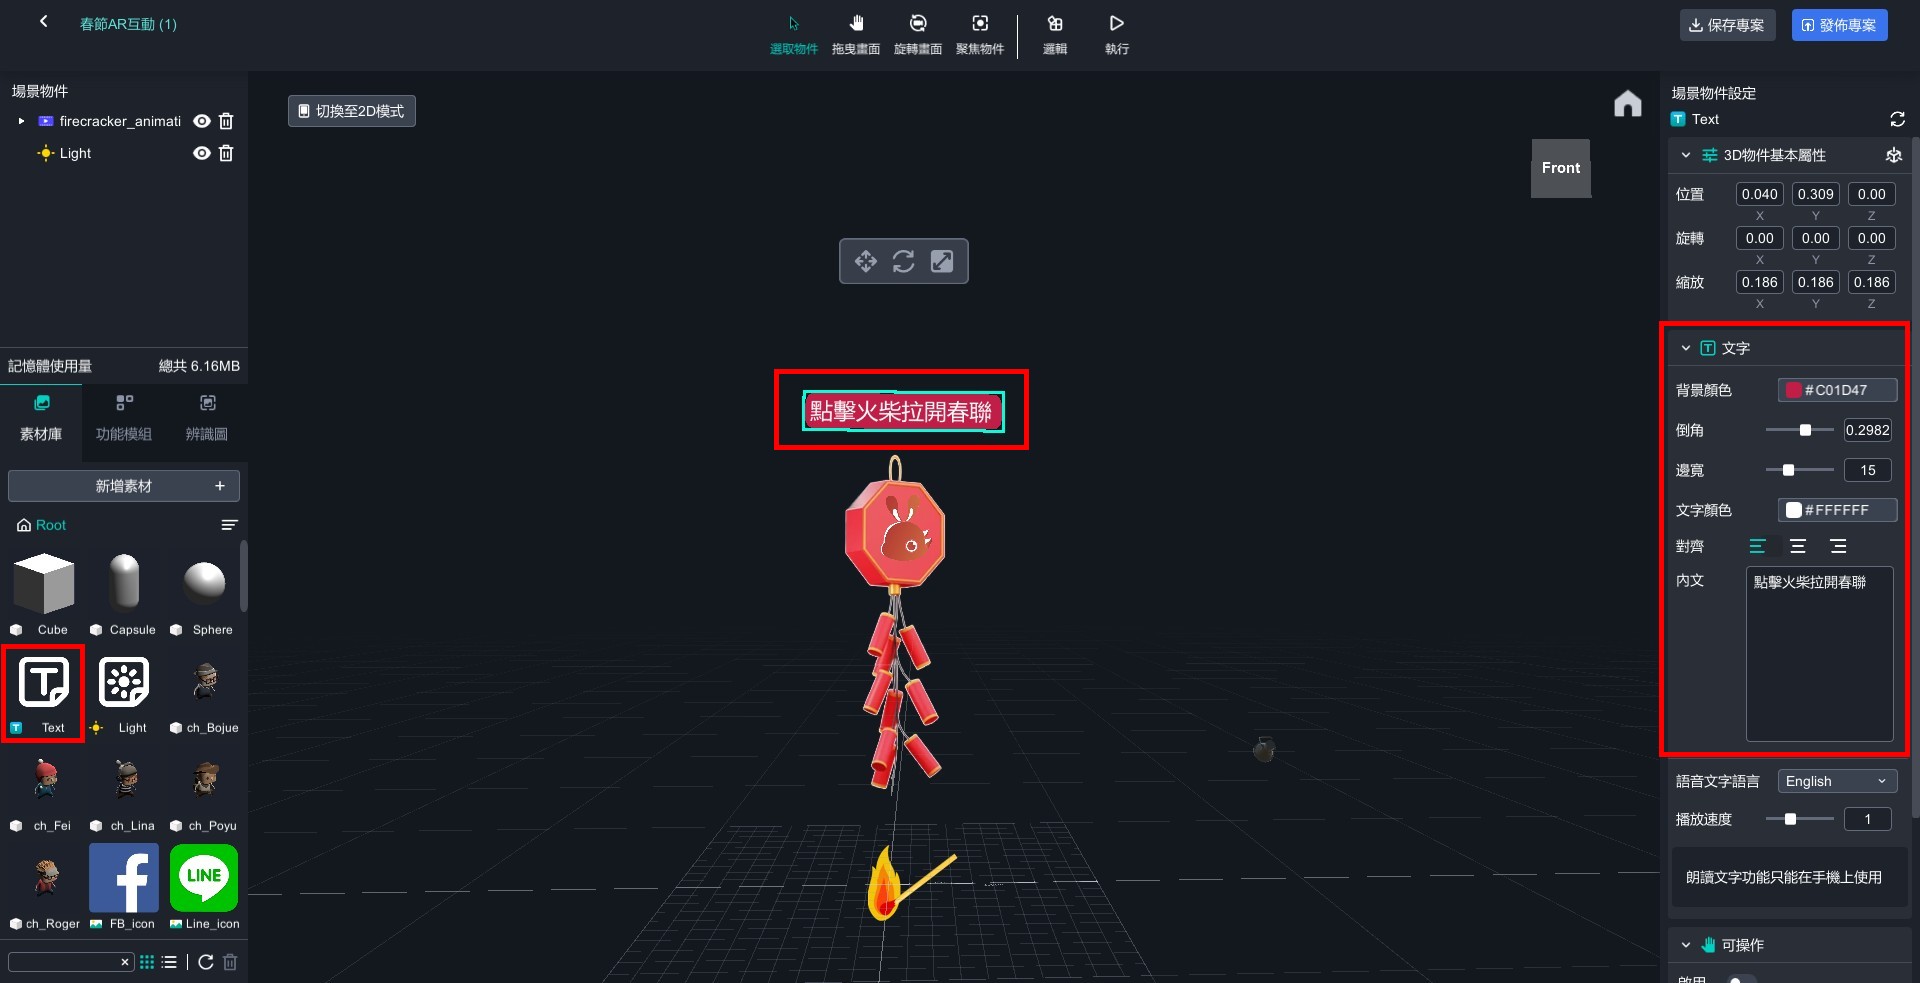
- Add a text editor and put it above the firecracker.
- Drag two fireworks videos into editor, adjust them to the appropriate positions, and remove their backgrounds in the same way.
- Except for icon, matchstick, firecracker, and text, turn off other objects' visibility by clicking eye icon.
【Set up firecracker ignition】
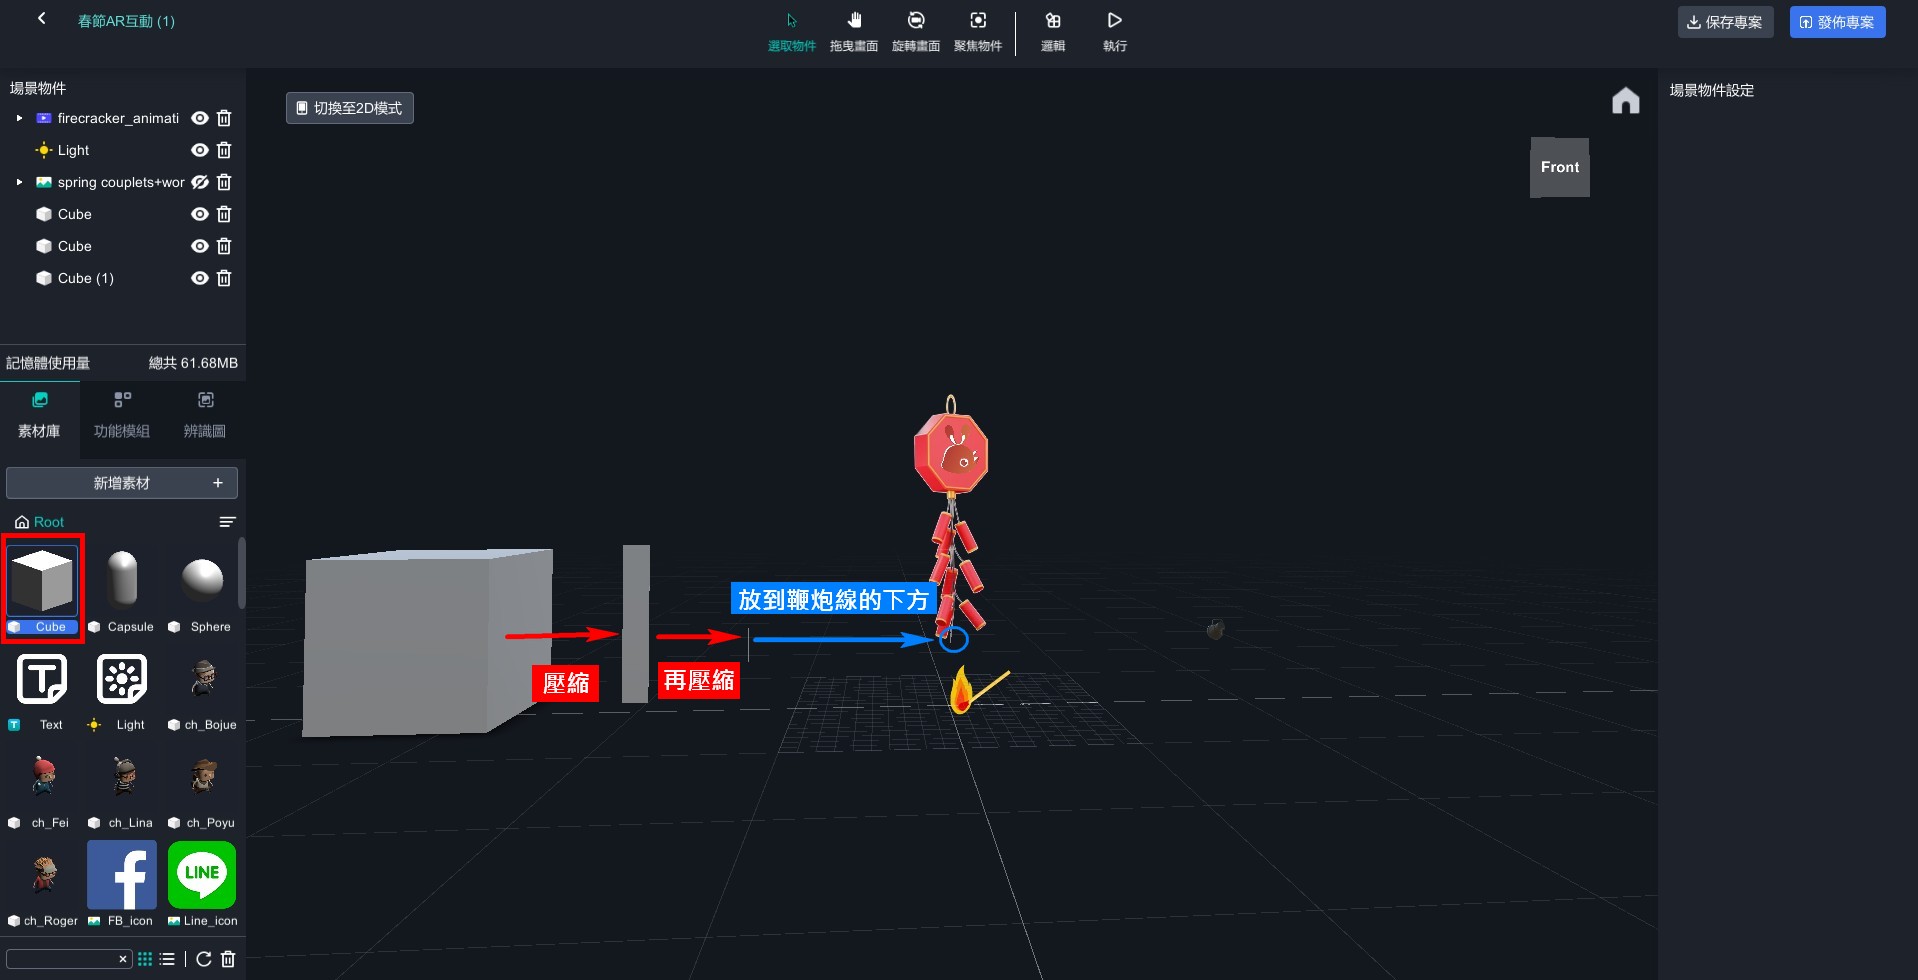
- Drag a cube, compress it into a line, and put it under firecracker to disguise it as part of object itself.
- Set a cube, matchstick, text, and firecracker animation video as individual logic objects.
- Open logic editor and add controls such as visibility, click execution, movement, etc., and adjust them as shown in the figure.

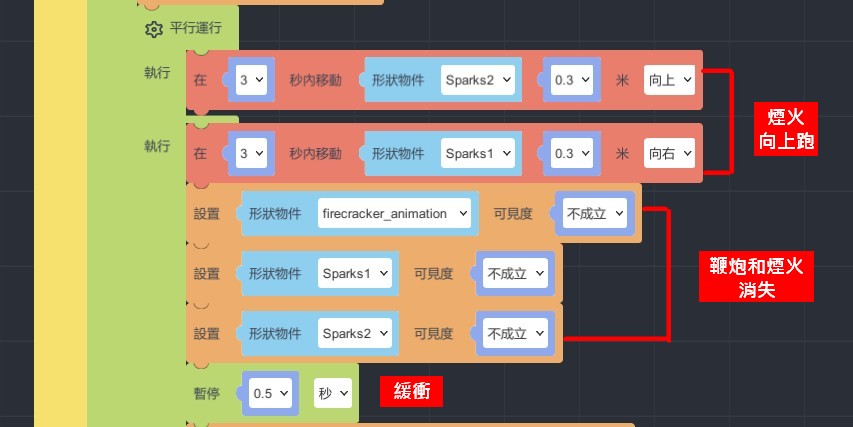
【Set up firecracker】
- Add "when...collides with..., enter..." and "run parallel do... and do..." and set up a dynamic video of two fireworks when matchstick and cube collide.
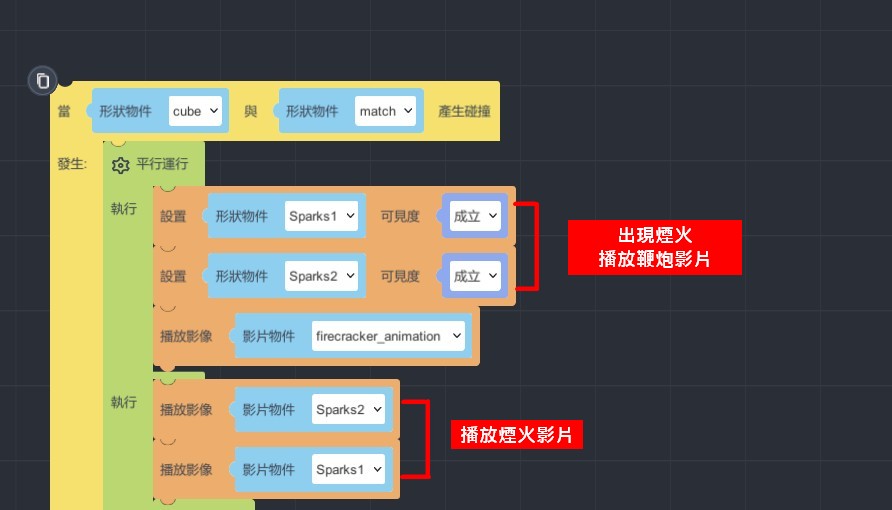
- Drag one more "run parallel do... and do...". Set the video of the fireworks to run upwards, and make both the fireworks and firecrackers disappear immediately after the firecrackers have finished. To prevent the upcoming couplets from appearing too abruptly, add a "wait for...second" control.
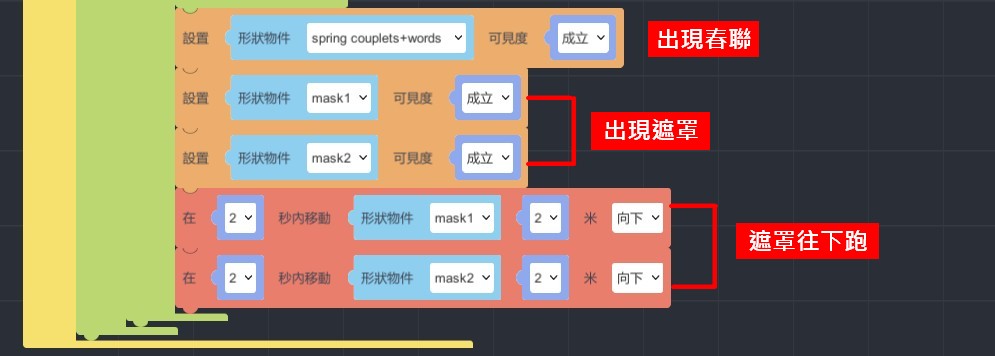
【Set up couplets】
- Set up controls to display Spring Festival couplets and masks, and set the mask to run downwards to create the effect of opening the couplets.

How to experience?
Pick up your phone and enter the ID, then start the experience~
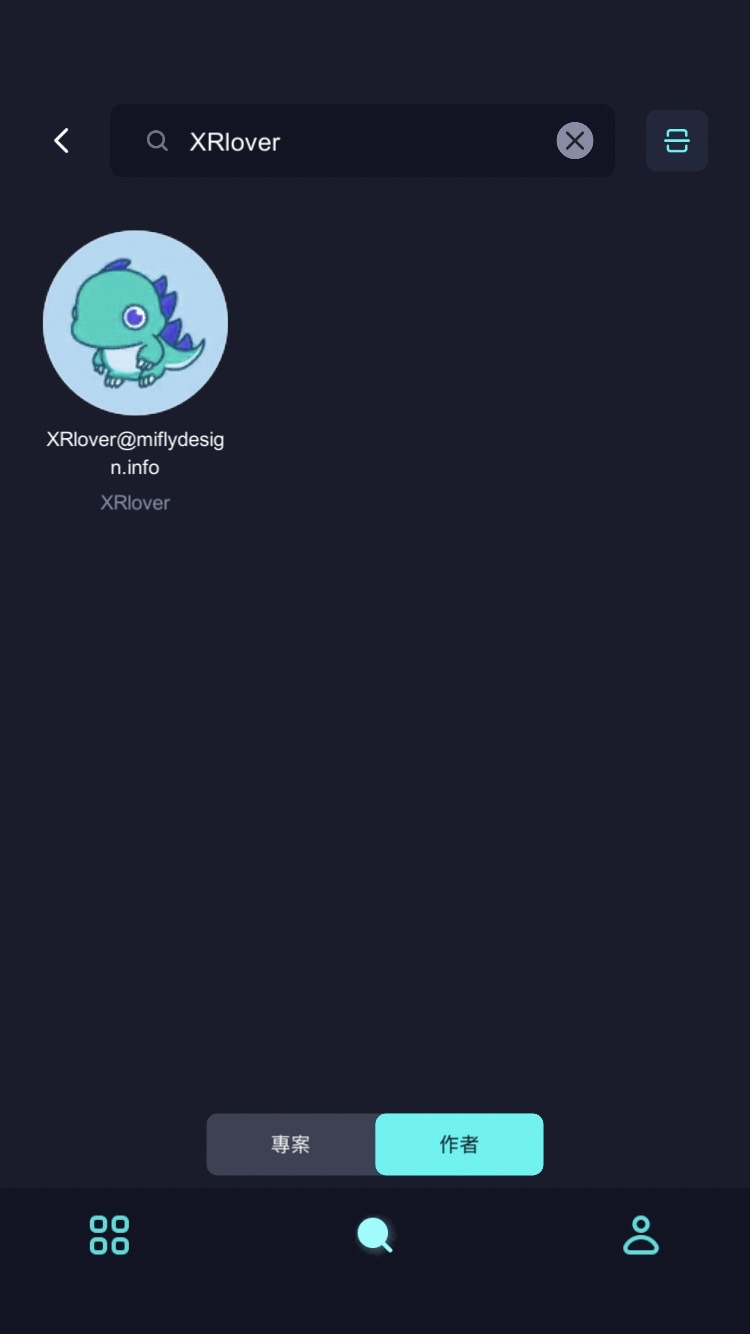
1.Install the MAKAR APP
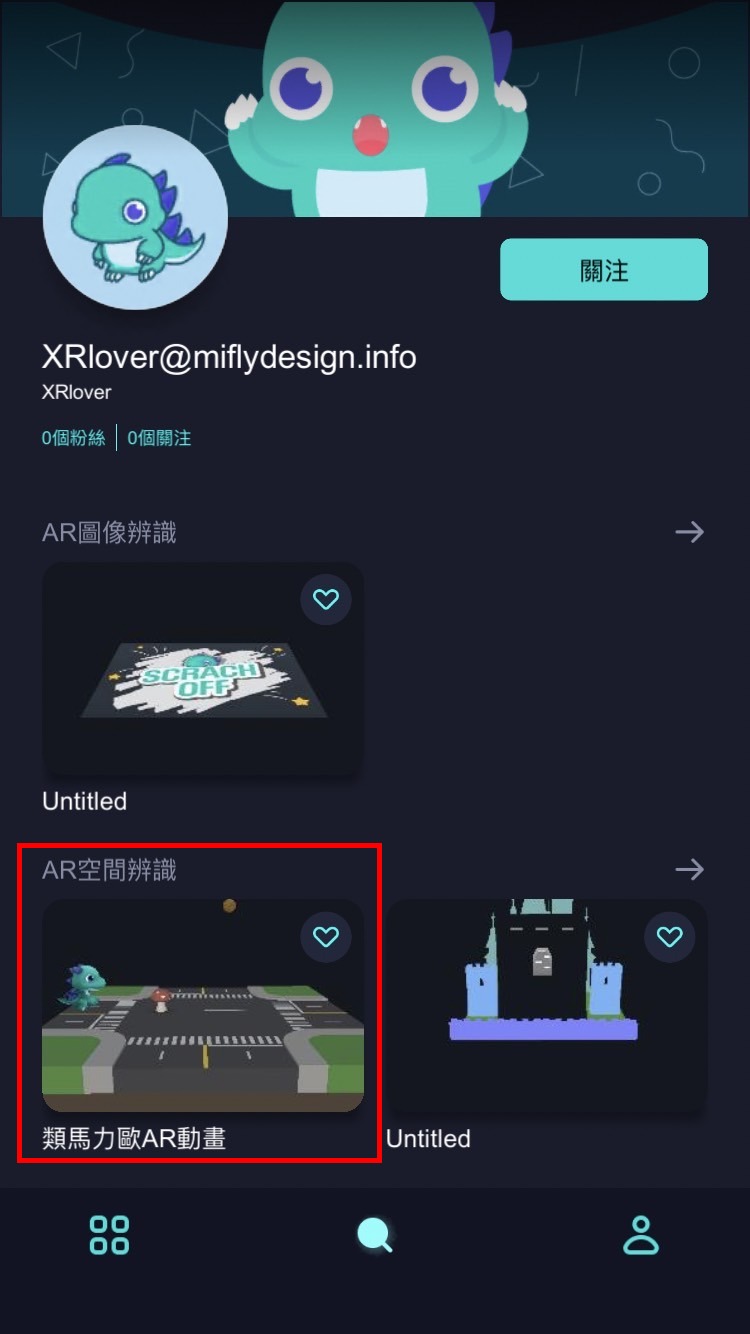
2.Scan QR code or search for ID:XRlover to select the author.


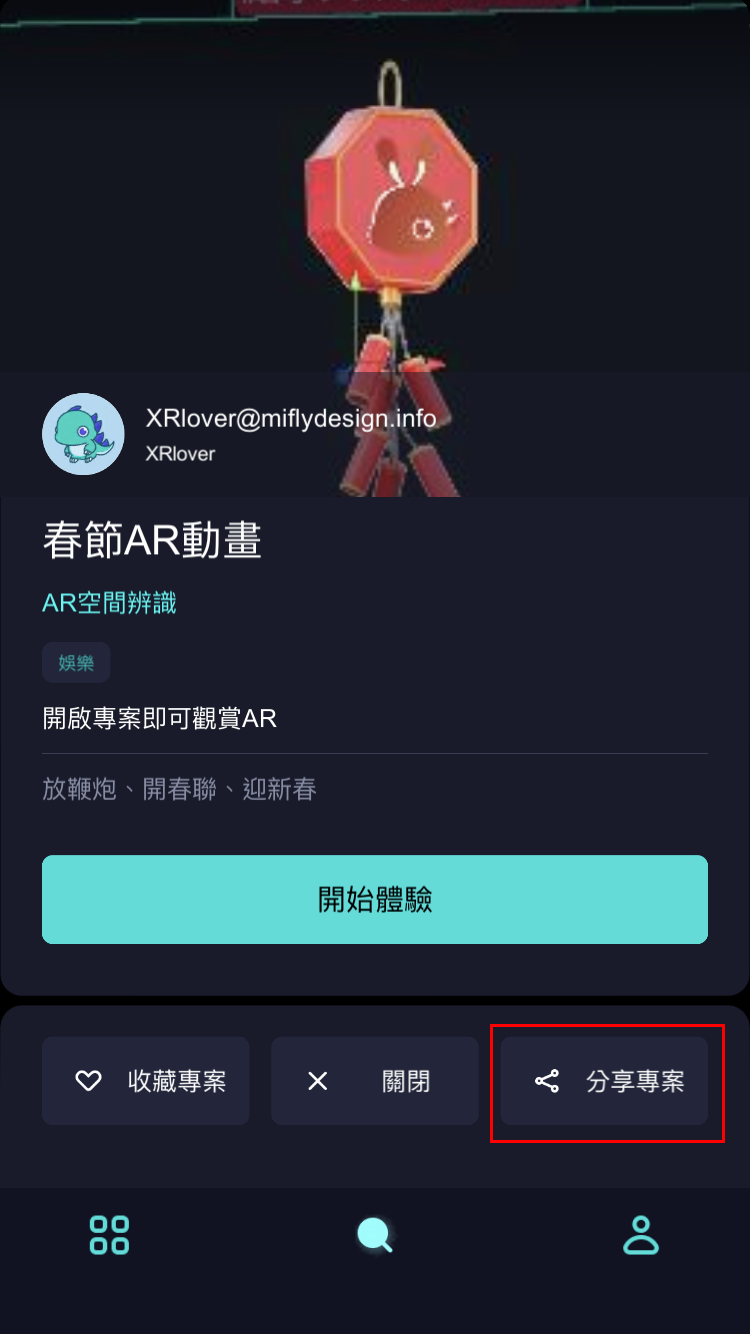
- Click on the AR space recognition "春節AR動畫" project to launch it, and then click "Start Experience".

4. After entering the project, clicking on "Share Project" allows you to obtain a project link, which you can quickly share with others.
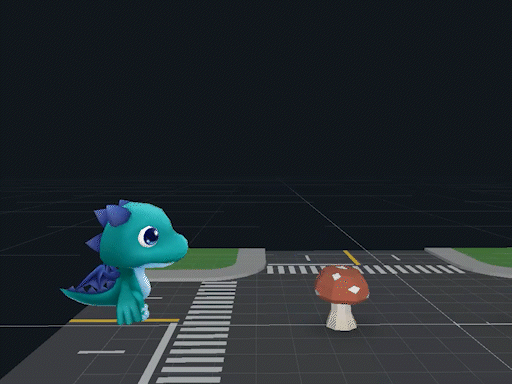
Logic-Macaron AR Animation
▲ Animation:rotation、scale、moving and jumping、collides、visibility
▲ Object:coin、mashroom、Macaron(walking)、street(you can all download on MAKAR resources)
- Drag the road and Macaron into the editor, and rotate Macaron.
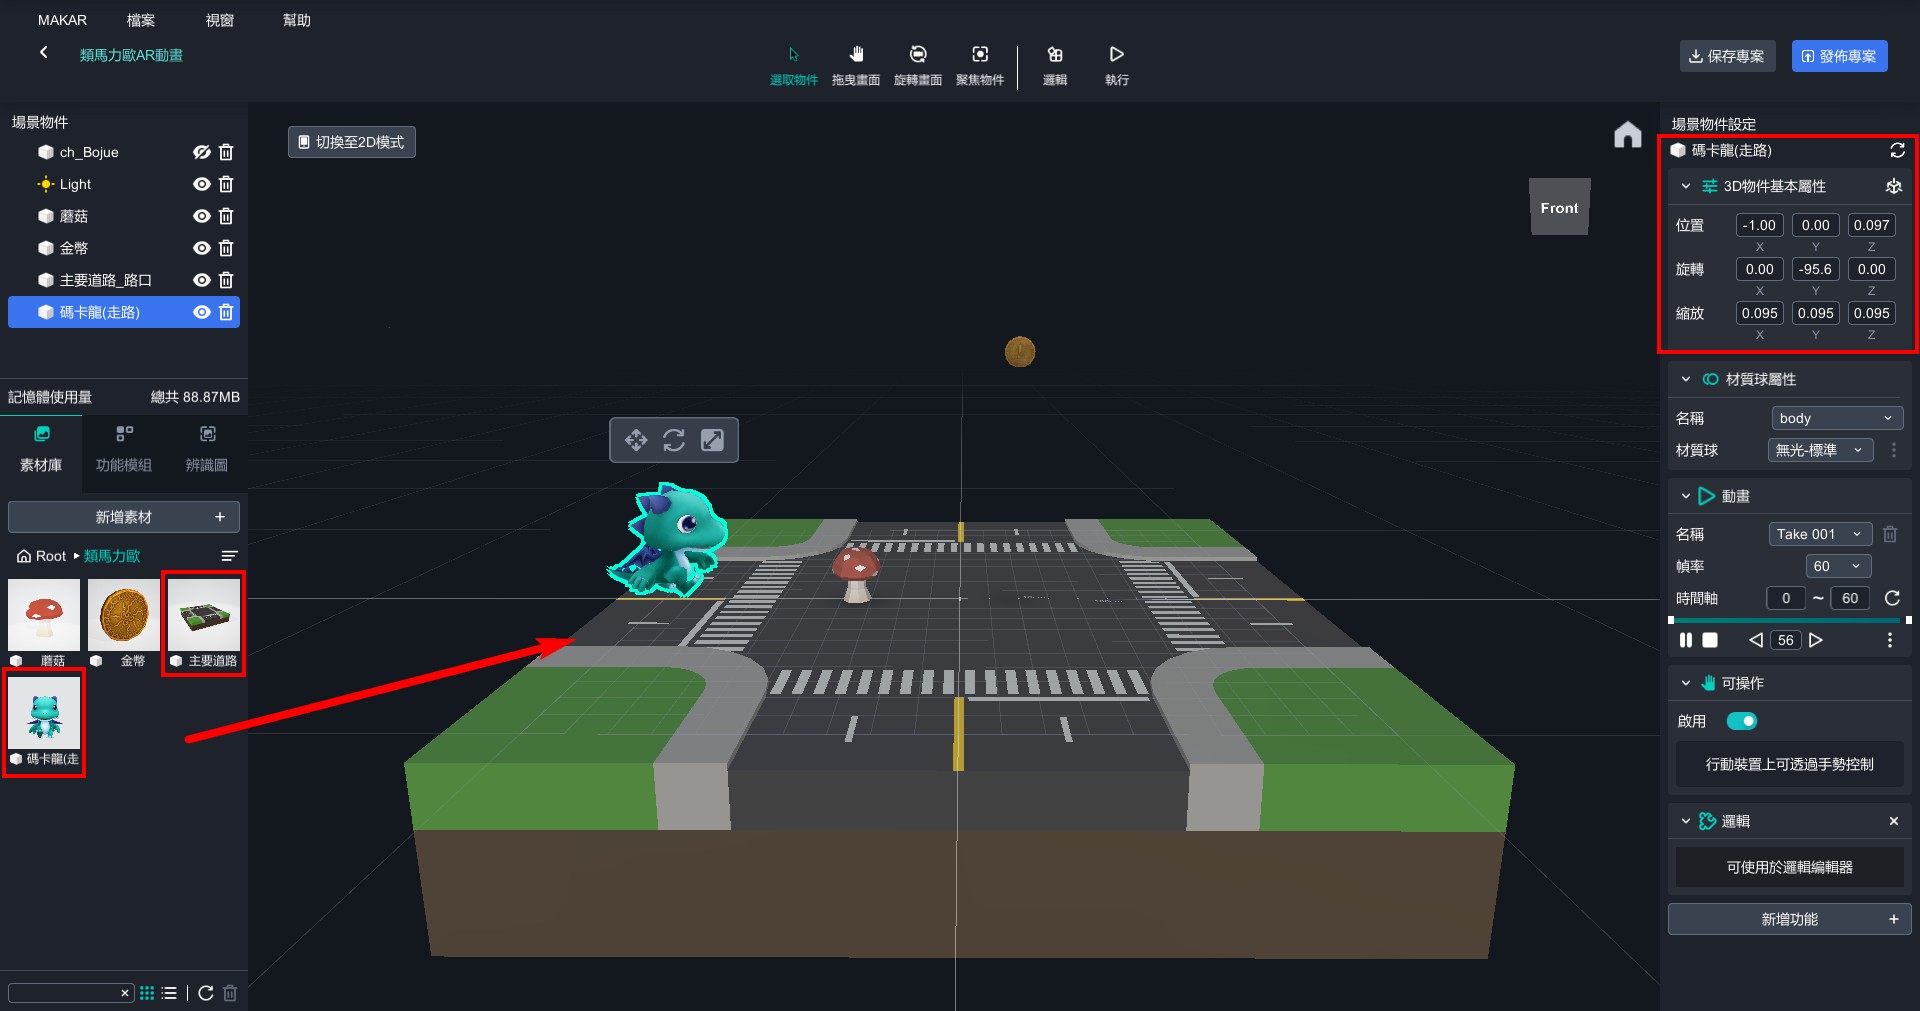
- Drag mushroom and coin into the editor and position them at appropriate distances.
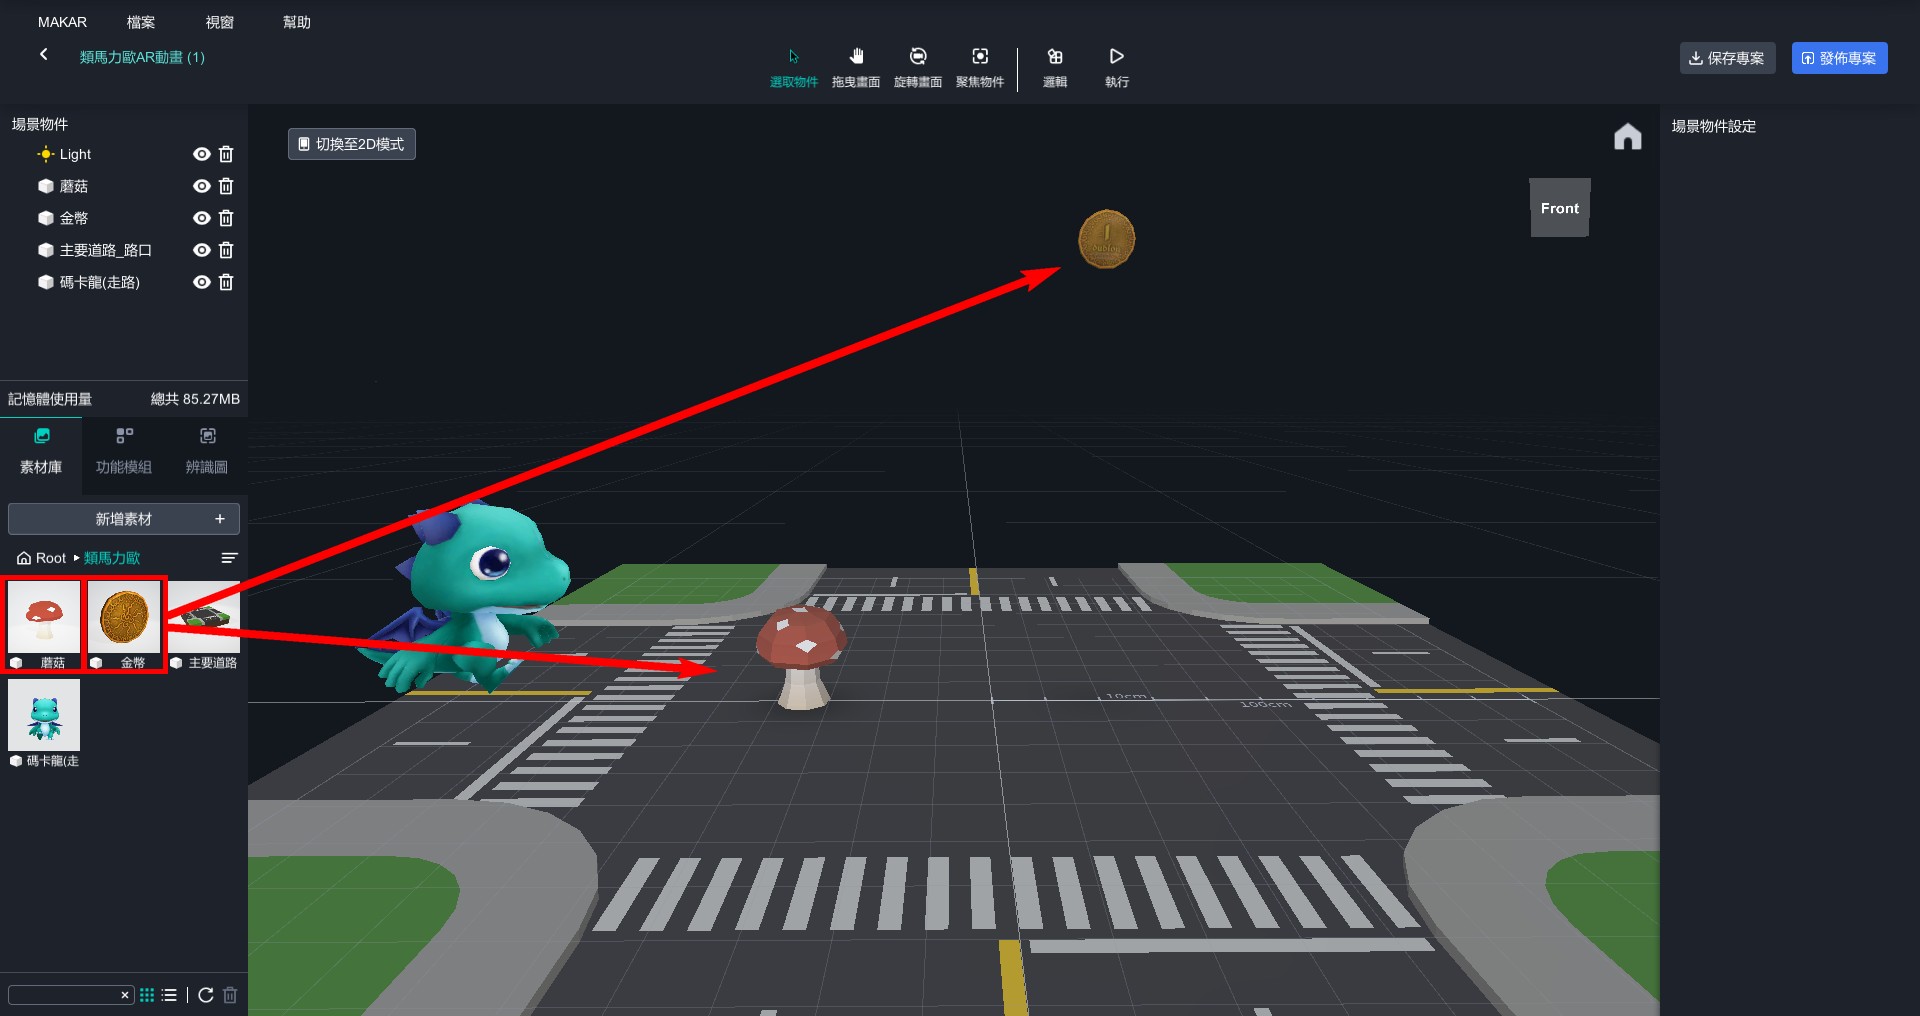
- Set Macaron, coin, and mushroom as logical object.
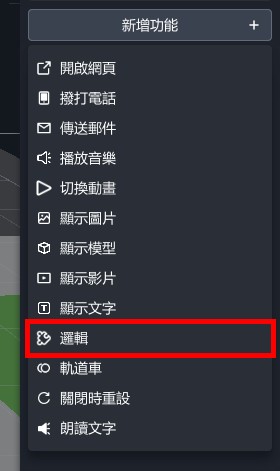
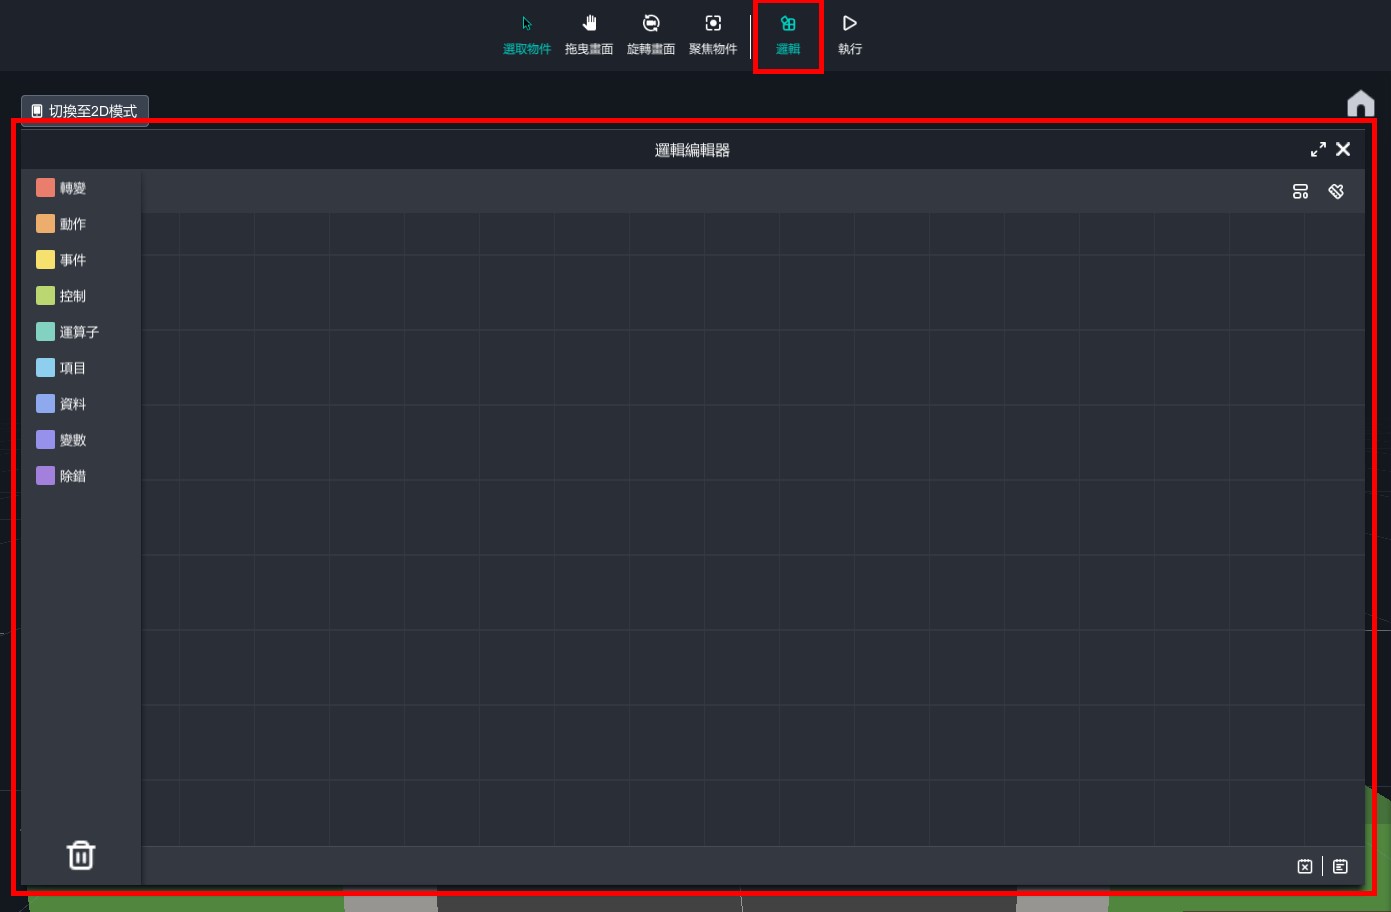
- Open the logic editor and start editing.
【Macaron Moving and Jumping】
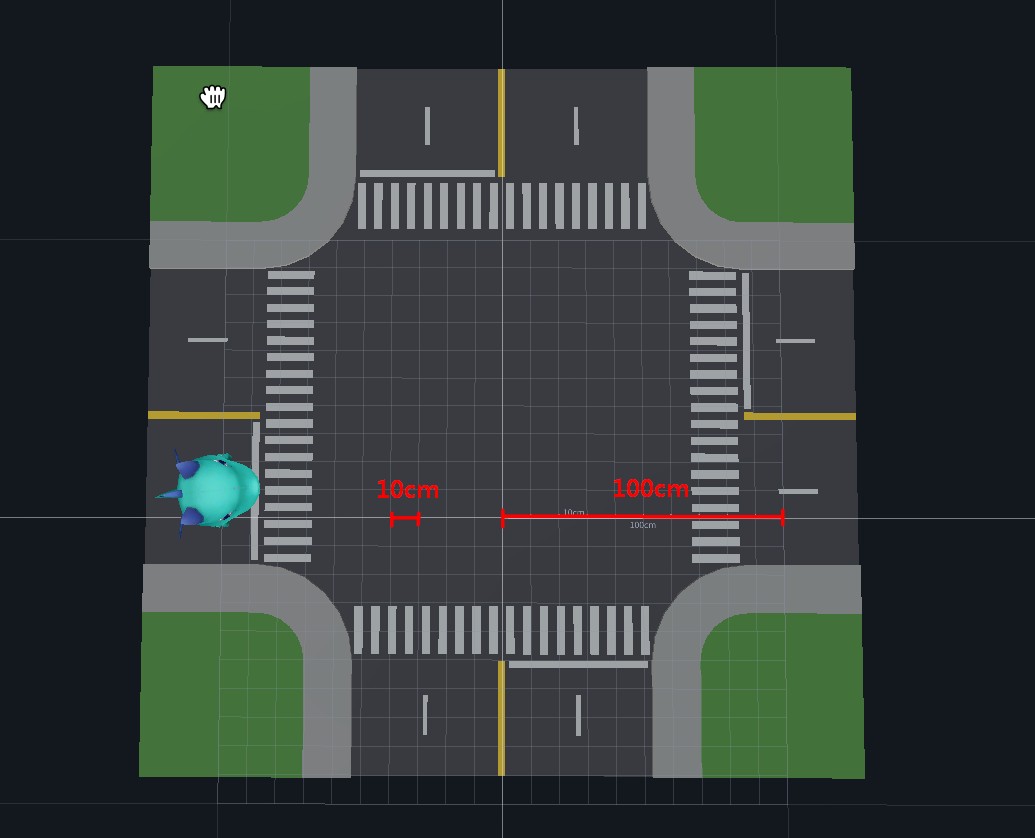
- In the scene, one small square represents 10 centimeters and one big square represents 1 meter. Set the walking distance of Macaron based on this standard.
- From "Transform" > "Transitions", drag out "move...object...meters...in...seconds", and all subsequent actions will be executed based on this block.
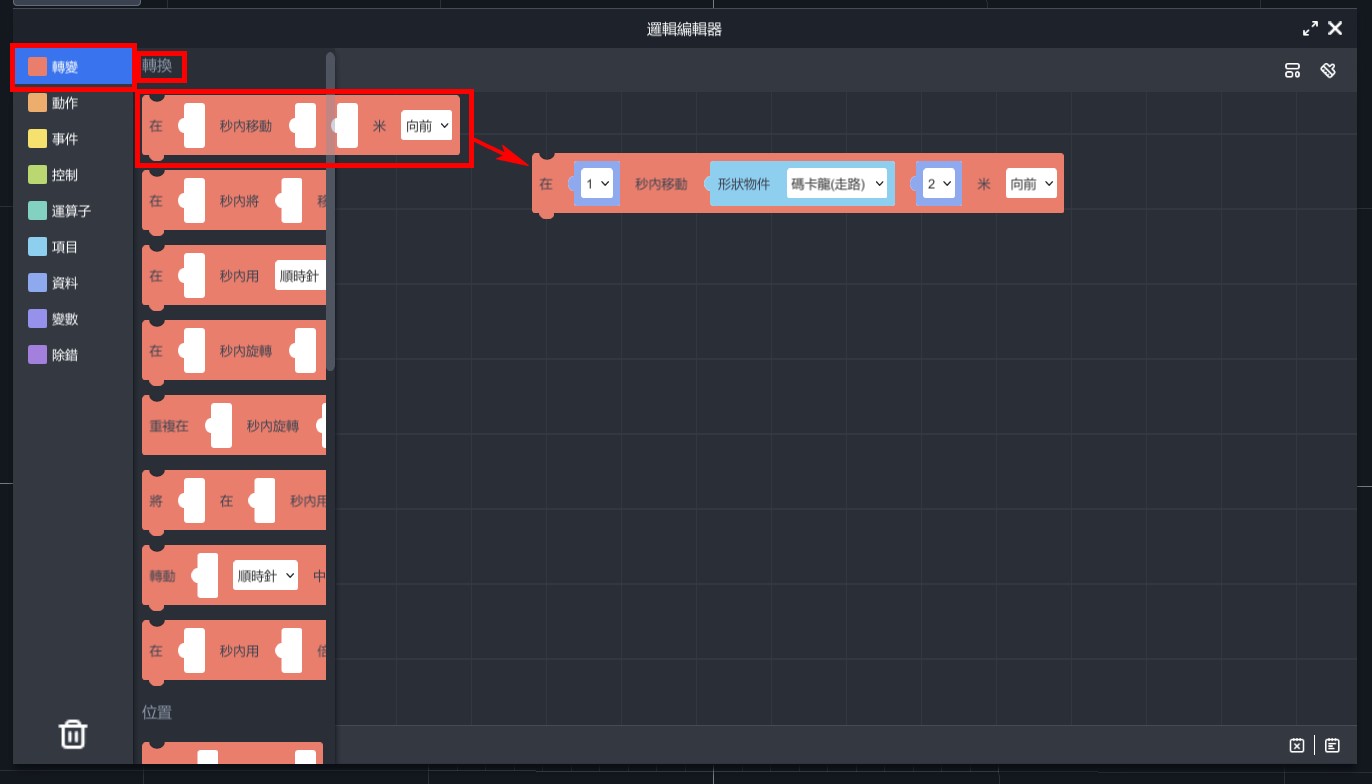
STEP(1)Walk a certain distance
Set block to "move Macaron (walking) 1 meter backward in 1 second". Although the coin is located 1.3 meters from the starting point, adjusting the distance to 1 meter and having Macaron jump forward can make it look more natural due to its larger size. You can adjust the distance according to the actual situation as needed.
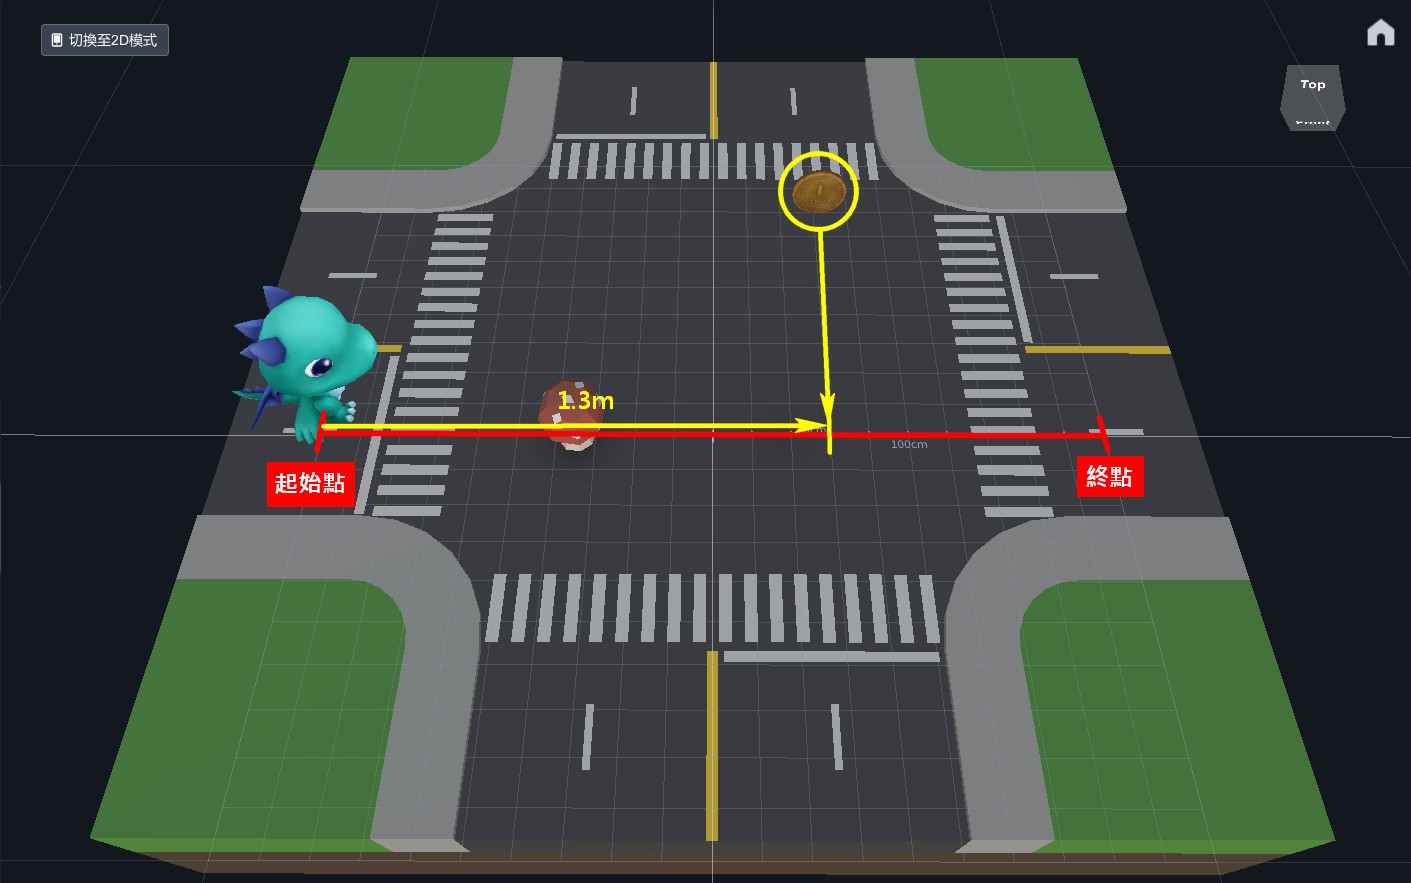
※ The object movement direction is set to "backwards", but the object appears to be moving towards the right. This is because the object's properties is not X=0, Y=0, Z=0 after rotating. Therefore, adjustments must be made based on the actual situation.
STEP(2)Jumping
Set the block to "move Macaron(walking) 0.4 meters up in 0.08 seconds" and duplicate it to set it to move downwards. You can adjust the distance and speed as needed.

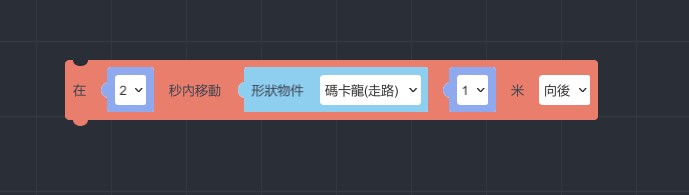
STEP(3)Continue walking a certain distance
Set the block to "move Macaron(walking) 1 meter backwards in 1 second" to allow Macaron to continue moving forward naturally after eating the coin.

※ The blocks will execute the animations in the order they are arranged.
.gif)
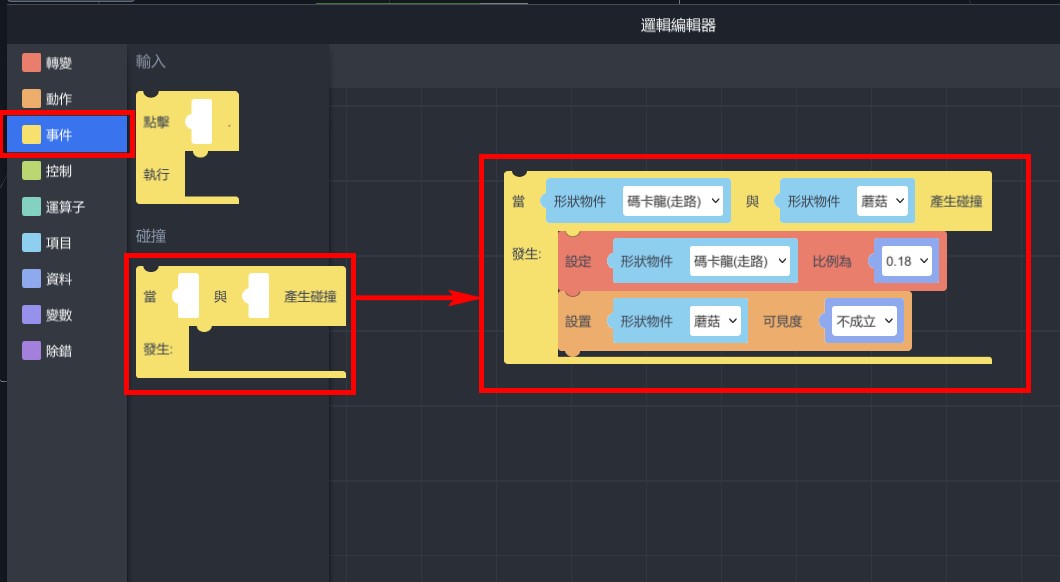
【After eating the mushroom, Macaron grows in size and the mushroom disappears.】
- From "Transform" > "Scale", pull out "Set scale of...to..." and set Macaron scale to 0.18.

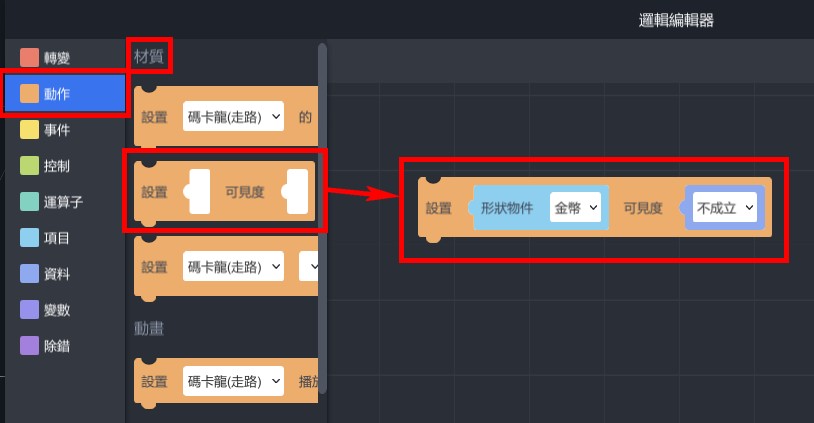
- From "Actions" > "Material", pull out "Set visibility of...to..." and set mushroom's visibility to false.
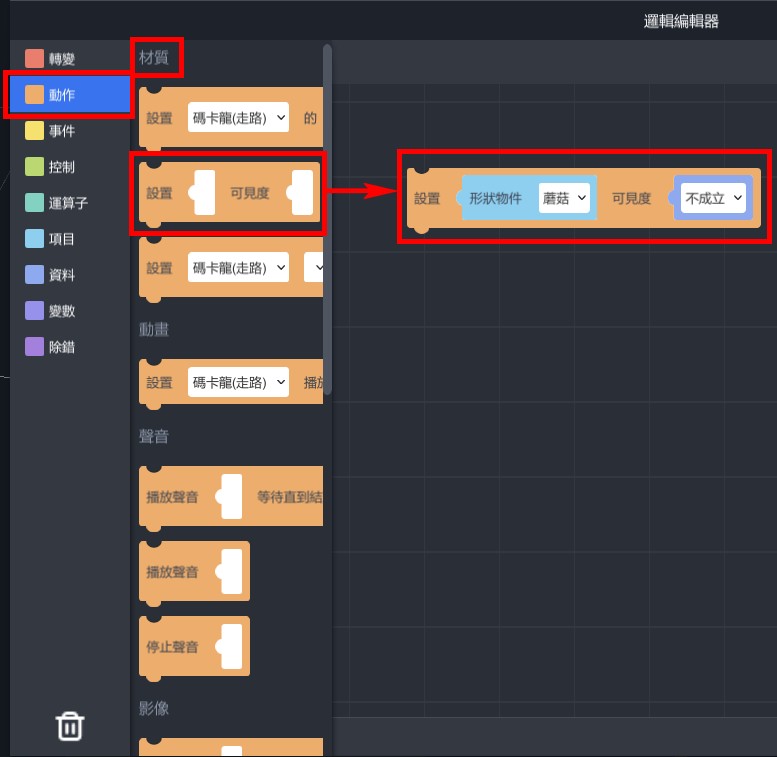
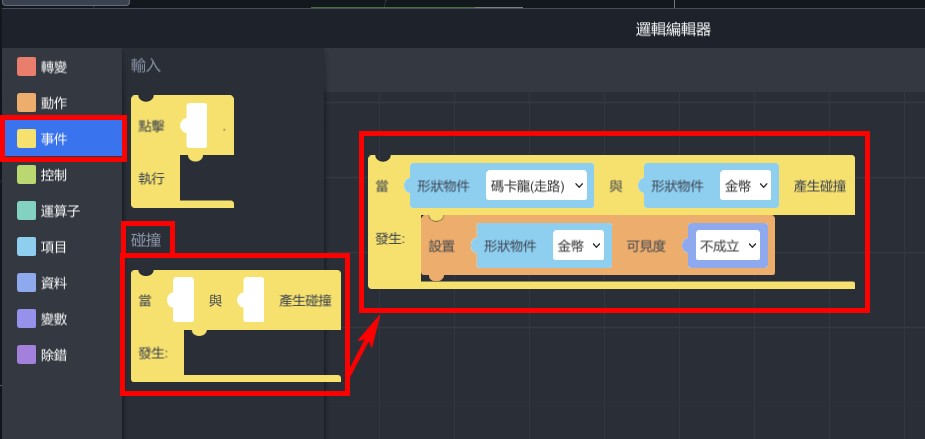
- From "Events" > "Collisions", drag out "When...collides with..., enter..." and place the previous two blocks inside it, and set the collision between Macaron and mushroom.
【The coin rotates on its own】
- From "Transform" > "Rotation", drag out "turn...object...clockwise by degree...in...sec", and set "turn coin clockwise by degree360 in 1 sec".
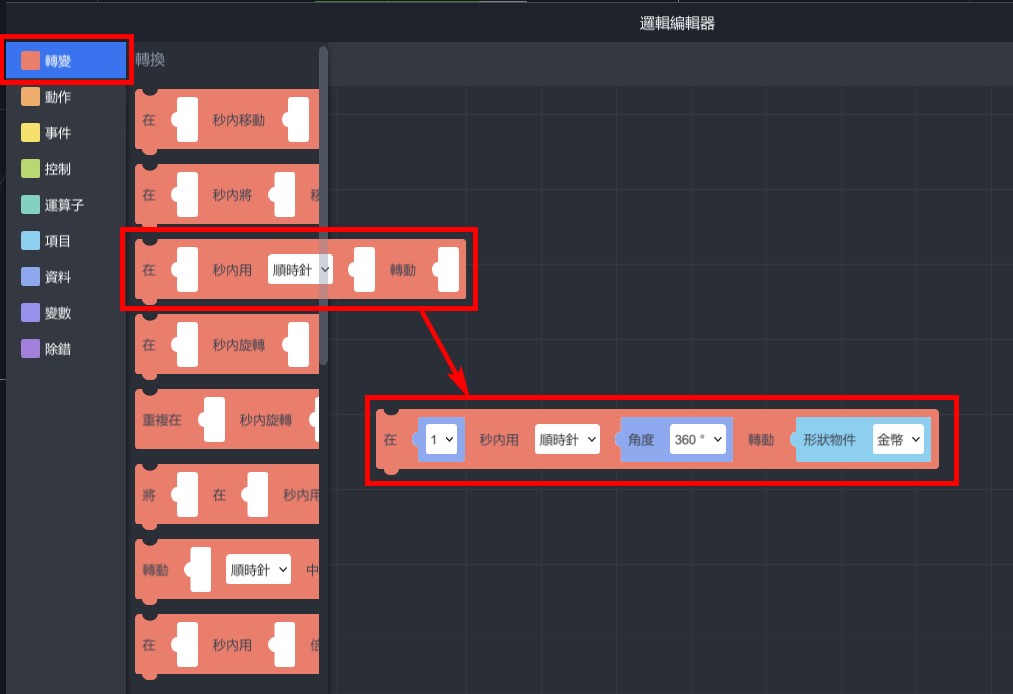
- From "Control" > "Loops," drag out "forever do..." and place the previous block inside.
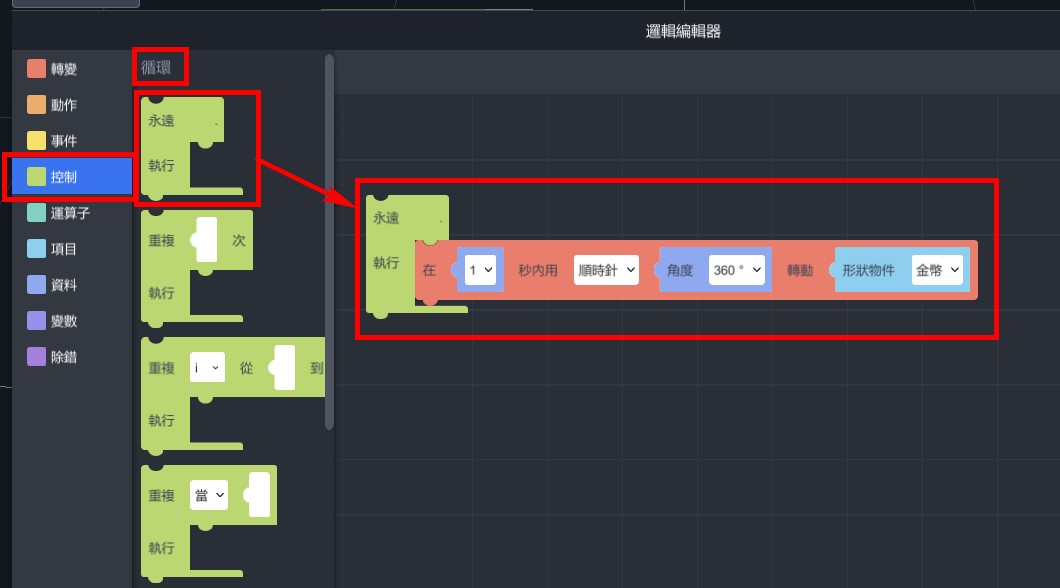
- The coin will keep rotating automatically.
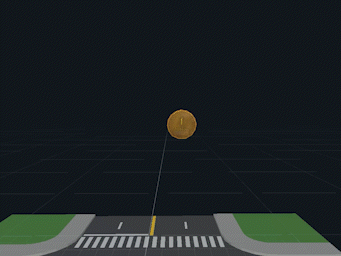
【After eating the coin, it disappears.】
- From "Actions" > "Materials", drag out "Set visibility of...to..." and set the visibility of the coin to false.
- From "Events" > "Collisions", drag out "When... collides with..., enter..." and place the previous block inside it. Set it to detect collisions between the dragon and the coin.
How to experience?
Pick up your phone, enter ID, and scan the recognition image to start the experience!
1. Install MAKAR APP
2. Scan QR code search ID:XRlover

3. Click on "Macaron AR Animation" project in the AR space recognition and click on "Start Experience".
MAKAR Mask project
Abstract:
In this lecture, there is going to demonstrate how to use Mask function in MAKAR editor v3.4 to create a project.
Introduction:
Mask is one of the new function in MAKAR editor, it’s similar to invisible cotton in Harry Potter. You will learn how to make a room invisible in this lesson.
1. Material: https://skfb.ly/6CGo8 license: CC Attribution

This is a kind of isometric scene material.
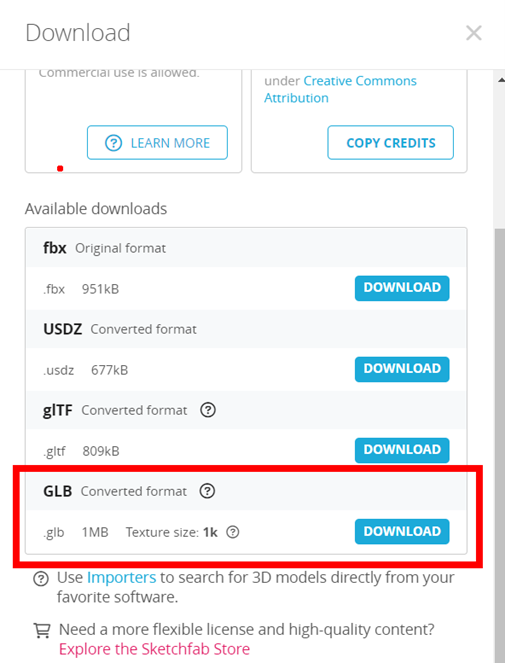
2. Download the file
We are going to download GLB file for this lesson, though the FBX file looks smaller, it need to conduct extra-process after you download it.
3. MAKAR editor
Make sure your MAKAR editor upgrade to at least version v3.4 or above.
Create a AR Target project. It’s necessary to select a category in latest editor.
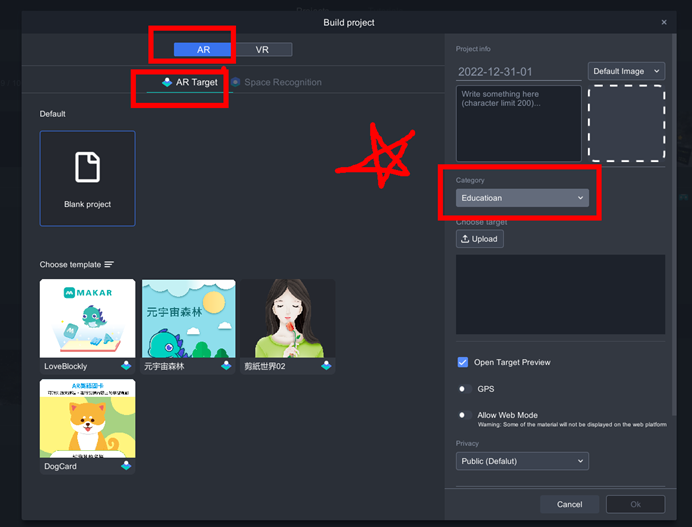
Extra: How to create a fire-star recognition target?
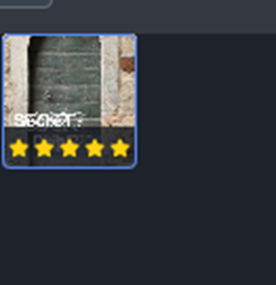
The star number in MAKAR represents the recognitive ability. There is a tutorial for AR recognition by Lina, you can check it out. https://becutelina.com/2022/03/24/ar/
In this lesson, I’m going to use the popular AI tool, DALL-E, to generate a unique image target, and use Zalgo text transformation for complicity.
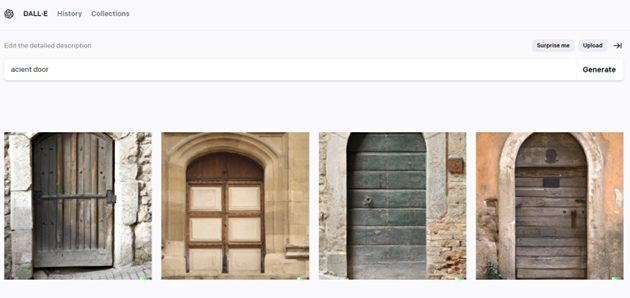
DALL.E (https://openai.com/dall-e-2/ )
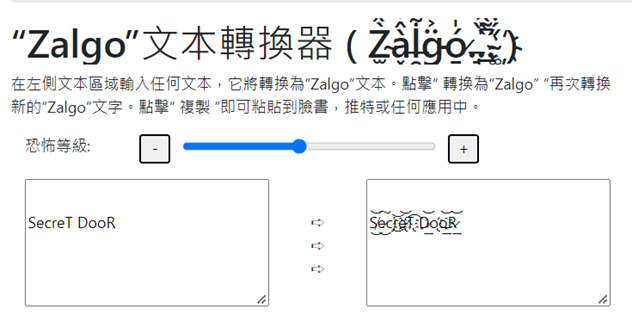
Zalgo text generator (https://tw.piliapp.com/cool-text/zalgo-text/)
4. Mask
You can change the 3D model’s material into Mask.
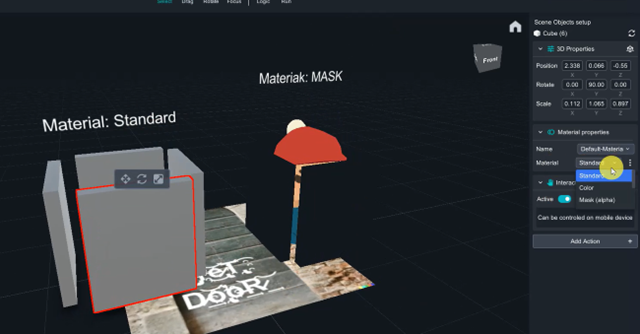
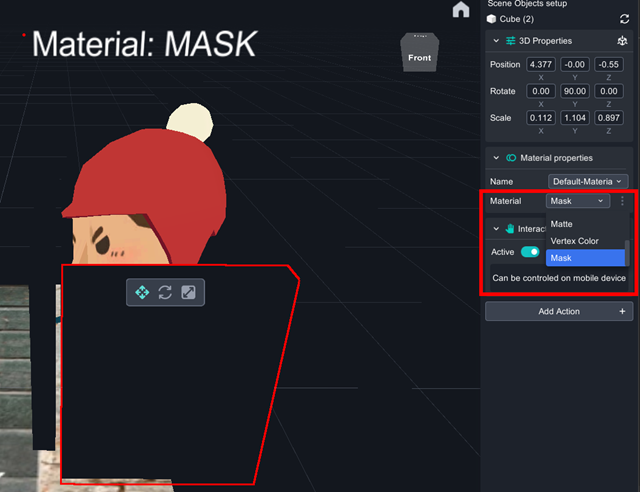
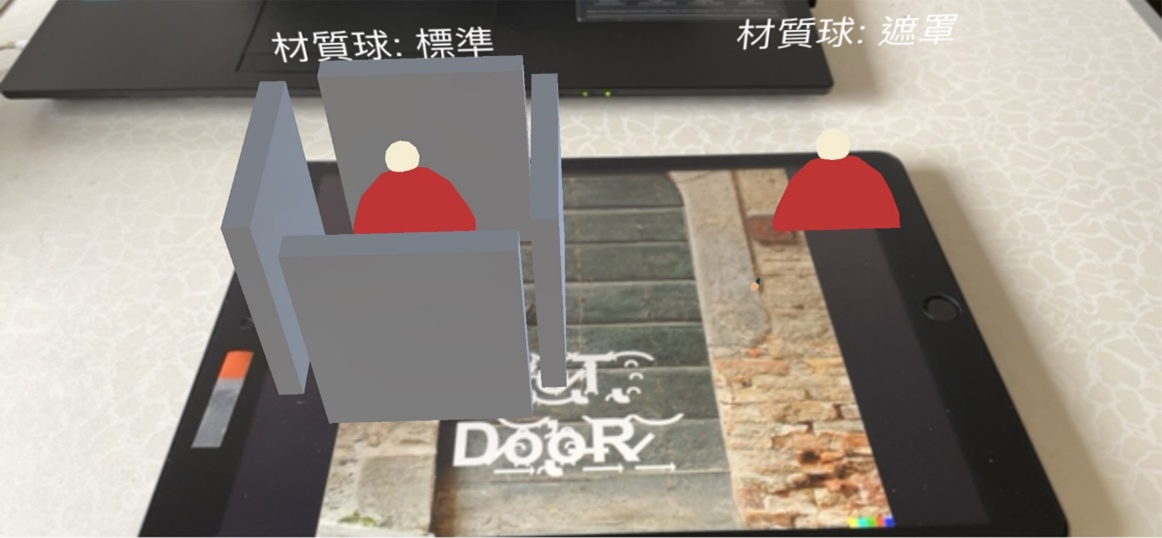
In reality, Mask can cover the object, make it become transparent, such as invisible.
5. Create an invisible room
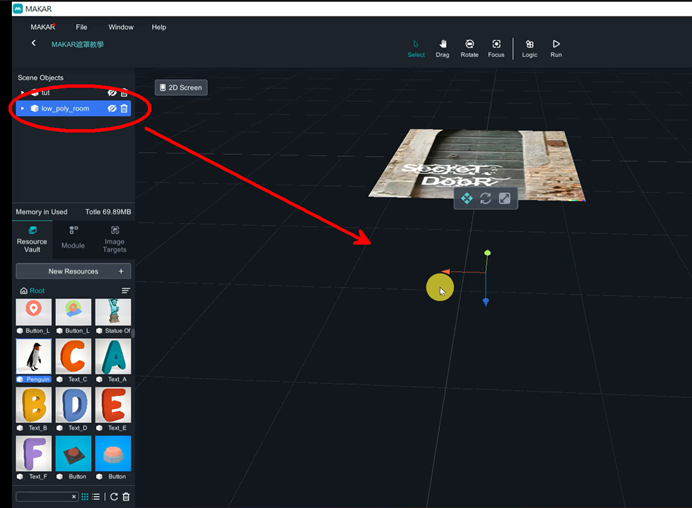
Import the low_poly_room and drag it in to the scene.
Adjust the Blue face to Top aspect.

As above.
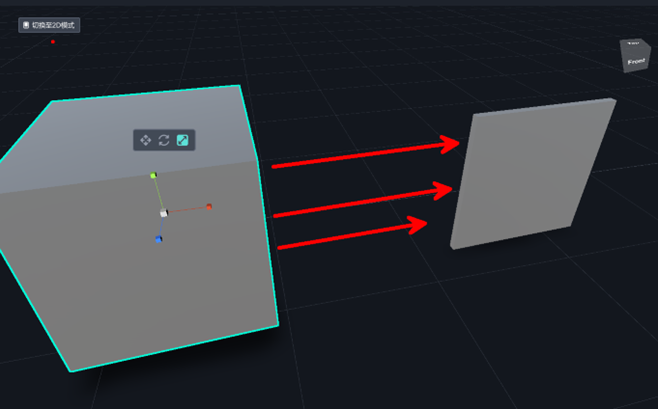
Transform the cube into flat square.
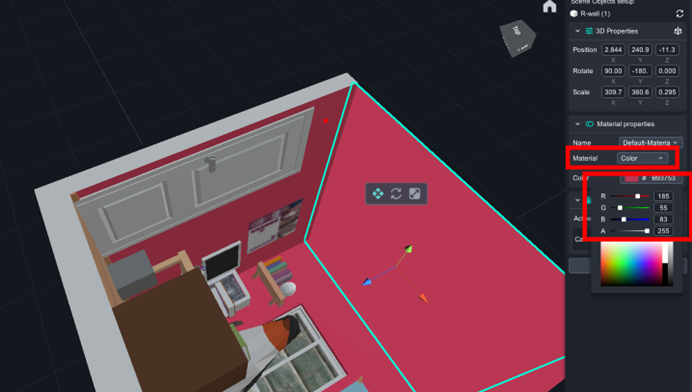
Set flat square as wall of the room, change its material into【color】, RGB=(185, 55, 83).
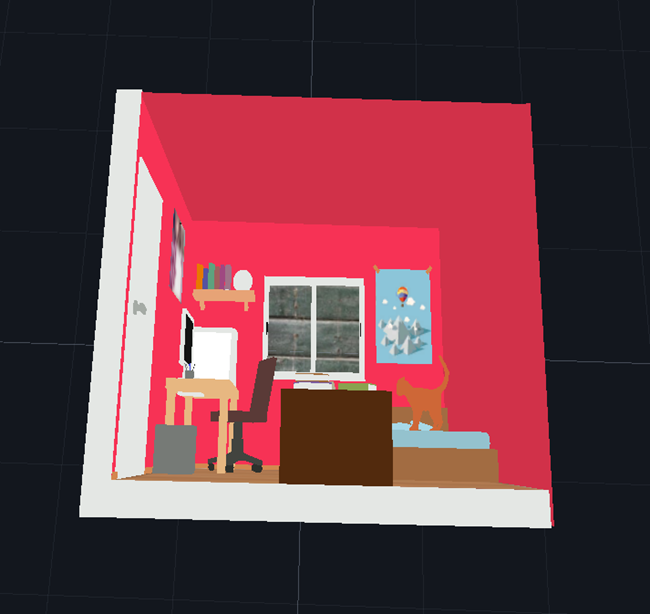
And set the ceiling as the same.
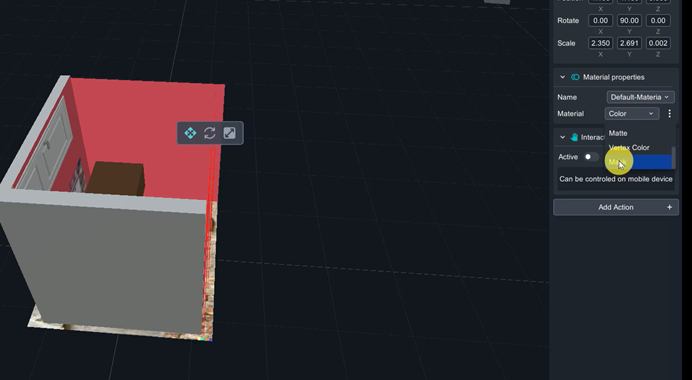
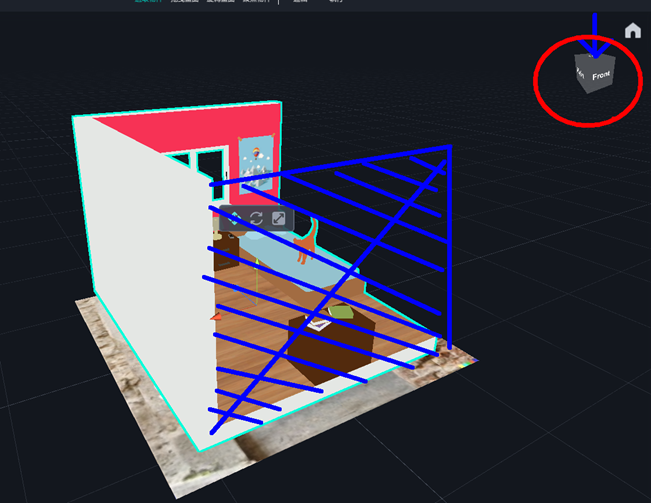
Add another walls as Mask material to cover whole room, so that it can make the room invisible.
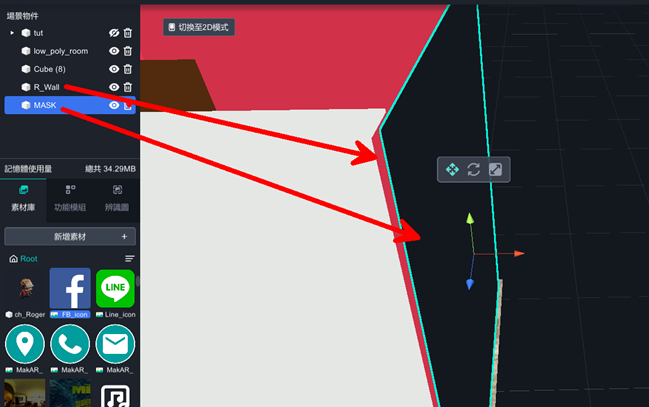
Mask should be a little bigger than walls, and be care for the gap between the wall and mask.
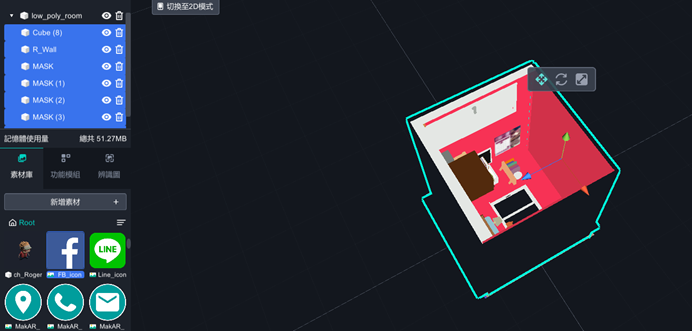
After cover the whole room except the Top aspect, select all elements and drag them into low_poly_room to group them, so that you can move all elements all together.
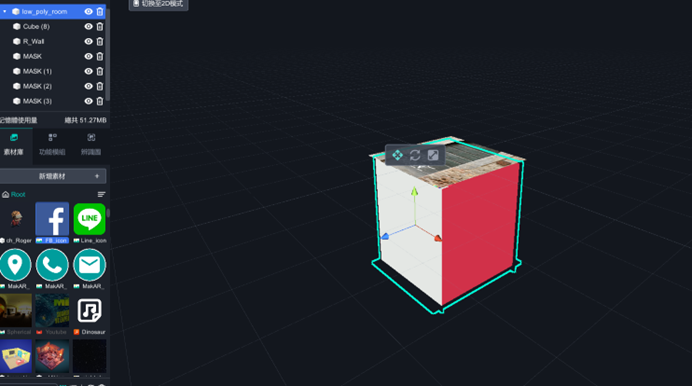
Select the room model, which is the group leader, move it down behind the Target
image. You will see the mask become transparent during the path, and you should not be worried. Adjust your viewpoint down to the ground(press the right button), you will find out it still invisible underground. And Well done!
6. Advance
There is a feature in MAKAR app. The camera scanned the target image, the room will show up, and if you move away from target, the room will still show up in the middle of your screen. Here is going to show you how to make the room appear only if you scanned the target.
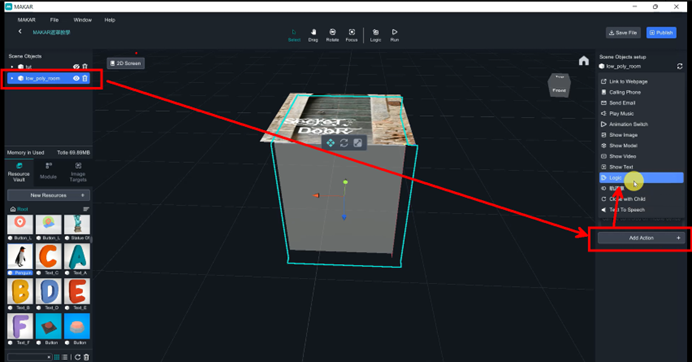
Select the room and add action, and add Logic function on it,
Close the room’s eye to make it disappear.
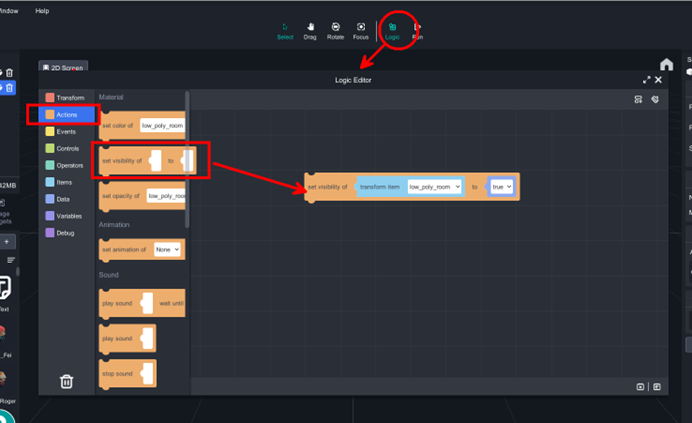
Click the logic on the top banner, you can turn on logic editor, select 【Action/ set visibility of ______to _____ 】, drag the blockly to the scene, and you just solve it.
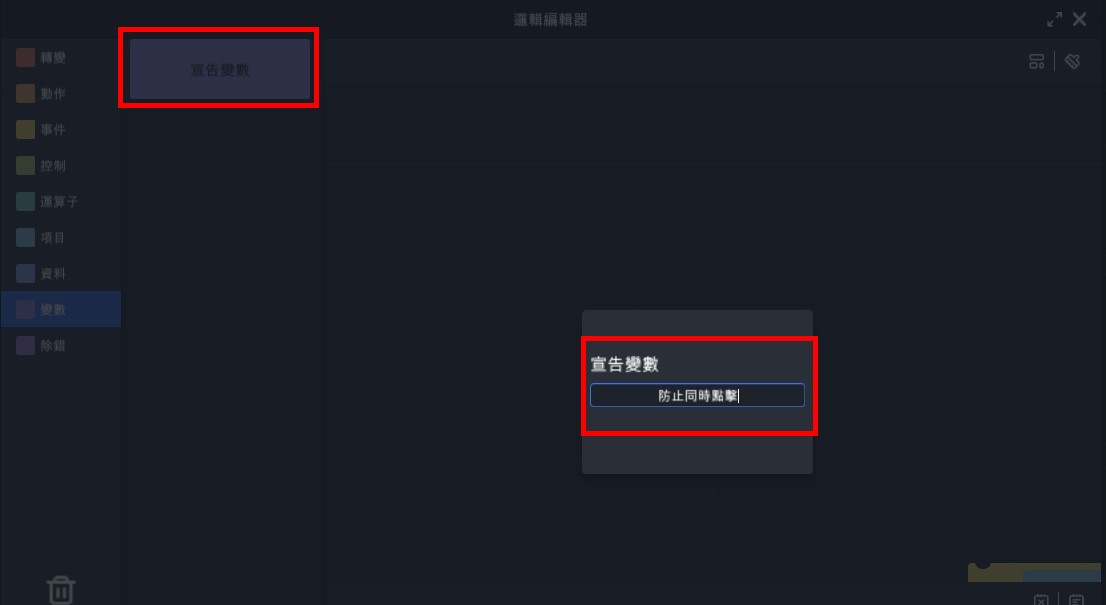
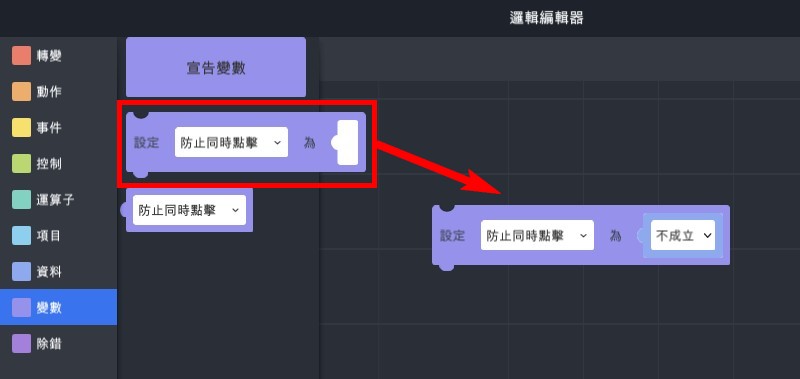
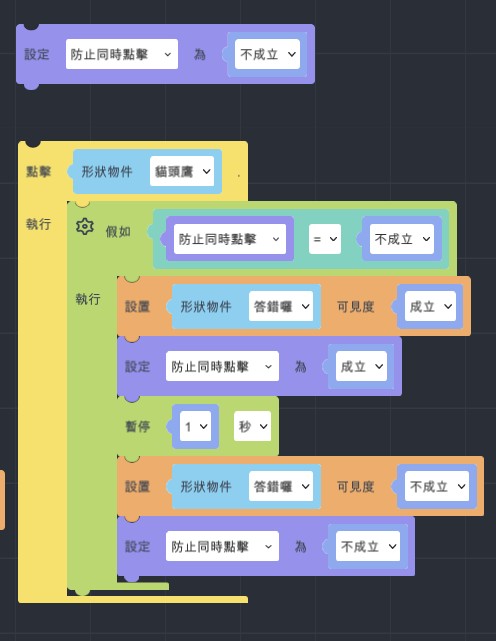
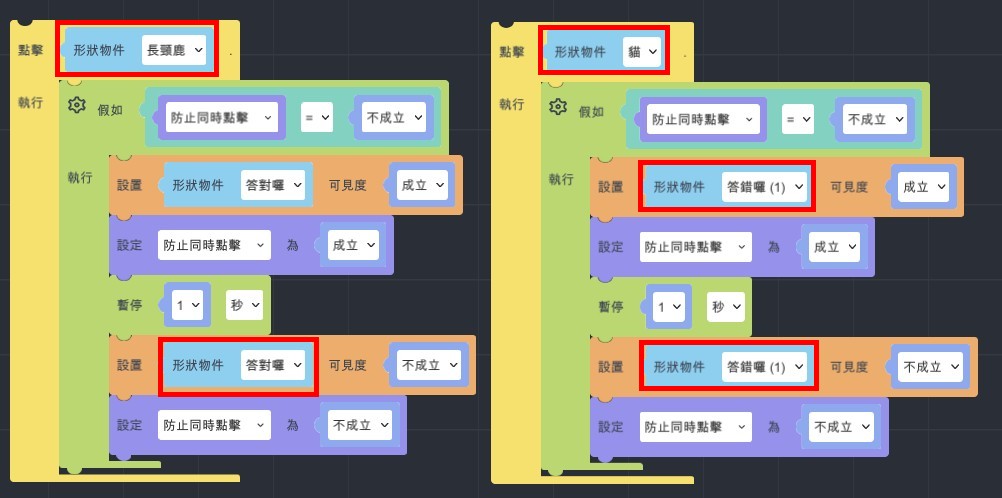
Metaverse Draw Lots-Using Variable and Lists of MR Project
This tutorial includes logic of "Transform, Actions, Controls, Events, Events and List".We will learn about:
Keep from simultaneous click,
Come up draw lots after setting visibility to false
Randomly come up lot after clicking the box
- Open PowerPoint, edit image and export it.
- file>save it to jpg
- open Blender>import FBX>shift to Shading>change the image
Object's basic setting
- Drag 3 model to the scene.
Add text of "correct " and "wrong".
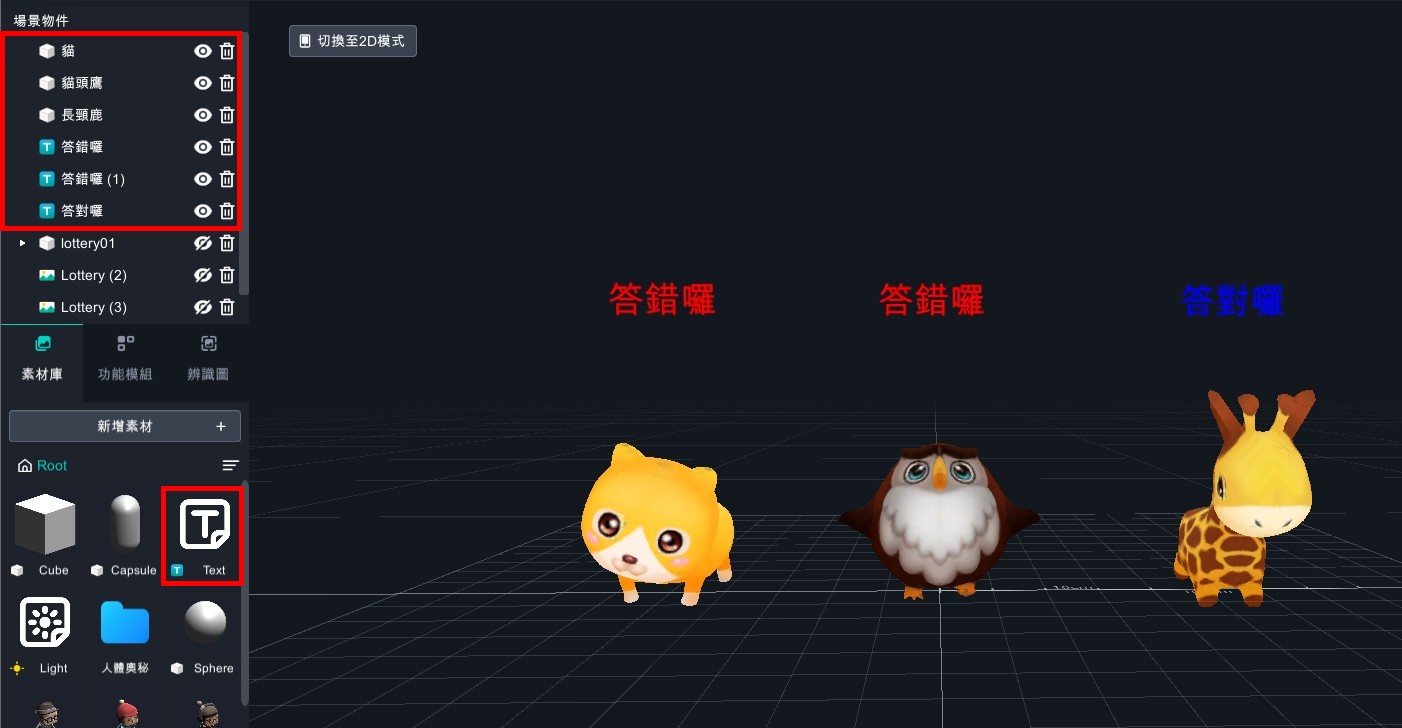
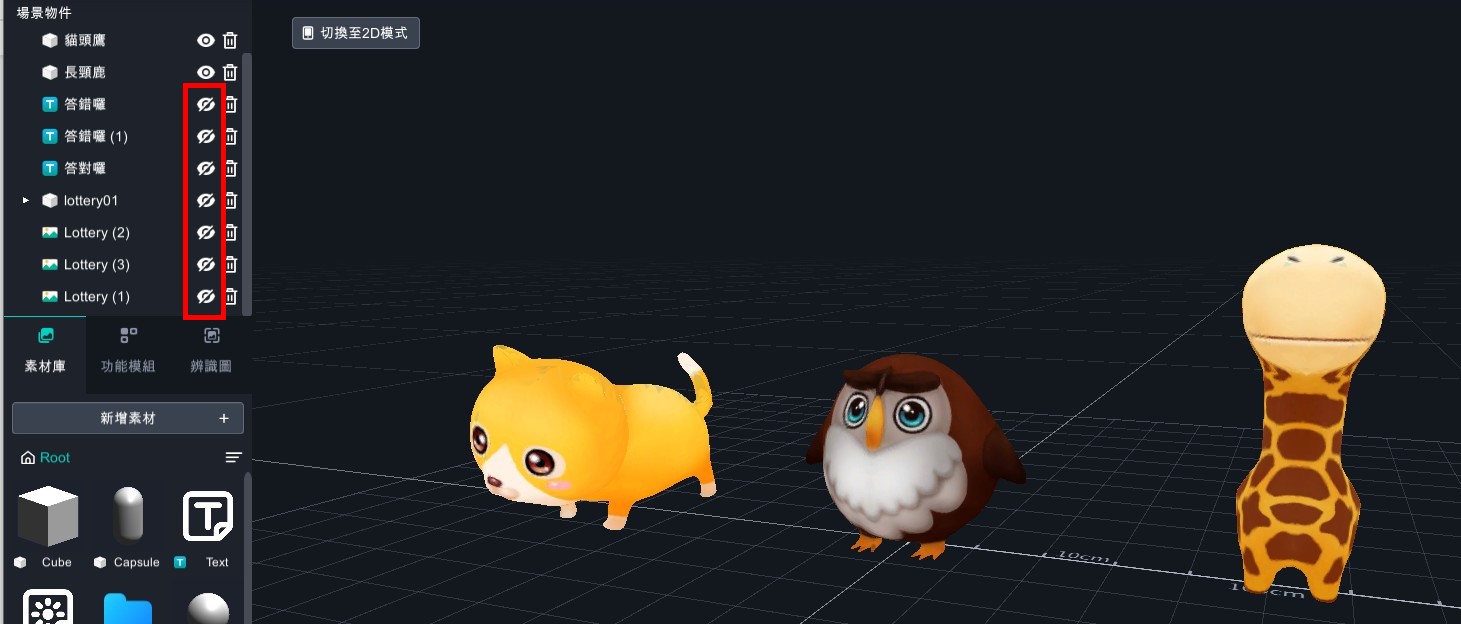
- Drag box to the scene, and put "lottery02、lottery02(1)、lottery02(2)" to lottery01.
- Put lots to the box and adjust the angle in needs.

- Close the objects besides 3 models.
- Add all of object logic.
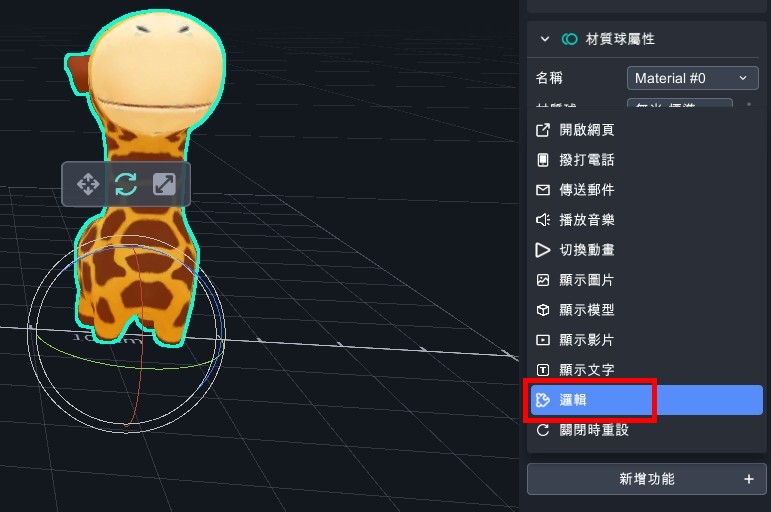
- Open the logic.

- Set the object's visibility to true.
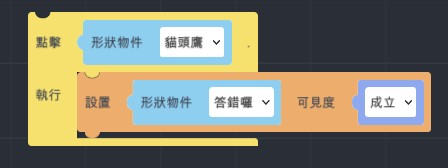
- Add variable>keep from simultaneous click and set the visibility to false.
- Add "If…do" logic.
(2). Set object's visibility to true.
Note: add text of "wrong".
(3). Add variable "keep from simultaneous click=false".
Note: you can not click the objects before step4.
(4). Wait for 1 second.
(5). Set object's visibility to false.
Note: close the text of "wrong".
(6). Set "keep from simultaneous click=false".
Note: close the situation that can not click objects.
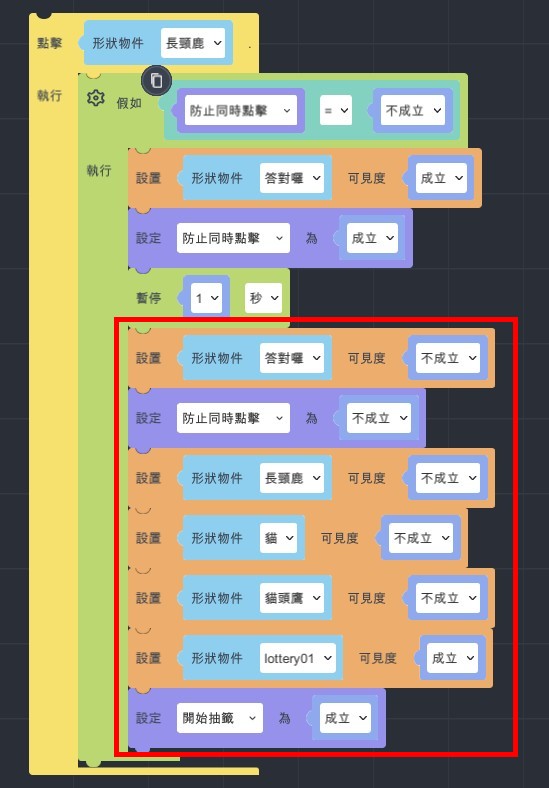
(7). Copy 2 and adjust the other object's trigger situation.
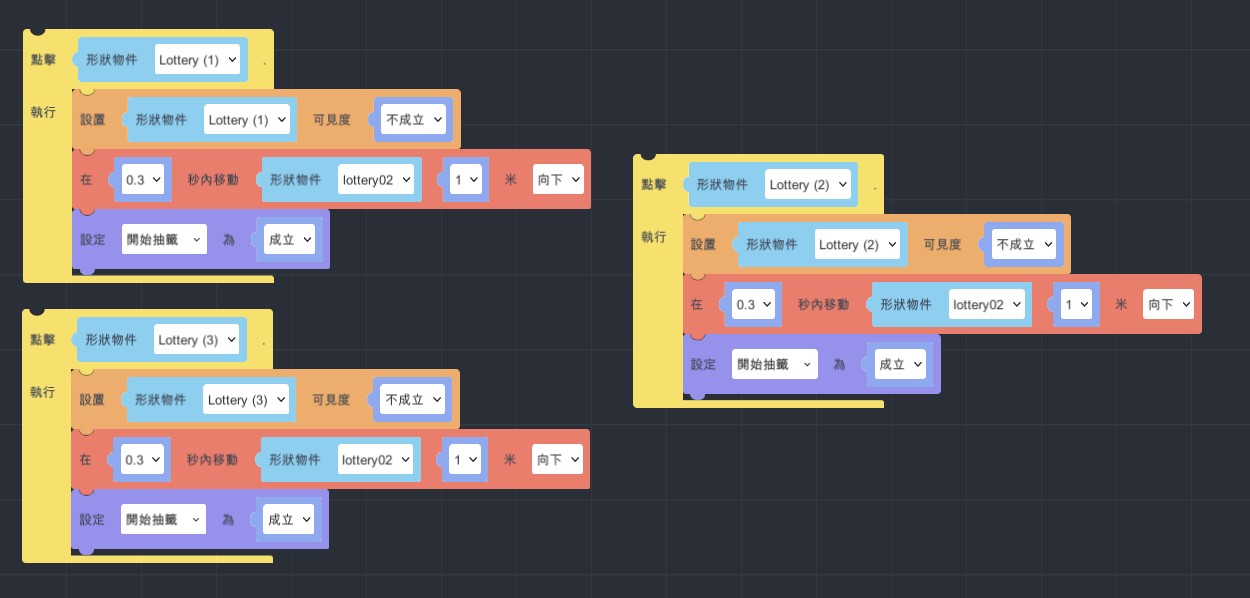
- Take the model of giraffe for example.
- Copy three model and set their visibility to false.
- Set lottery01 visibility to true.
- Add variables>start to draw lots >true.
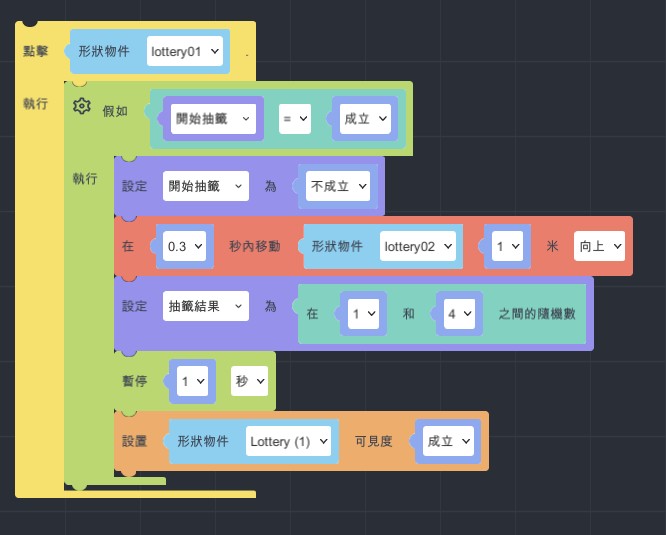
Draw Lots Setting
- Add "When…is clicked" >set the up moving animation.
- Add "If…do">set variable of start to draw lots to true. You can repeatedly click.
- Set click for once, add variable to false and put it on the animation's top.
- Add variable : lot result.
- Set lot result: operators>random number from …to…
- Set random number from 0 to 5.
- Set random number from 0 to 5 (01234) in logic.
- EX1: set 0~5, it will be 01234.
- EX2: set1~6, it will be 12345.
- EX3: set6~9, it will be 678.
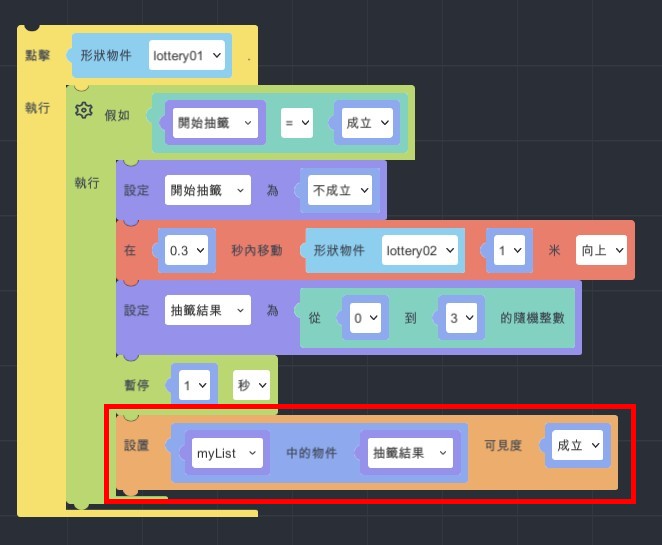
- When setting lot’s visibility, you could know that the coming up of animation and lot is too close, so add wait for 1 sec.
- Add "create empty list" and add "MyList" to variable.
- Add data>lists> add transform item to MyList.
- Copy 3 and put them behind create empty list.
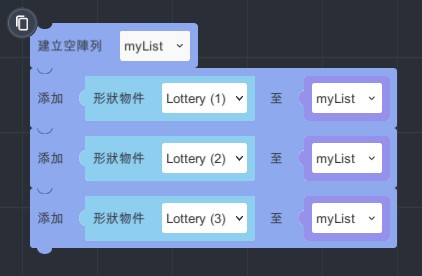
- Data>list>set set "add my list to lot result" visibility to true.
- Repeatedly click setting
- Event>when…is clicked.
- Set Lottery (1) visibility to false.
- Copy animation and change it to moving down.
- Set "start to draw lots" to true.
- Finish and start to experience!

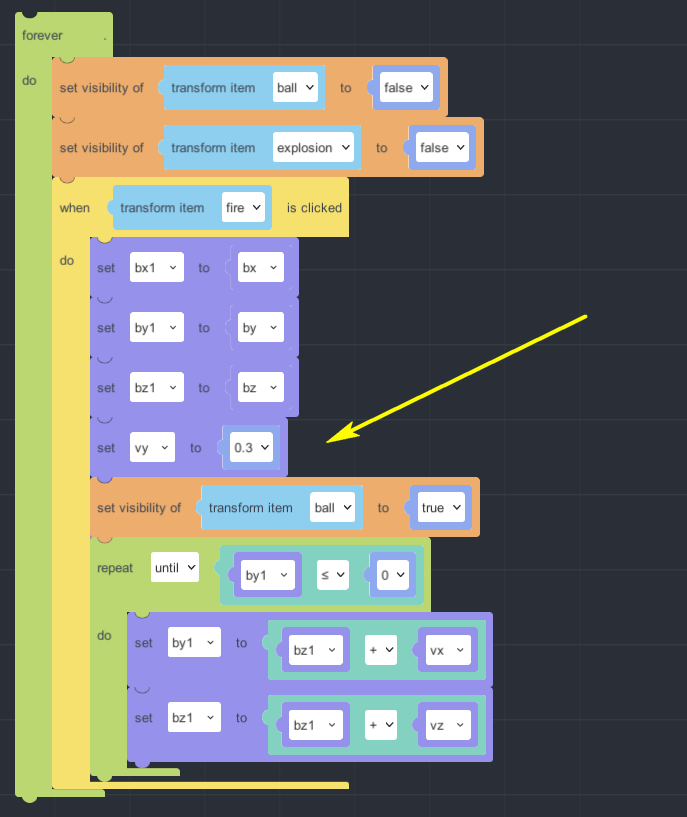
Use MAKAR to learn physics-Let's make an AR cannon!
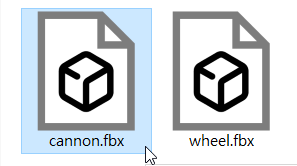
1. Please download the file of cannon.zip and decompress it, import them to MAKAR.
https://drive.google.com/file/d/1HdJHrGcdfRRikf1zViDViWFNuRBjVmCz/view?usp=sharing
Click "New Project"> "Space Recognition", and enter the project name.
Click "OK".
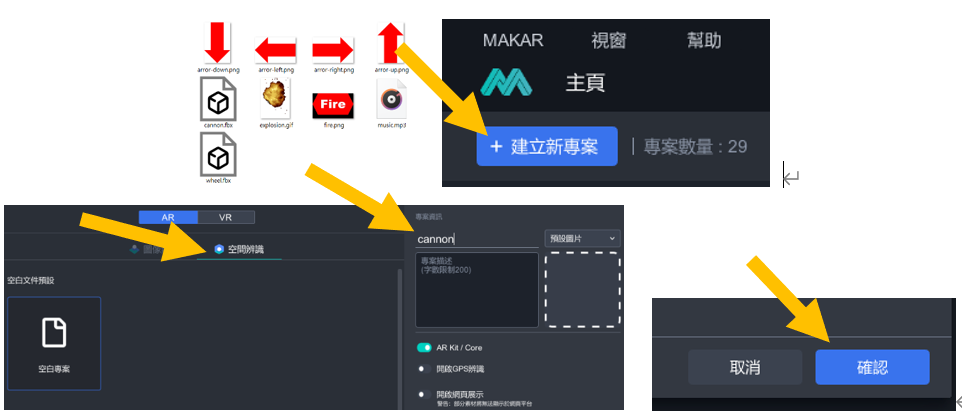
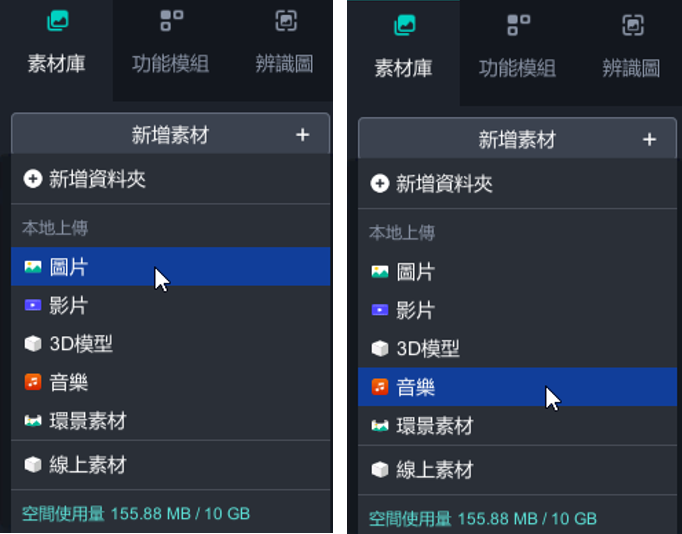
2. To the left side find and click "New Resources" > "3D Model"
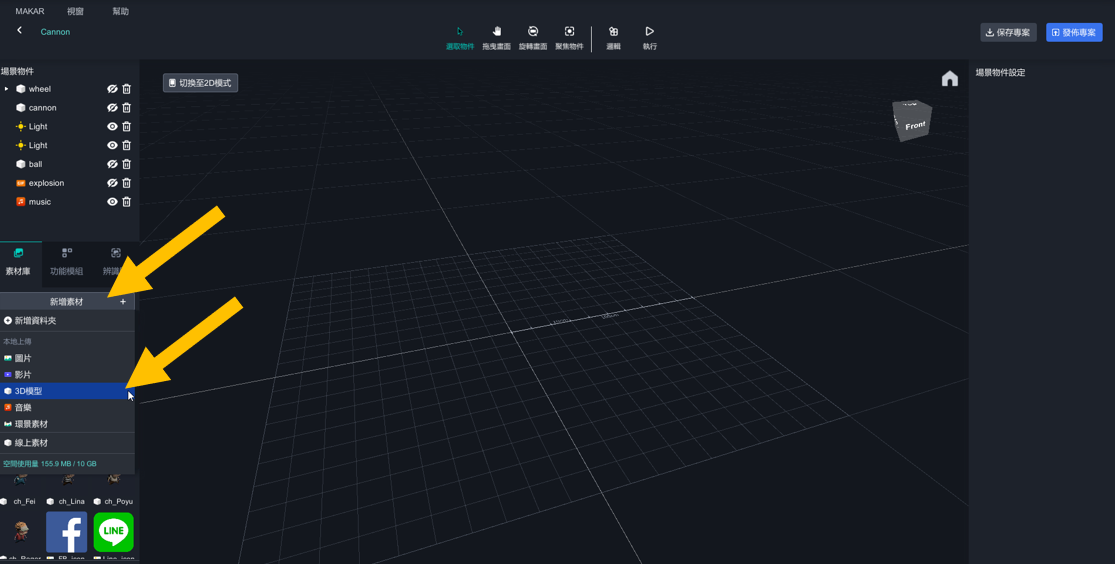
3. Find these two files and import them to the resources.
4. Import image and audio to the resources, Click "New Resources" > "image" and "New Resources" > "Audio".

5. All of the resources were done, drag them to the scene and start to edit objects and arrange logic.
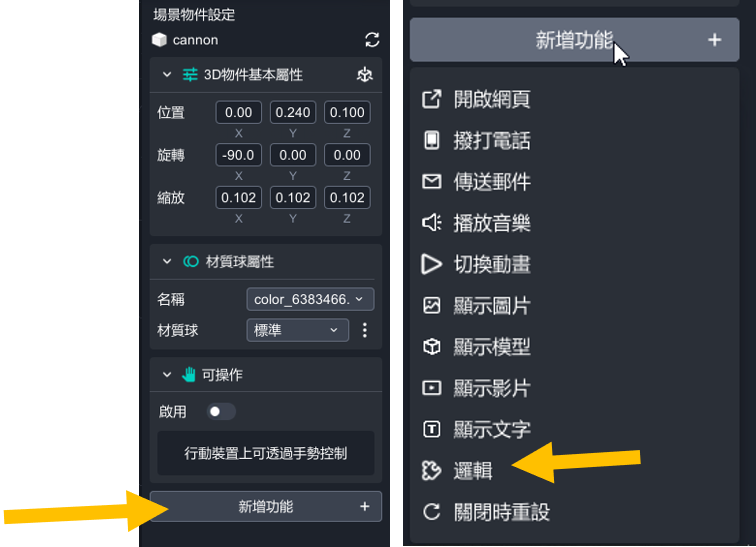
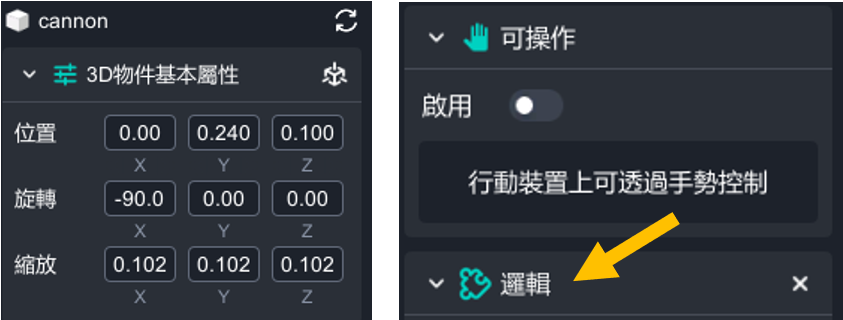
Drag the object of the cannon to the scene and edit position, rotate, scale. Cancel interactable and add action logic.
drag cannon to the scene.
6. Set the position, rotate, scale on the right side. And turn off the interactable.
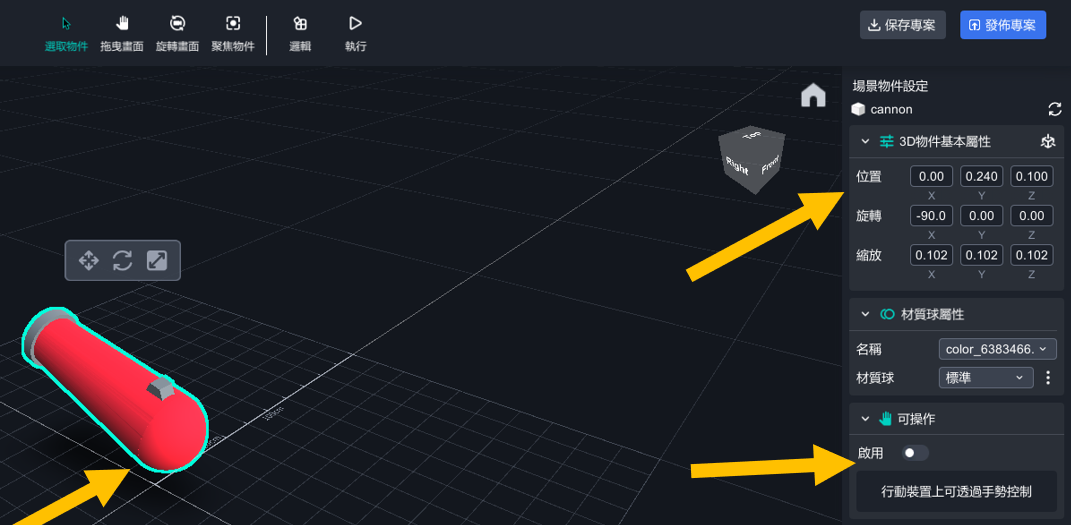
7. Click "Add Action">"Logic"
It's how it looked when you were done every steps.
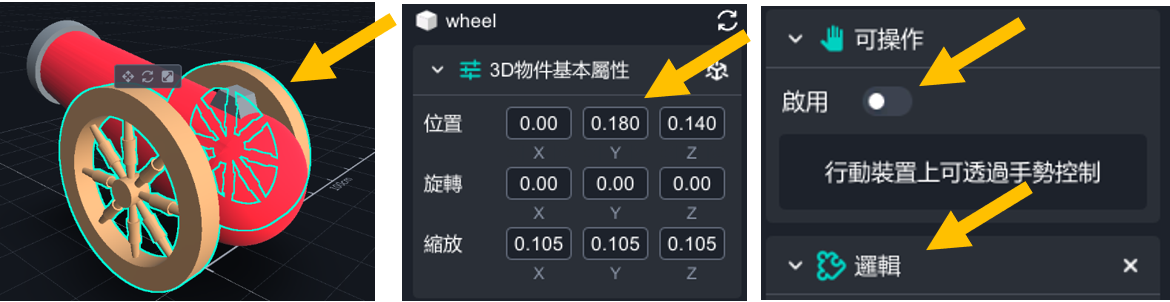
8. Drag the object of wheel to the scene and edit position, rotate, scale. Cancel interactable and add action logic.
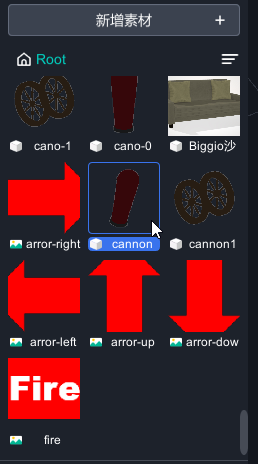
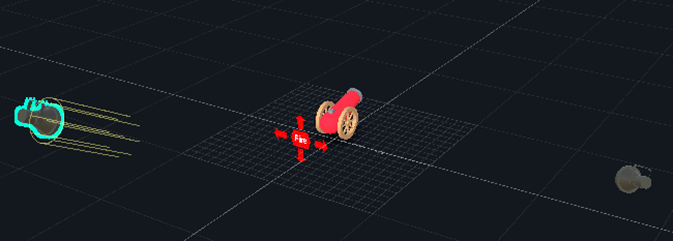
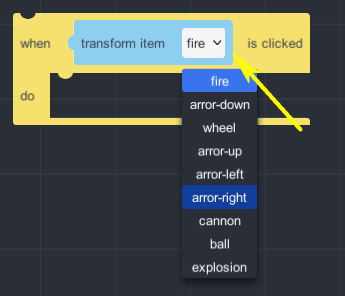
9. Next on, drag the image of arror-right,arror-left,arror-up,arror-down,fire to the scene, and edit position, rotate, scale.
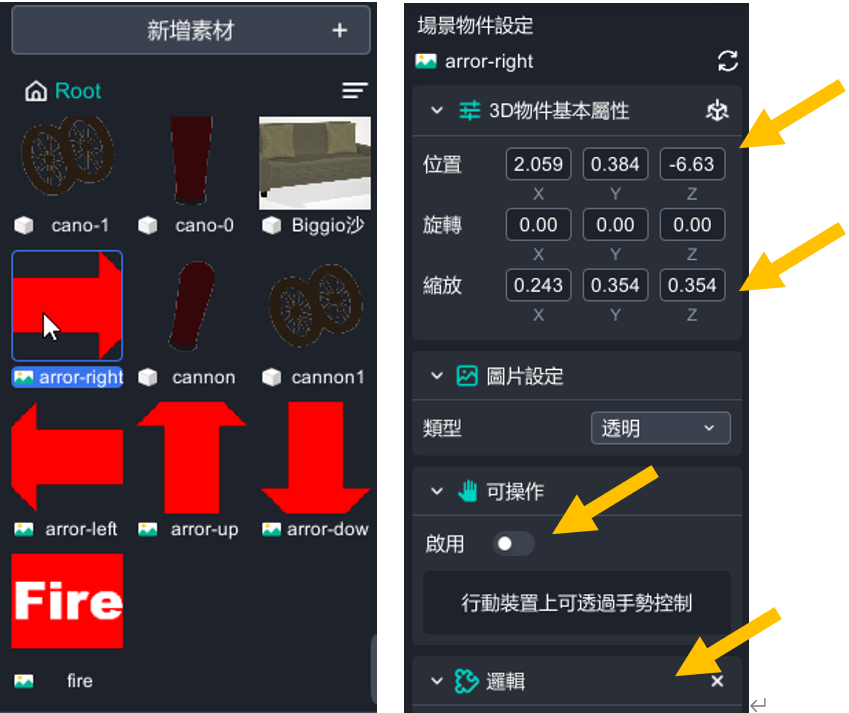
10. Cancel interactable and add action logic.
11. Drag the video of explosion to the scene, and edit position, rotate, scale. Cancel interactable and add action logic.
12. Drag the video of explosion to the scene, and edit position, rotate, scale. Cancel interactable and add action logic.
13. Drag the music to the scene and edit its position. Cancel interactable and add action logic.
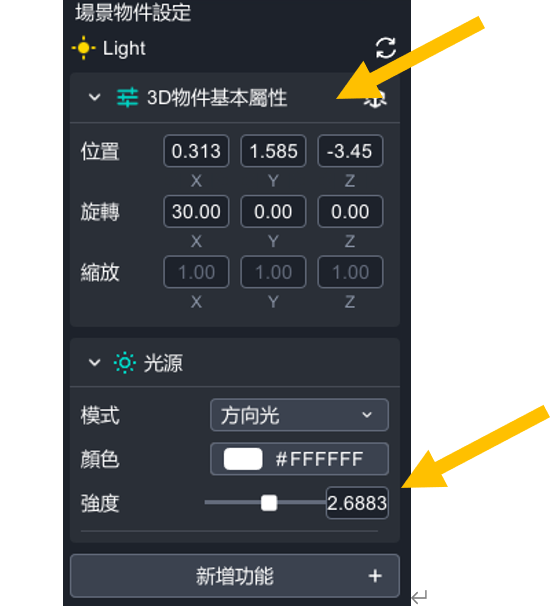
14. Add the light and drag it to the scene.

Edit the light’s position, rotate, and lighting strength.
【Group】
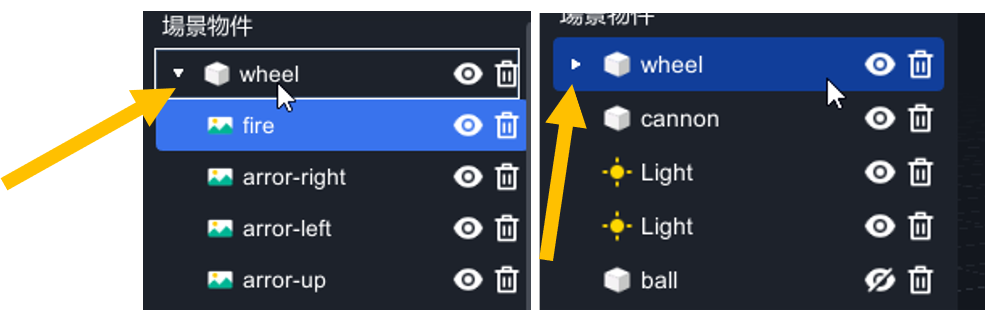
arror-rightt, arror-left, arror-up, arror-down, fire, drag these five objects to the "wheel" object to make them become a group. Being a group is the most convenient way in MAKAR. So that there would be a triangle icon on the left top. You can open and close these objects easily.
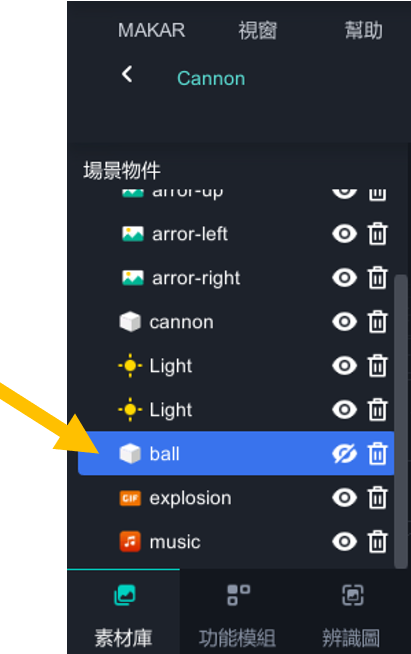
15. Drag Sphere to the scene, and edit the position and size. Cancel interactable and add action logic.
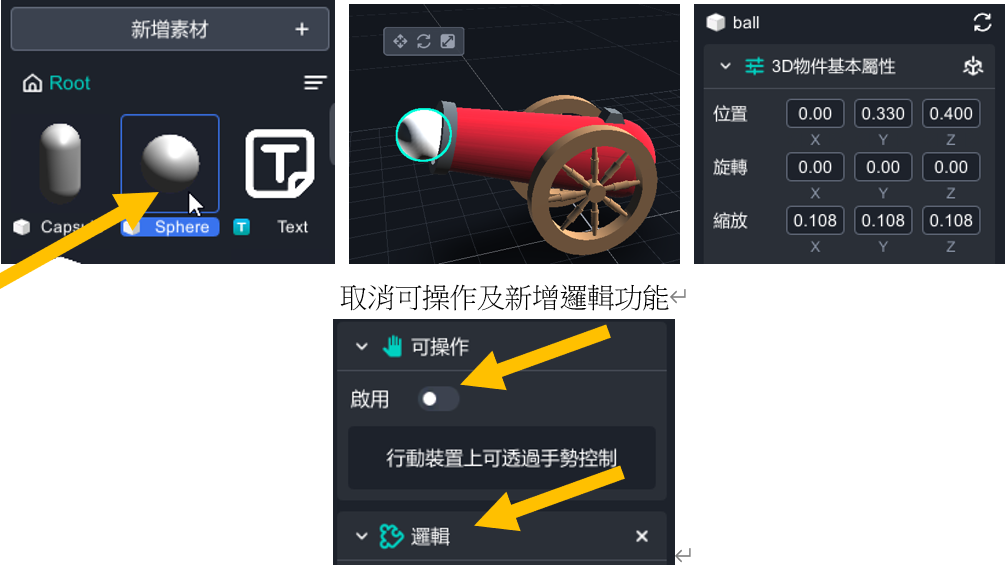
16. Click two times on the Sphere to edit the name into "ball”
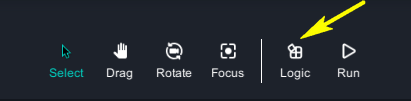
17. Click logic to arrange logic.
Logic:
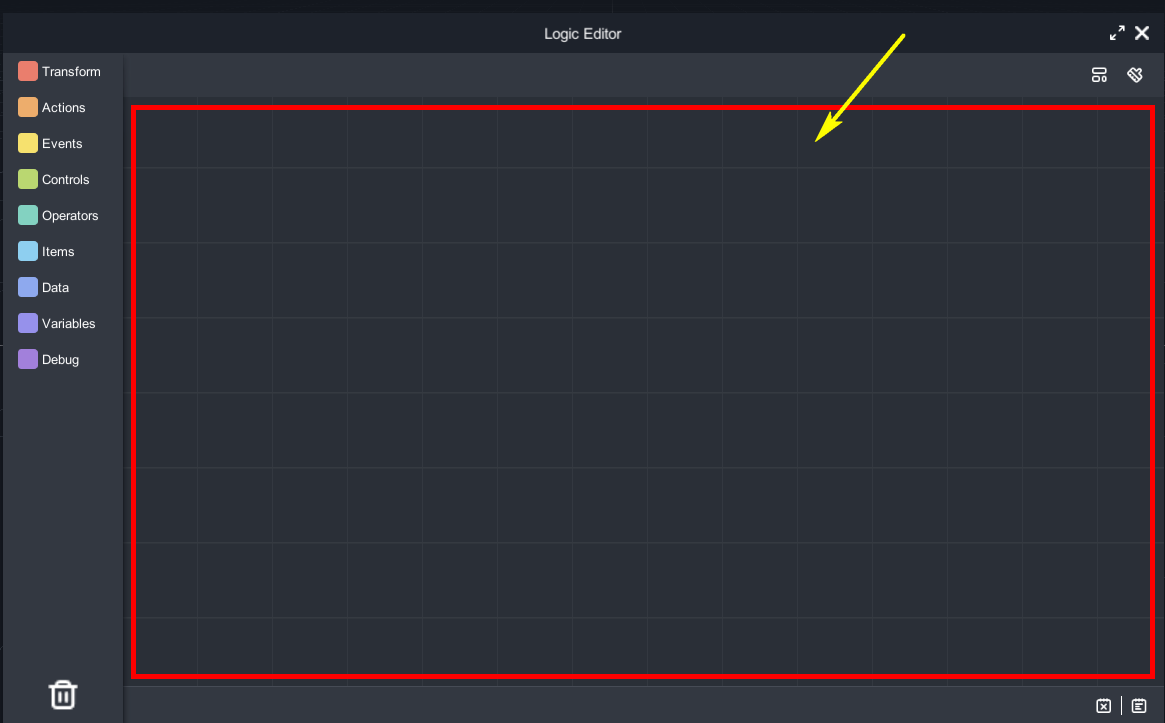
1. There are different blocklies on the left. Please drag one blockly into the blank space to start.

Use variables to design every deta.
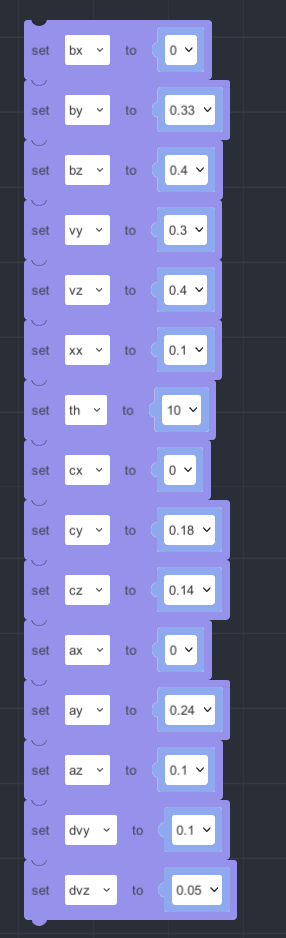
| variables name |
|
value | variables name | project | value | |
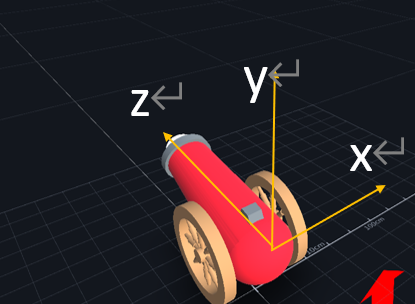
| ax | cannon-x coordinates | 0 | vx | ball-x direction velocity | 0 | |
| ay | cannon-y coordinates | 0.24 | vy | ball-y direction velocity | 0.3 | |
| az | Cannon-z coordinates | 0.1 | vz | ball-z direction velocity | 0.4 | |
| bx | ball-x coordinates | 0 | dvy | ball-y direction velocity effected by carron's height | 0.1 | |
| by | ball-y coordinates | 0.33 | dvz |
|
0.05 | |
| bz | ball-z coordinates | 0.4 | xx | canoon right left moving distance | 0.1 | |
| cx | wheel-x coordinates | 0 | th | setting the angle of cannon's up and down | 10 | |
| cy | wheel-y coordinates | 0.18 | bx1 | ball-x coordinates staging value |
||
| cz | wheel-z coordinates | 0.14 | by1 | ball-y coordinates staging value |
||
| bz1 | ball-z coordinates staging value |
【About variables】
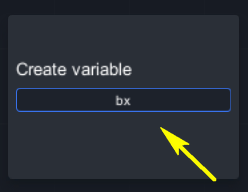
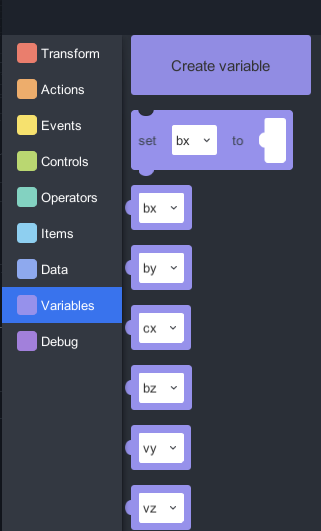
1. Drag the blockly of variables, and drop it to create a variable. Arrange every value according to this sheet.
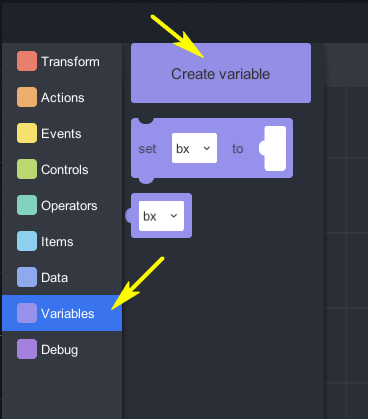
It is how it looked after creating variables.
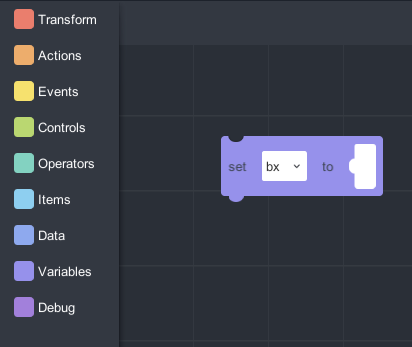
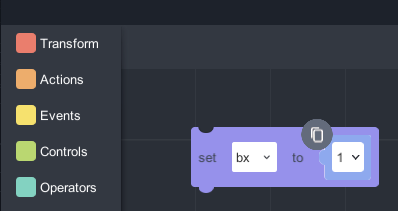
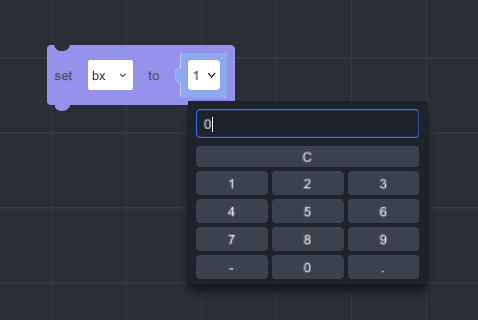
2. Drag bx blocky to the right.
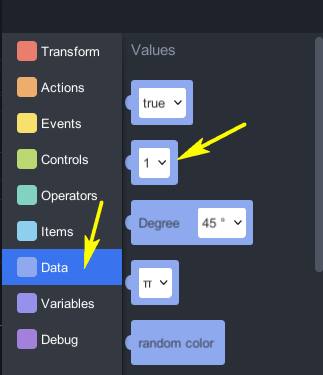
3. Click ”Data” > “1”, and drag it to the bx blockly’s right side. Edit value to 0.
【Editting Variables】
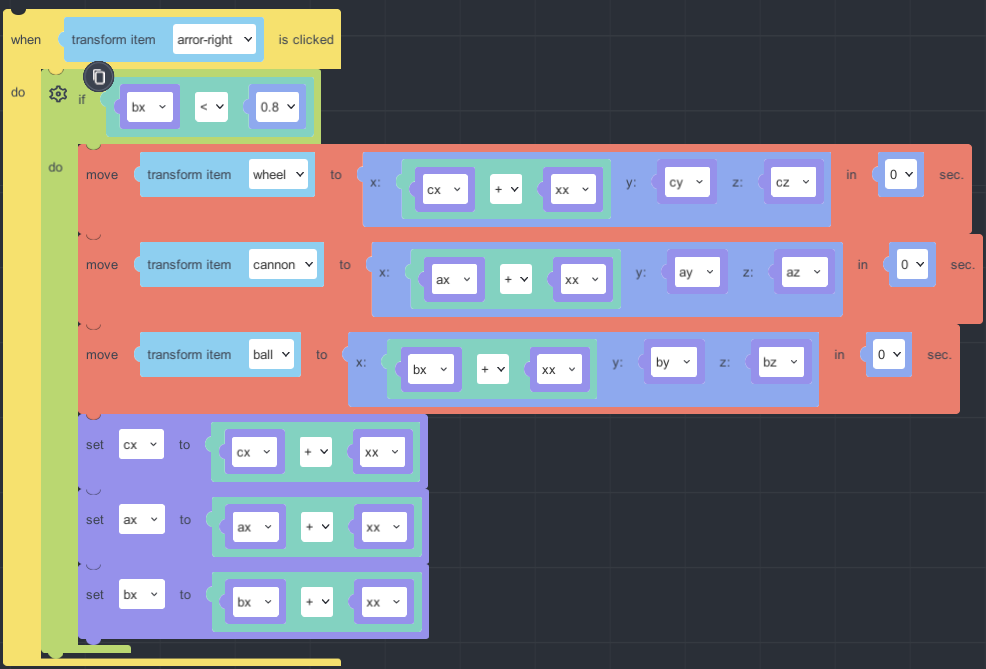
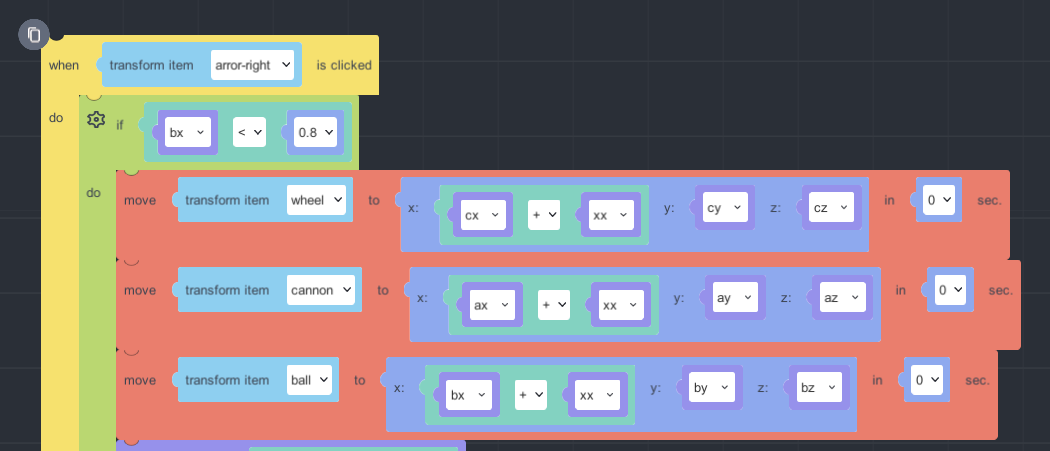
〔Click the right arrow and the cannon will be moved right.〕
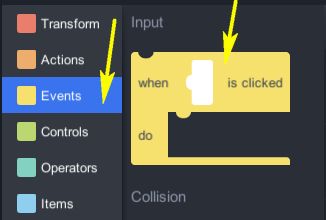
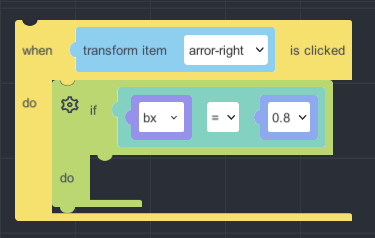
1. Click and drag “Events” > "when…is clicked". Choose “arror-rijgt”for the transform item.
2. Click and drag “Controls” > “If…” to the editing space.

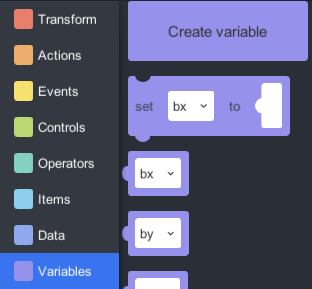
3. Click and drag “Variables” > “bx blockly” like this.
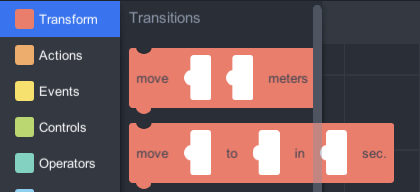
4. Click and drag “Transform” > “move…to…in…sec” to the editing space
5. Click and drag “Operators” > “...+...” to the editing space.
6. Click and drag “Variables” > "set…to…", and edit its different variables.

7. Please edit the last variables to finish moving right.
8. Click the copy icon on the left up side. So that it will come up a whole blockly.
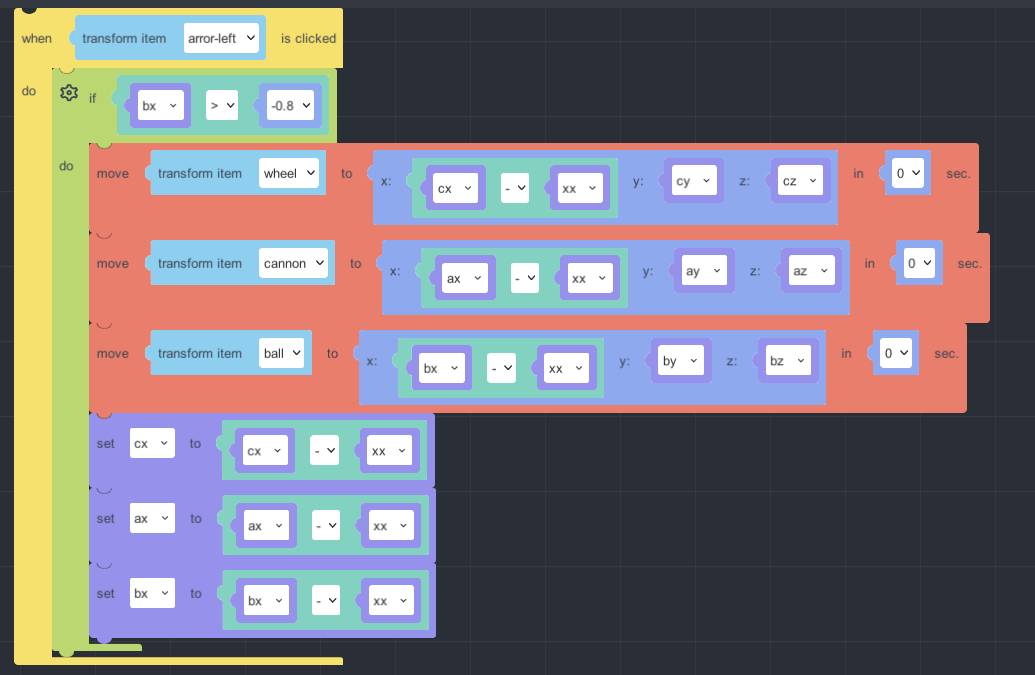
【Click the left arrow and the cannon will be moved left.】
Coped blockly can be edited for moving left.
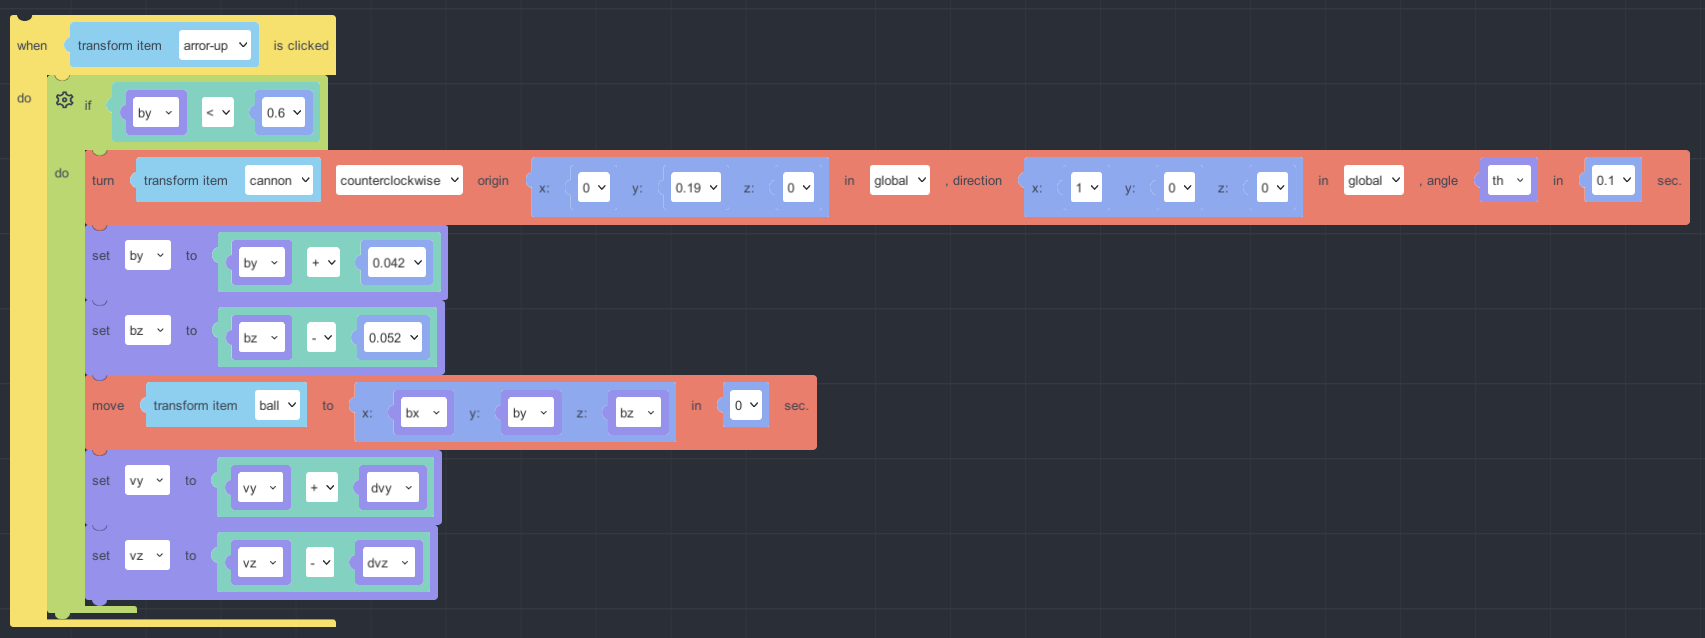
【Click the up arrow and the cannon will be upped.】
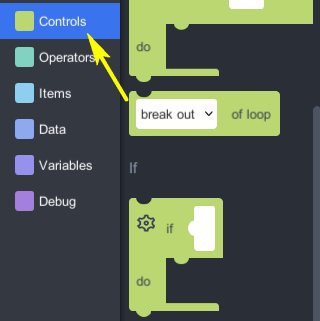
When by value is bigger than 0.6, it will be stopped.
【Click the down arrow and the cannon will be raised.】
When by value is smaller than 0.331, it will be stopped.
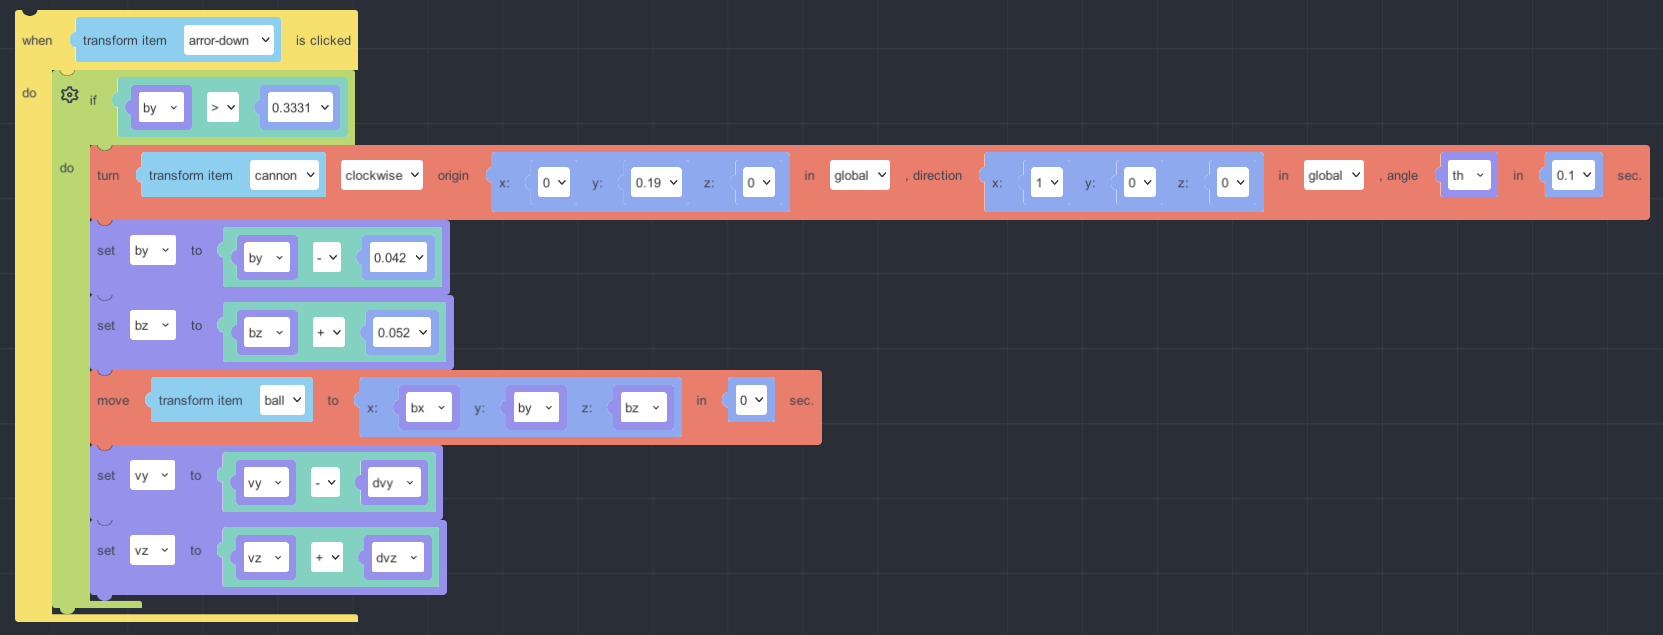
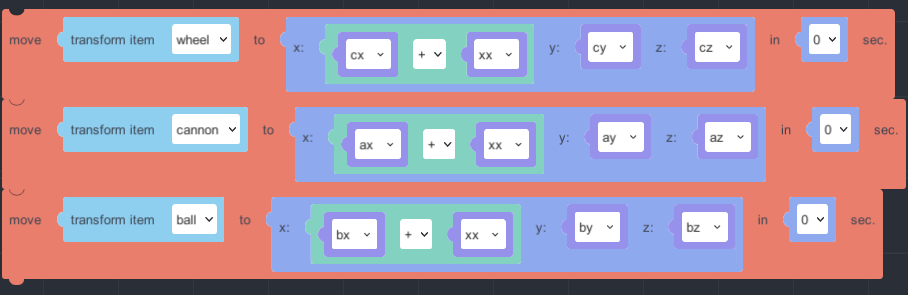
【Trajectory of a cannon】
※ vy value is the same as the variables of vy value.
1. vx value could be 0 because there is no speed of x direction for cannon.
vz is the z direction, when vz is bigger speed will faster.
Therefore every loop will go straight regulately.
z direction is motion with constant velocity.
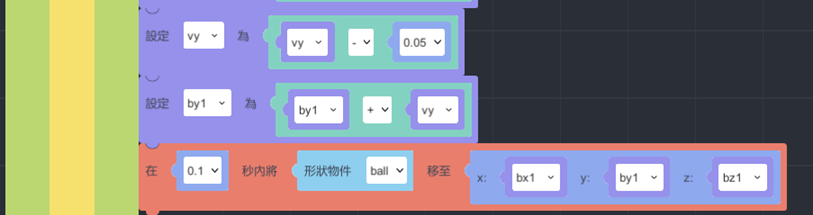
2.
y direction, after the cannon is shooted, it will be affected by gravity.
Up speed will be more and more small unitil achieving the max. And starts to go down.
vy value, it is original speed of going up, so that the more vy value it goes, the far height is.
And the vy value is going small by getting higher. It will decrease by 0.05 each time it is looped.
by1, it is y direction of updating staging value,the more by value increases, the less vy value decreases.
When height is going to max, vy value will go to minus, and then the cannon will go down.
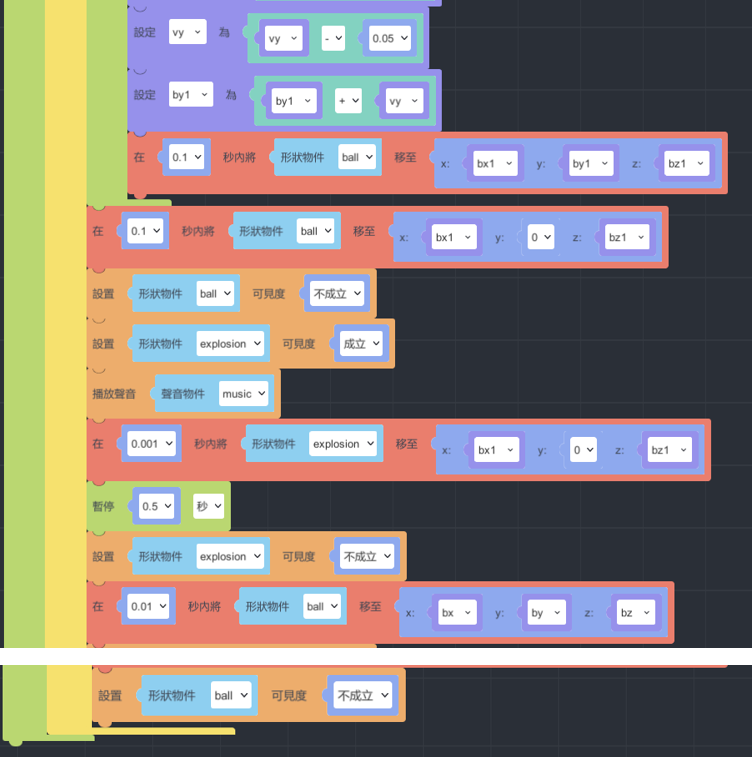
3. Finish all of canonn design.
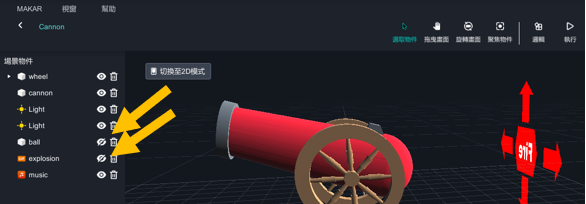
Finally, close the eye of “ball” and “explosion” to not show them.
4. Click “Publish”.

Cooperative Learning in MAKAR_Portal
Abstract
This tutorial gives an example of connecting different projects via project link, and it can be achieved the purpose of cooperative learning.
1. Introduction
In the past, it’s not available to have multiple creators to create a huge or complex task in the same project at the same time. Therefore, here is another method you can do. Separate a big project into several small parts, and link each other with “portal ”. This method may help to decrease the loading compared with only one person is responsible for making the entire project.
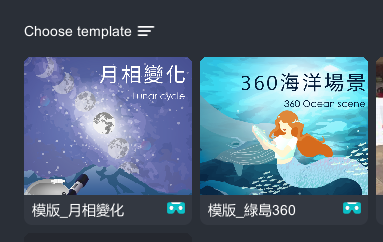
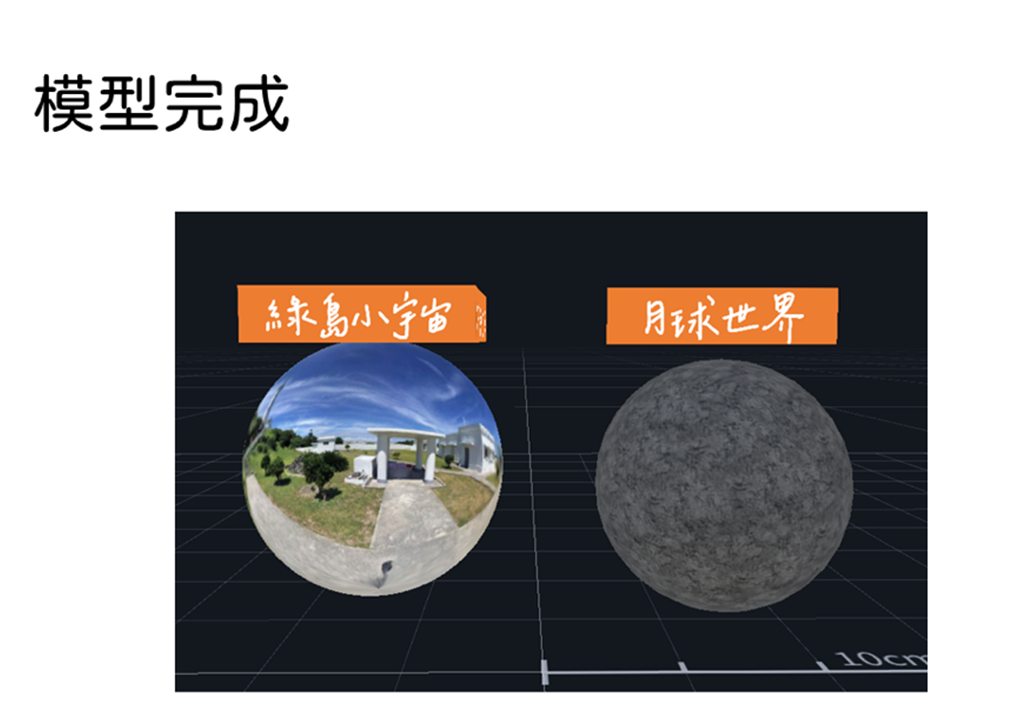
For the demonstration, there three students (A, B, C). Student A and B are individually create two VR projects. We used the templates in MAKAR editor for this tutorial(Green Island & Moon Phase).
2. Project link
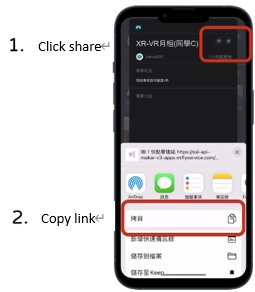
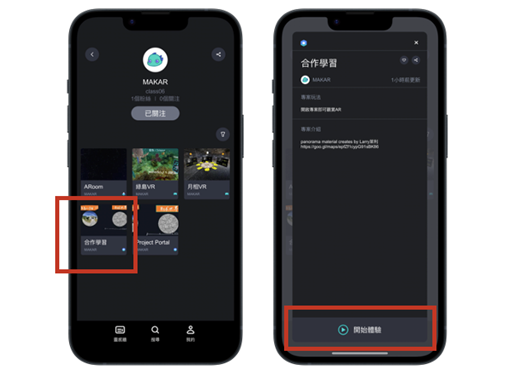
On mobile device(iPad/iphone), after selecting the project. There is a “sharing button” on the top right corner, then you can copy the link after you tapped the sharing button. And send this link to the student who is responsible for integrating the whole project(student C).
Student A(Green Island):https://is.gd/WdjCSk
Student B(Moon Phase):https://is.gd/zj1Rg5
3. Create an integrate project
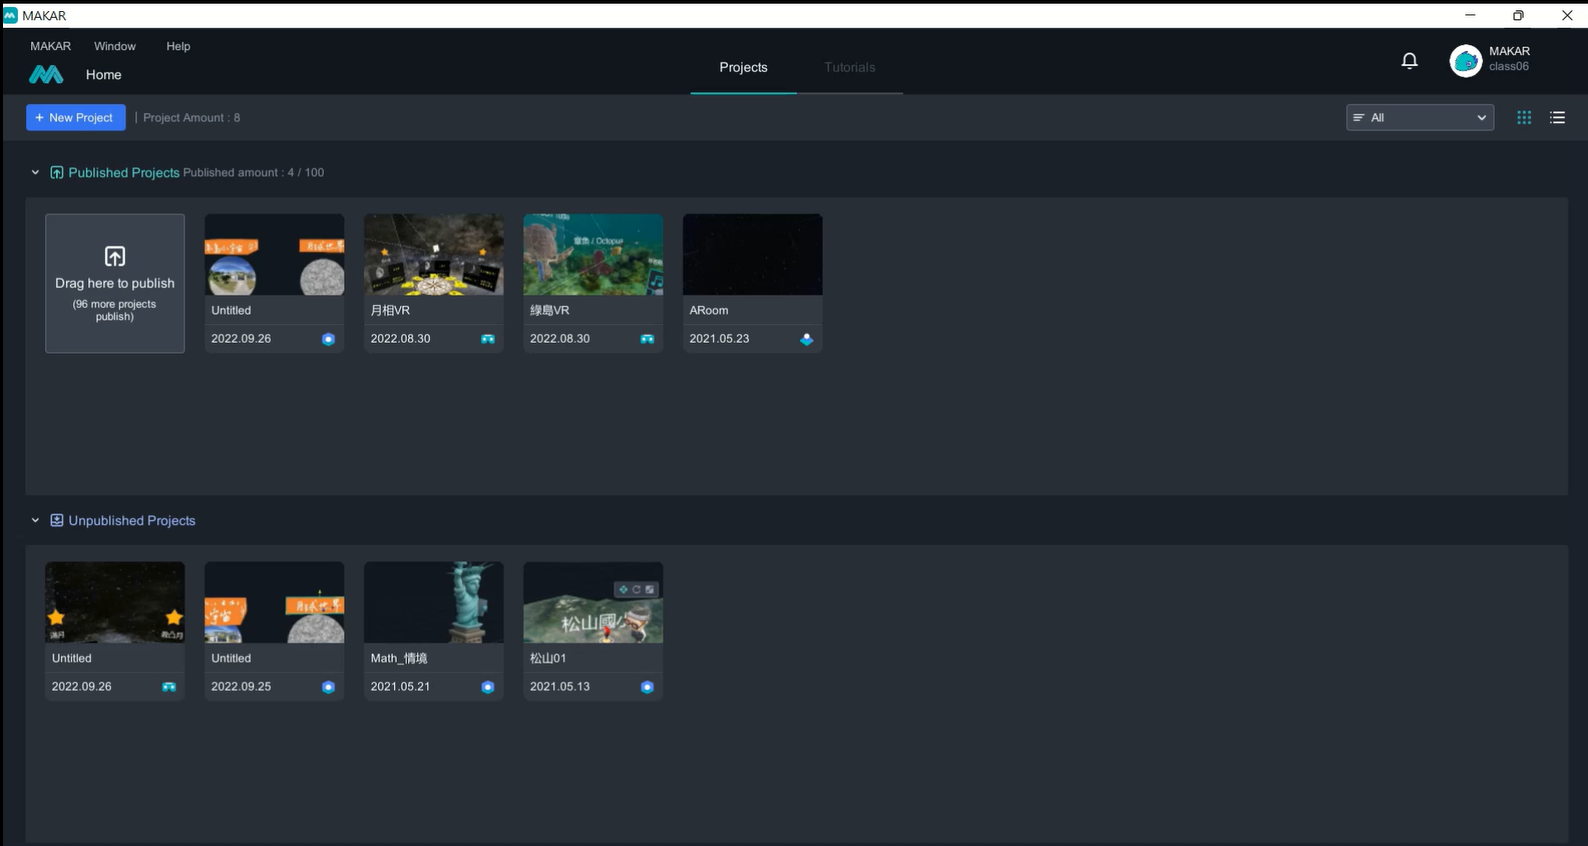
Click top left corner, “+New Project”
4. Space Recognition
In AR area, chose space recognition for this project, then click “ok” button

5. Import material
Material download link:
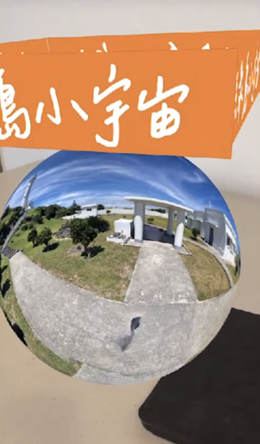
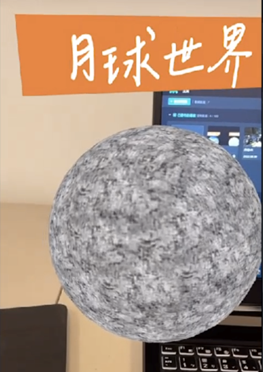
(a) In this tutorial, I will use sphere as a trigger. A panorama sphere is for Green Island project ( panorama image: https://goo.gl/maps/epfZf1cypG91sBK86 by Larry); Moon Phase project will use the 3D model provided by MAKAR online resource.
(b) Image material: there are created by PowerPoint.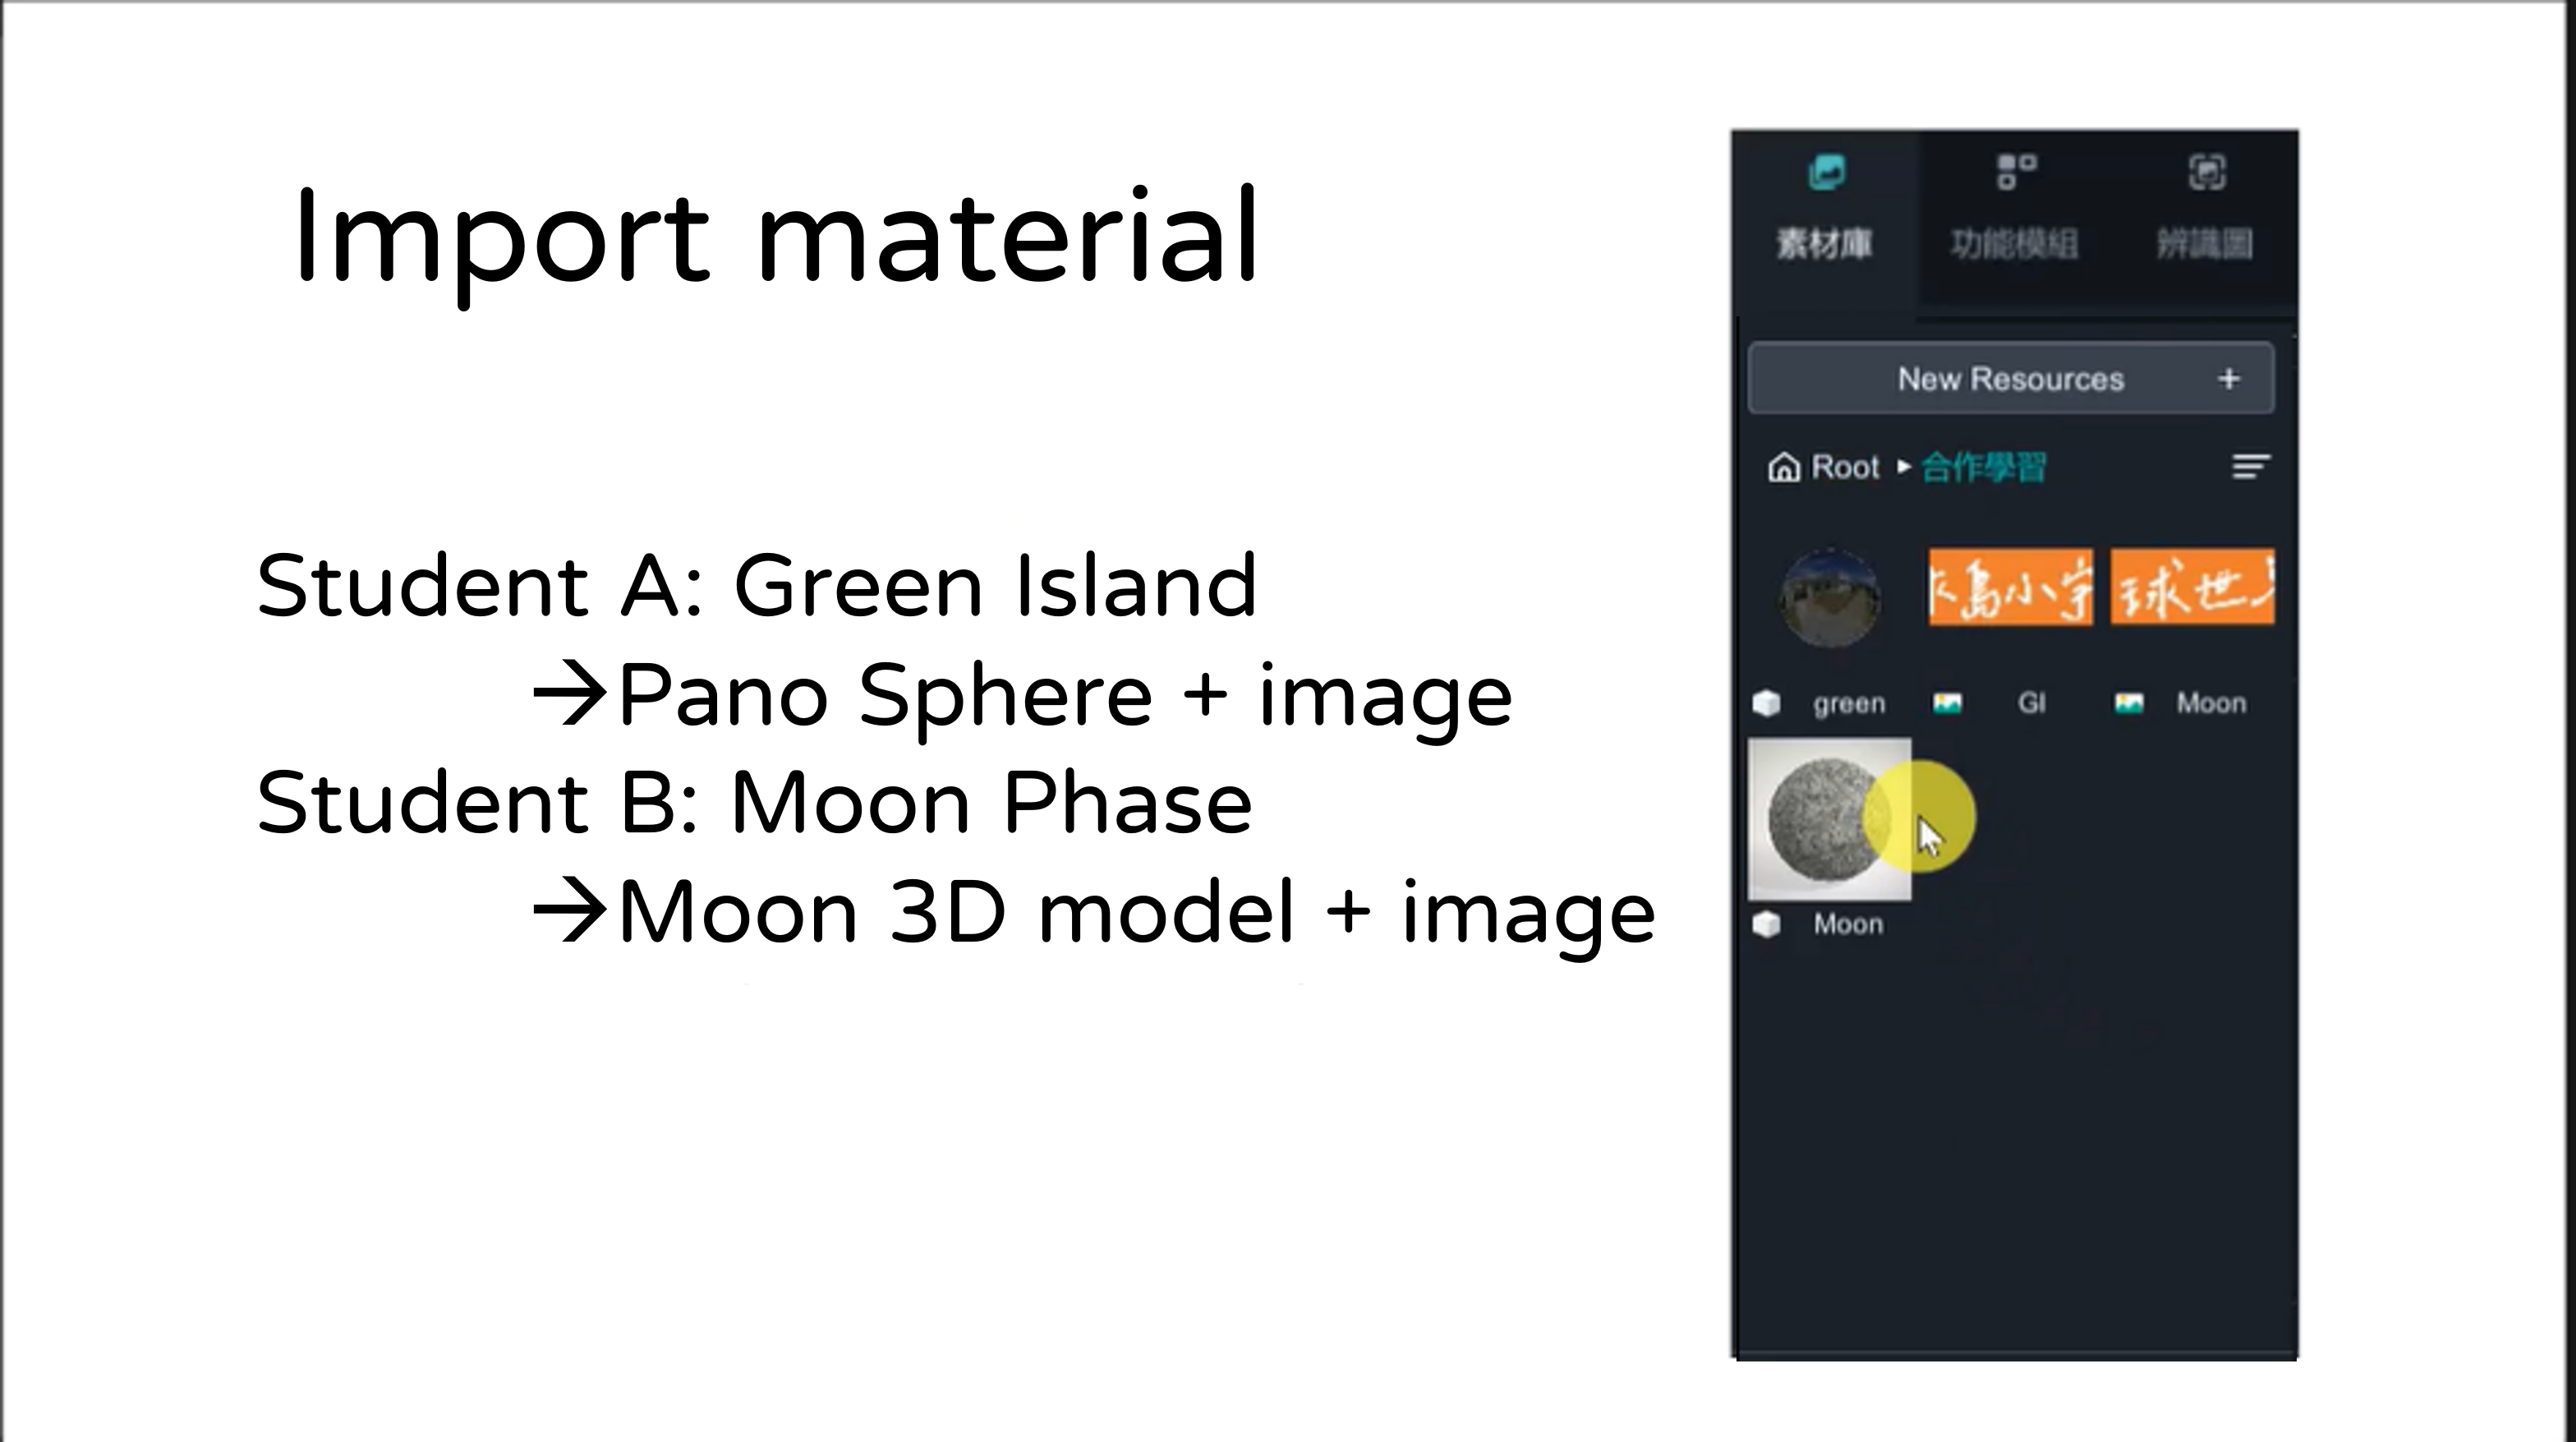
(c) Put 3D models in the canvas, rescale(Hotkey” R ”) their diameter around 10 cm may easily demonstrate on ordinary table. There is a scale in the center of the canvas if you zoom in. Later, if you need to demonstrate for full size, such as human body, then you can group them all and rescale them.
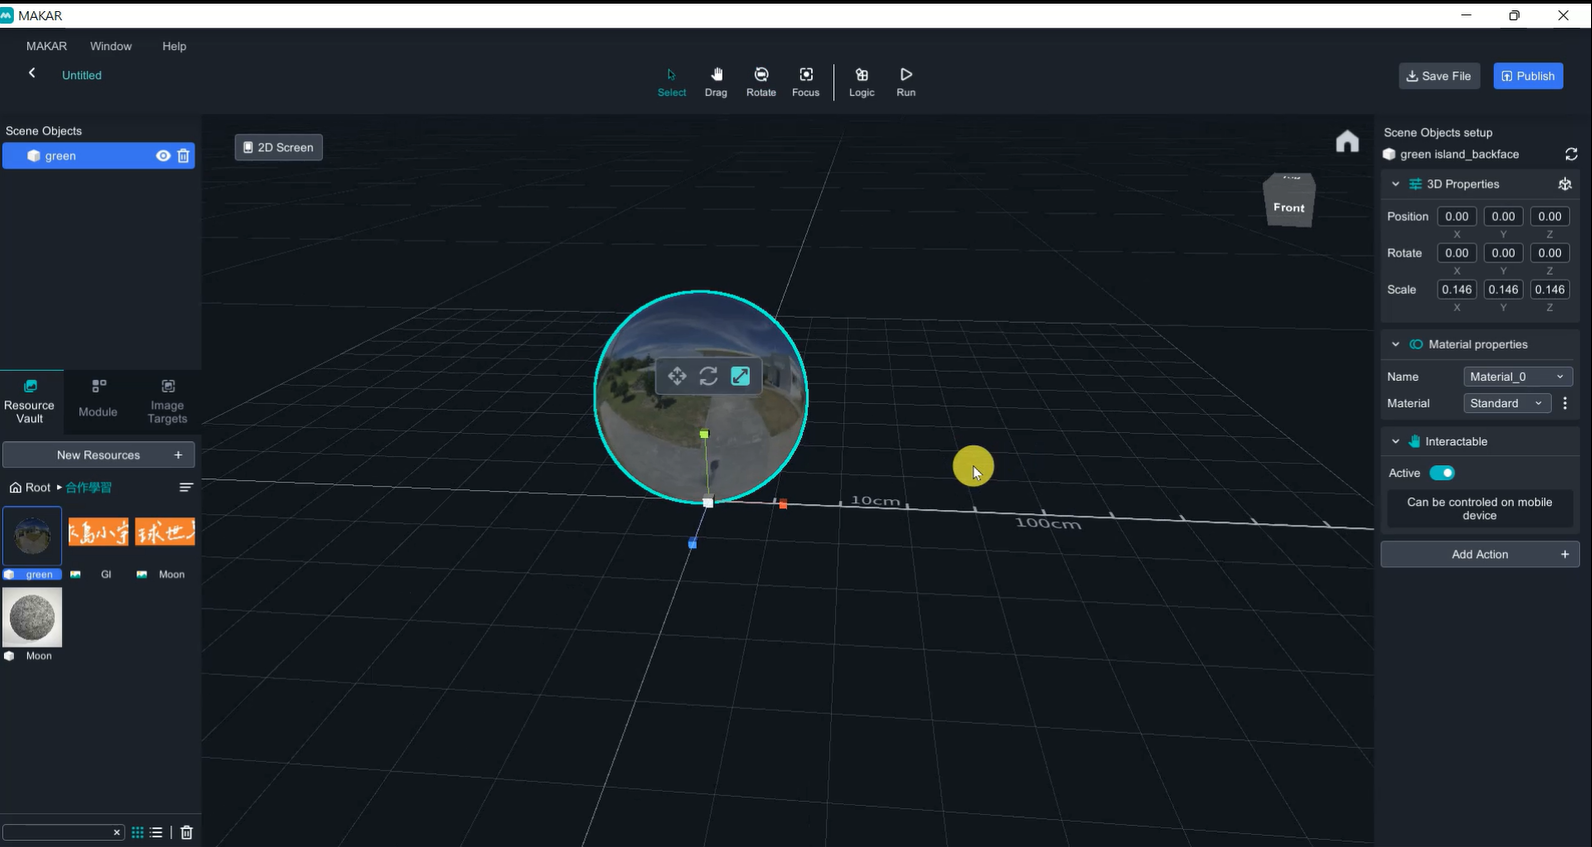
(d) Model action
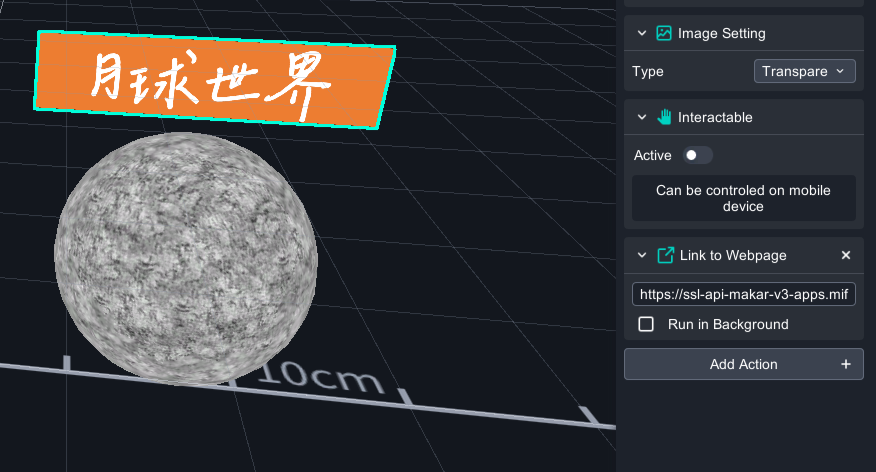
- Tap the sphere to show image: Select sphere🡪 Add action🡪 Show image 🡪 select the image
- Tap the image to teleport to another project: Select image🡪 Add action🡪 Link to Webpage🡪 Paste the project link.

Material Link
Student A(Green Island):https://is.gd/WdjCSk
Student B(Moon Phase):https://is.gd/zj1Rg5
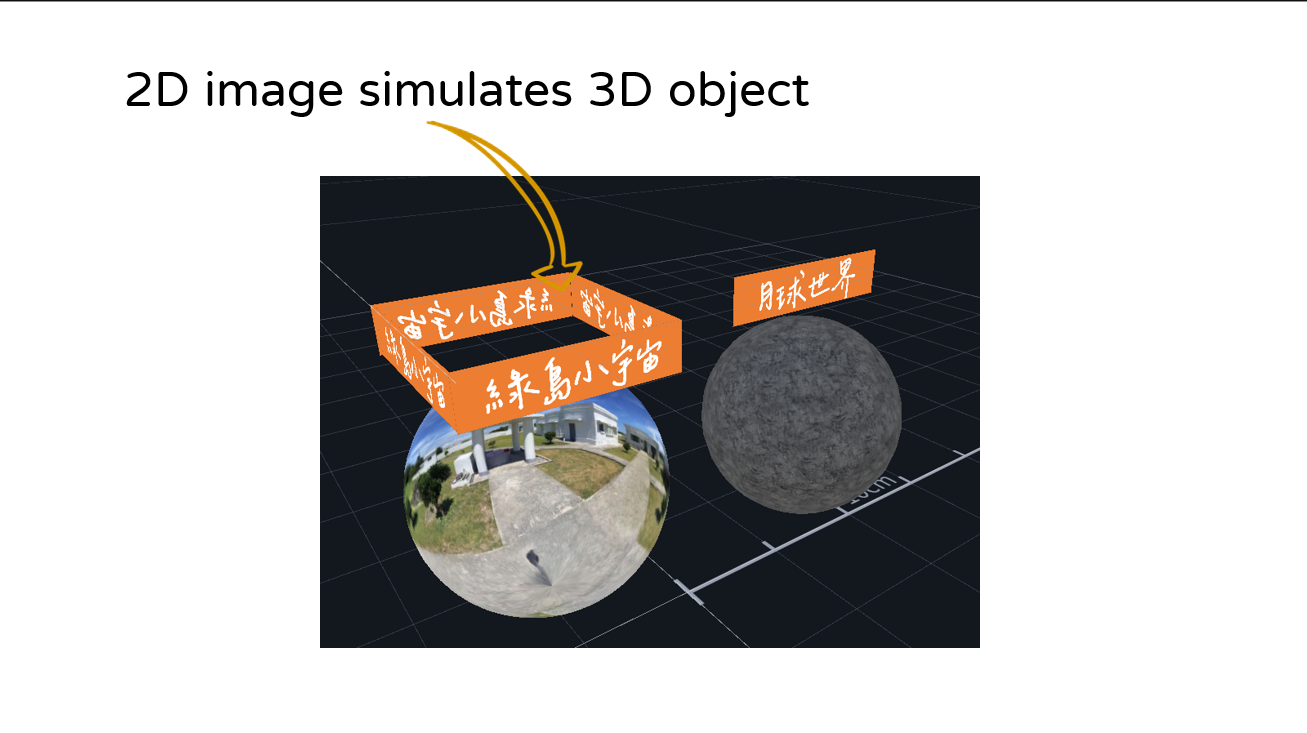
(e) 2D image simulates 3D object
2D image only shows full information in certain angle in 3 Dimensional world, which is very angle sensitive. Therefore, if we create a box with 2D images to mimic 3D object, it can almost cover every angle.
(f) Forbid image movement
Inactive the interactable will forbid the object be moved , it will reduce user accidently change the object in the canvas. Once the interactable is lucked, the action can still work, such as link to webpage and logic programming function.
(g) Finish
How to play
Click the application, type in the ID or scan the QR code to experience the AR/VR !
1. Install MAKAR application2. Scan QRcodec or search ID: class06

3. Select“ Project portal”, Click “ Start ”to activate.
Demo
※ Please keep in mind
1. The portal trick is only for IOS device so far, it’s unavailable for Android device.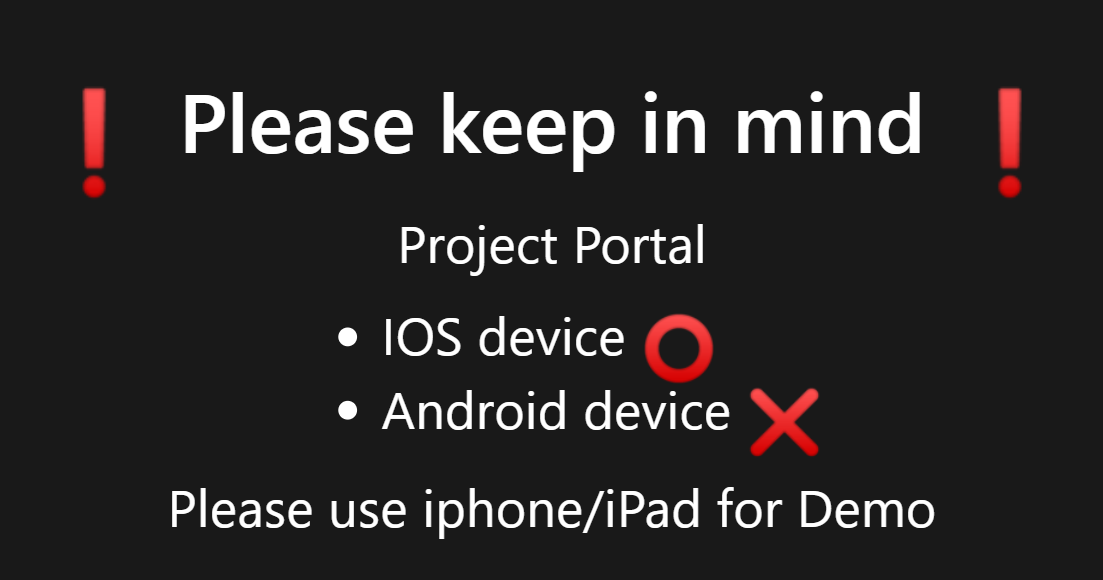
2. Project portal (Available)
- Account:Projects in same account, Projects in different account
- Project type:AR(AR target), AR(space recognition), VR are all available for teleporting to each other
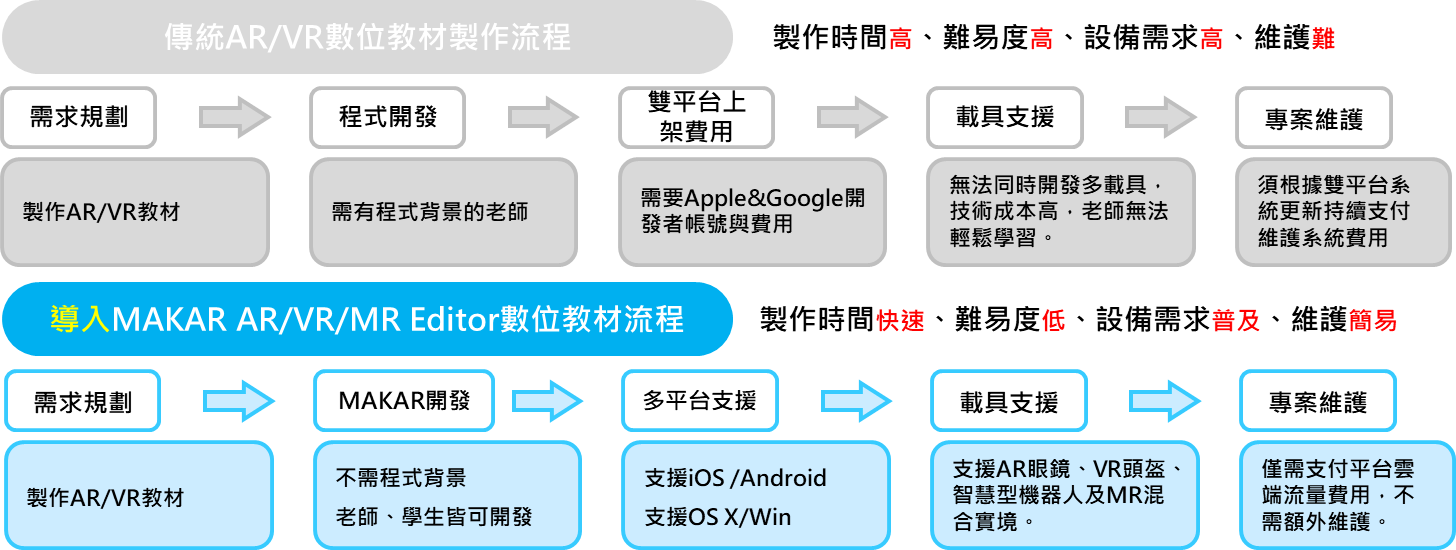
前瞻計畫ARVR教材開發重點
近年來因應數位化的學習,許多學校已經融入VR相關的硬體規劃,其中包含手機、平板、HTC VIVE(PC VR)、HTC Focus及EPSON AR…等,過去通常使用相關的現成AR/VR教材或內容,前瞻2.0許多單位大規模導入AR/VR硬體設備,卻苦無數位內容之開發平台,過去許多老師在製作數位教材都需要學習程式語言技術,需要花費大量的時間與成本,透過MAKAR進行數位教材的創建,並且於創建完成後,發佈到各個不同的行動載具中進行觀看。
行動載具分析表
在前瞻計畫中,相信已經有許多學校已經採購了大量的平板電腦及VR頭盔的行動載具,本圖表針對近年來許多學校已採購之硬體提出行動載具分析表,透過本分析表,能夠了解在硬體上的搭配與使用狀況。
| 行動載具分析表 | ||||
|---|---|---|---|---|
| 型號 | 類型 | 外接 | 載具支援 部分教育雲教材支援 |
MAKAR 支援 |
| HTC Focus Pro | PC-VR | - | VR | 無 |
| HTC Focus / Focus Plus | 一體機-VR | - | VR | 支援 |
| Oculus Quest 2 | 一體機-VR | - | VR | 支援 |
| XRSPACE | 一體機-VR | - | VR | 支援 |
| Cardboard | 手機VR | 手機 | VR | 支援 |
| EPSON AR Glass |
AR眼鏡 | 有控制器 或攝影機 |
AR/VR | 支援 |
| 手機/平板 | 支援空間辨識 | - | AR/VR/MR | 支援 |
| 手機/平板 | 陀螺儀 | - | AR/VR | 支援 |
教育雲ARVR教材表
因應前瞻基礎建設實施計畫,教育部數位教材支援表(以ARVR支援條列)
| 課程編號 | 課程名稱 | 行動載具 | AR眼鏡 | VR頭盔 | |||||
| 智慧型手機 | Android 手機 |
平板電腦 | Epson AR BT-40S | HTC FOCUS | Oculus | Acer VR | VR頭盔(VICO) | ||
| 108-A01 | 我的寵物是蝴蝶 | V | V | V | V | - | - | V | - |
| 108-A02 | 探索水生生物世界的秘密 | V | V | V | V | - | - | V | - |
| 108-A03 | 太陽與植物世界課程之AR教材 | V | V | - | V | - | - | - | - |
| 108-A04 | AR Bot | V | V | - | - | - | - | - | - |
| 108-A05 | 翻轉教室YOUTUBER | V | V | - | V | - | - | - | - |
| 108-A08 | 單軸經緯儀之主軸模型結合擴增實境於工程測量課程 | V | V | - | V | - | - | - | - |
| 108-T01 | 虛擬天文教室二 | V | V | V | V | V | - | V | - |
| 108-T02 | 飛閱臺灣體繪地形 | V | V | V | V | - | - | V | - |
| 108-V01 | 酸鹼鹽之化學虛擬實境教材開發與教學 | - | - | - | - | - | - | - | - |
| 108-V02 | 科學調查實驗室--神秘的摩電球 | - | - | V | - | - | - | V | - |
| 108-V03 | 太陽系大發現日心月相星座 | V | V | - | - | V | - | - | - |
| 108-V04 | 電腦硬體組裝虛擬實境教材開發 | - | - | V | - | - | - | V | - |
| 108-V05 | 醫學人體排泄泌尿生殖系統與植物運輸系統之介紹 | V | V | - | - | - | - | - | - |
| 108-V06 | 穿越時空學電子 | - | - | - | - | V | - | - | - |
| 108-V07 | VR工業配線實習 | - | - | - | - | - | - | - | - |
| 108-V08 | 動物的循環系統VR探索之旅 | - | - | - | - | - | - | - | - |
| 107-A01 | 台灣海岸環境變遷 | V | V | V | V | - | - | V | - |
| 107-T01 | 百年好合萬金盟 | V | - | - | V | V | - | - | - |
| 107-T02 | 國中理化第三冊之電池與電解 | V | V | - | V | V | - | - | - |
| 107-T03 | 自然科學 - 植物課程 | V | V | - | V | - | - | - | V |
| 107-T04 | 天文觀測 原名 : 科學科技虛擬一點通 | - | - | - | V | V | - | - | - |
| 107-T05 | 虛擬天文教室二 | V | V | - | V | V | - | - | - |
| 107-T06 | 生物的演化 | V | V | - | - | V | - | - | - |
| 107-V00 | 電流電壓與歐姆定律 | - | - | - | - | - | - | - | - |
| 107-V01 | 地球科學天文探祕之虛擬星象館 | - | |||||||
3131922-5G New Technology Learning Demonstration School Series Study
- #Research
- #AR
- #VR
- #NationalTeacherResearchCenter
- #XR
- #RealityEducation
- #Teachers
- #VRCourses
- #ARCourses
- #TeacherResearch
- #MAKAR
| Course Information |
|
||||||||||||||||||||||||||||||||
| Registration Information |
|
||||||||||||||||
| Course unit |
|
||||||||
| other |
|
3088204- XR Practice Application (Advanced)
- #Research
- #AR
- #VR
- #NationalTeacherResearchCenter
- #XR
- #RealityEducation
- #Teachers
- #VRCourses
- #ARCourses
- #TeacherResearch
- #MAKAR
| Course Information |
|
||||||||||||||||||||||||||||||||
| Registration Information |
|
||||||||||||||||
| Course unit |
|
||||||||
| other |
|
3088200- XR Practice Application (Beginner)
- #Research
- #AR
- #VR
- #NationalTeacherResearchCenter
- #XR
- #RealityEducation
- #Teachers
- #VRCourses
- #ARCourses
- #TeacherResearch
- #MAKAR
| Course Information |
|
||||||||||||||||||||||||||||||||
| Registration Information |
|
||||||||||||||||
| Course unit |
|
||||||||
| other |
|
.JPG)
.JPG)
.JPG)
.JPG)
.JPG)
.JPG)
.JPG)
3124796-VR reality design practical application course (online course)
- #Research
- #AR
- #VR
- #NationalTeacherResearchCenter
- #XR
- #RealityEducation
- #Teachers
- #VRCourses
- #ARCourses
- #TeacherResearch
- #MAKAR
| Course Information |
|
||||||||||||||||||||||||||||||||
| Registration Information |
|
||||||||||||||||
| Course unit |
|
||||||||
| other |
|
Link :Course code 3124796
Beishi Yanxizi No. 1100712009

| Approval number | Beishi Yanxizi No. 1100712009 |
| Study name | 110 Taipei Teachers e-textbook Innovation and Teaching Research Workshop: Development and Application of PowerDirector's Textbook-AR Augmented Reality |
| Study hours | 3 |
| organizer | Taipei Teachers' Research Center |
| Study object one | 109 school year Taipei teacher e-textbook development teacher and Taipei City teacher |
| Study object two | Open Inter-School Registration |
| Study object three | other |
| Number of students | 0 people every school 0 people |
| Study start date | 2021/7/26 |
| End of study | 2021/7/26 |
| Study unit address | Online meeting room  |
| Study classroom | Online course |
| Study goals | In line with the promotion of the 108 syllabus, promote the application of augmented reality (AR) and virtual reality (VR) to the teaching scene to enhance teachers' innovative teaching mode. |
| Study method | |
| ways of registration | Online registration |
| Selection instructions | 109 school year Taipei teacher e-textbook seed teachers are given priority admission |
| Study undertaker | Lin Qiuwan |
| Undertaker phone | 28616942#236 |
| Implement the plan |
Study Information
.jpg)
.jpg)
.jpg)
.jpg)
.jpg)
.jpg)
.jpg)
.jpg)
.jpg)
.jpg)
.jpg)
.jpg)
.jpg)
.jpg)
XR Practical Applications Course (Basic)
XR practical applications course (Basic)
Approval Number:Taipei City seminar No. 1100129033
Seminar:XR practical applications course (Basic)
Organizer:Taipei Municipal Nanmen Junior High School
Date:2021/4/23~2021/4/23
This course is designed to learn how to make VR campus digital tours through VR 360 photography, VR storyboard, and by making 2D materials. After finishing materials making, import MAKAR to create AR,VR learning plans or contents. Teachers can edit VR campus tours by themselves, and promote VR campus popularization in Taipei City effectively.
Learning Goals:
1.AR/VR experience
2.VR360 making
3.VR photoes taking
4.VR project planning
5.Basic VR project making
Visit Taipei City Teachers’ In-Service Information
Select Unit Of Issued and search:Taipei Municipal Nanmen Junior High School
XR Practical Applications Course (Advanced)
XR practical applications course (advanced)
Approval Number:Taipei City seminar No. 1100129034
Seminar:XR practical applications course (Advanced)
Organizer:Taipei Municipal Nanmen Junior High School
Date:2021/4/30~2021/4/30
Targets of seminar: 20 teachers enrolled by recommendation from their schools
-----This course is designed to learn how to make VR campus digital tours through VR 360 photography, VR storyboard, and by making 2D materials. After finishing materials making, import MAKAR to create AR,VR learning plans or contents. Teachers can edit VR campus tours by themselves, and promote VR campus popularization in Taipei City effectively.
Learning Goals:
1.Advanced VR production
2.Scene-to-scene transition and setting
3.VR Q&A production
4.Project experience and display
Visit Taipei City Teachers’ In-Service Information (Mandarin only)
Select Unit Of Issued and search "Taipei Municipal Nanmen Junior High School"
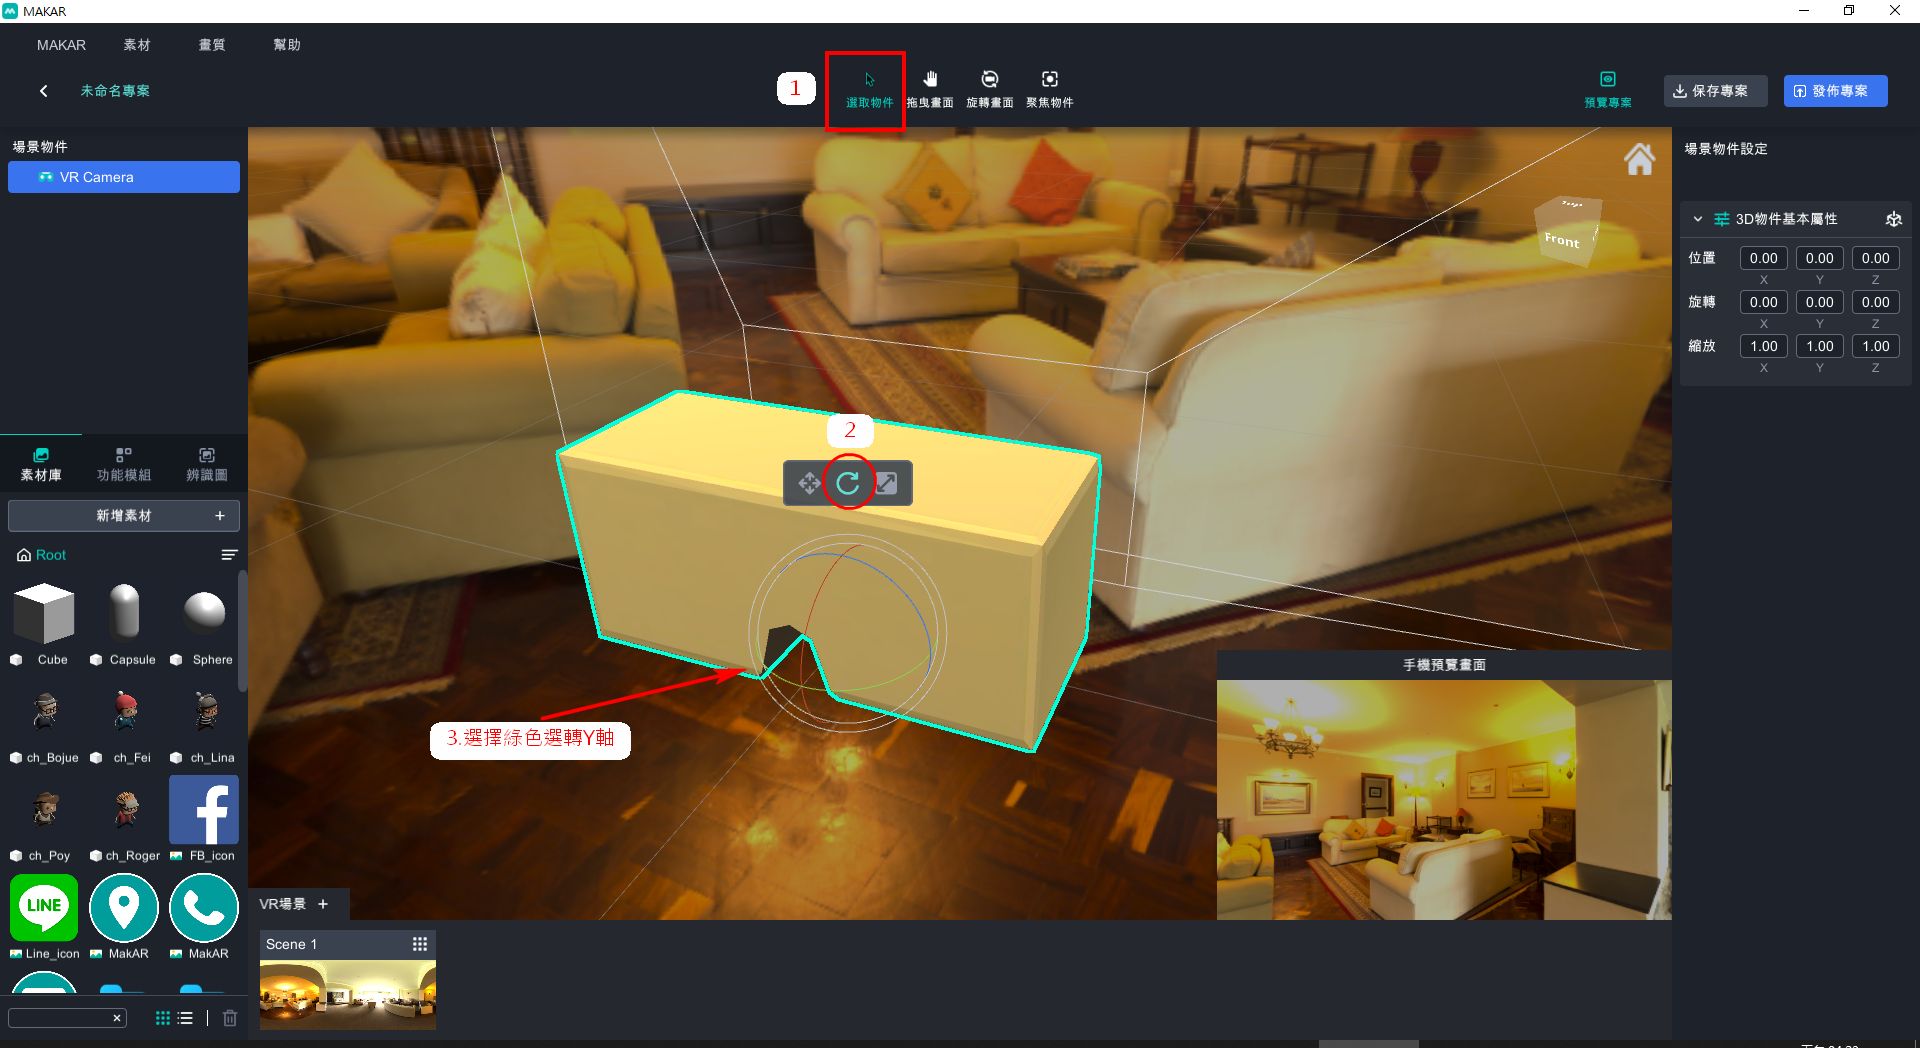
Missing VR Viewpoint
When you are viewing your VR project and discover that the viewpoint is missing:
Or the screen is howing flickering white block.
.jpg)
This issue is caused by accidentally scaled VR Camera on your project during editing process.
To solve it, login to your MAKAR Editor, go into the VR project, select VR Camera, and press reset button on upper right corner.

Reminder:
Please do not move or scale VR Camera.
Use only rotation tool to rotate VR Camera to preview your VR scene.