-
- The first AR coloring card in Taiwan- Bring 3DMommy's image into to life
- Bayer integrates MIFLY AR Technology , teach you how to help your dog relax
- Halloween combines with AR, shining New Taipei City
- Mei hao dahu
- Taiwan Railway celebrates 132nd anniversary exhibition, create immersive AR interactive APP together with MIFLY
- Zhu Ming Art Museum X MAKAR launches WEB AR painting experience
- CTV celebrates its 50th anniversary, especially using WebAR technology to add joy!
-
- AR Envelope for Beginner –New Year Rabbit
- AR Envelope for Advancedr –Lucky Rabbit
- MAKAR Magic index
- Spring Festival AR Animation Tutorial
- Logic-Macaron AR Animation
- MAKAR Mask project
- MAKAR Santa Claus - boning
- Metaverse Draw Lots-Using Variable and Lists of MR Project
- Use MAKAR to learn physics-Let's make an AR cannon!
- Cooperative Learning in MAKAR_Portal
-
- [3A Emerging Technology Center] Lantern Festival sky lantern wishing pool, MR virtual world is at your disposal
- 3131922-5G New Technology Learning Demonstration School Series Study
- 3088204- XR Practice Application (Advanced)
- 3088200- XR Practice Application (Beginner)
- 3124796-VR reality design practical application course (online course)
- Beishi Yanxizi No. 1100712009
App User Interface Navigation
- 2019-09-12
- by MAKAR
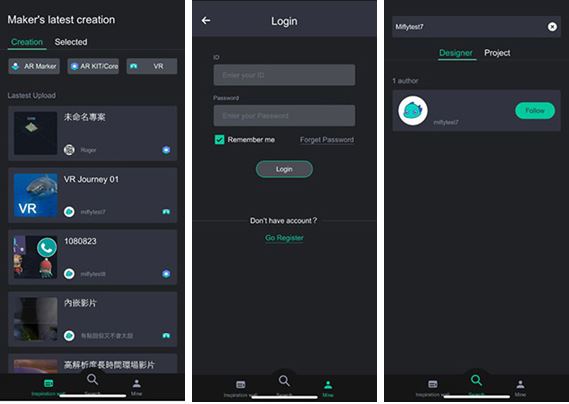
MAKAR App runs on any mobile phone, this is very effective in terms of reaching out to more audiences, as mobile devices are having the largest user base.
Start MAKAR App on your mobile device.
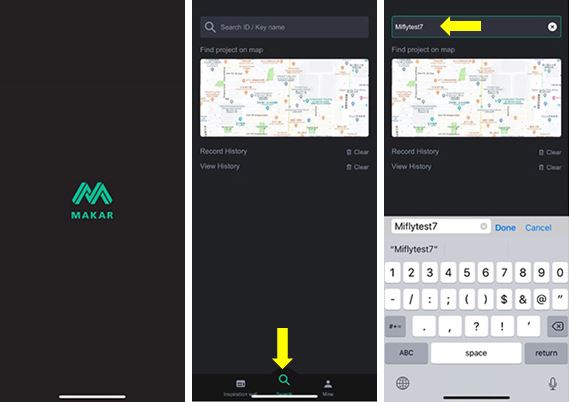
Tap on the Search button at the bottom, then type in the name of the project or project creator’s MAKAR ID to search.

Press on the search result, select the desired project, and then press on Experience button to start viewing the project.
There are 3 categories of project in MAKAR App. There are AR Marker, AR Kit/ Core, and VR. You can sort the project by clicking on the category tabs on the top.
AR Marker Project Viewing:
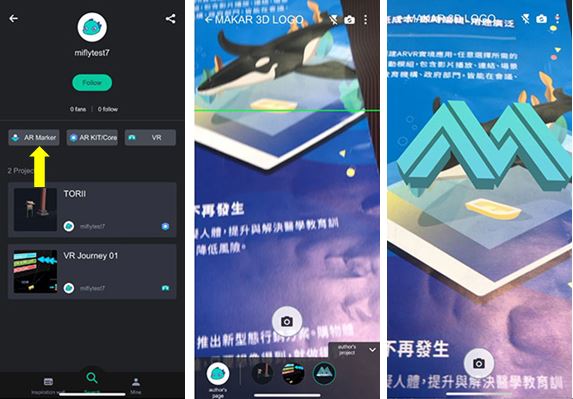
AR Marker project requires your mobile device to scan an AR Target in order to call out the AR assets. By choose an AR Marker project, your mobile device will activate its camera lens and start looking for the AR Target.
AR Kit/ Core Project Viewing:
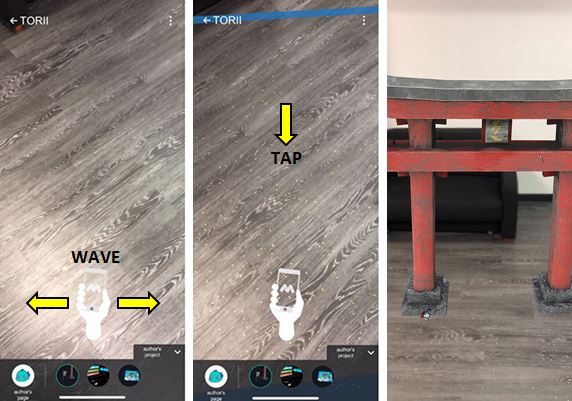
Select an AR Kit/ Core project and your mobile device will activate its camera lens to sense the environment. Point your mobile device at a surface where you want to project the AR asset.
Follow the device waving instruction on the screen and wave your device gently. The waving actions allow your device to capture your surrounding and simulate 3D surfaces. When a blue frame appears, tap on the blue frame to place your AR asset.
AR Kit/ Core technology enables space recognition capability of your mobile device and allows AR assets to be projected to 3D space. You can move closer to or further from the asset as it is being placed at your surrounding without an AR Target.
VR Project Viewing:
Tap open a VR project and your mobile device will automatically switch on landscape mode.

When viewing a VR project, there is a viewpoint at the middle of your screen. Place the viewpoint at specific assets to trigger interactivities. The interactive trigger can be set as immediately trigger or delay trigger. As triggering a delay trigger, the viewpoint will perform a loading animation to indicate the delay timing.

You can insert your mobile device into a VR mobile headset, such as Google Cardboard or Samsung VR Box, and switch on dual screen mode.

This turns your mobile device into an immersive wearable VR display headset.

Apart from viewing your own AR & VR project, you can explore and share projects created by other creators on MAKAR App. Login MAKAR App with your MAKAR ID then you can add favorite projects you found on MAKAR App, share them with others, and even follow your favorite AR & VR designer on MAKAR App.