Download and Install MAKAR Editor
Download and Install MAKAR Editor
1. Visit the Download Section of MAKAR Official and choose the appropriate installation file based on your computer system. MAKAR Editor is available in three versions: Windows 32-bit, Windows 64-bit, and iOS.
  |
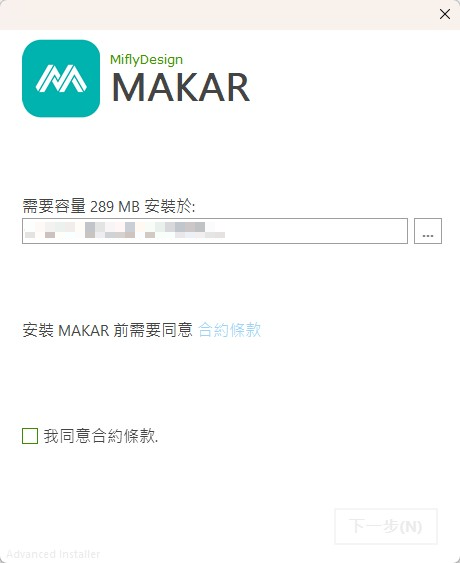  |
| 1. After opening the installation file, the MAKAR installation screen will appear. | 2. Select the installation destination and check "I agree to the terms of the agreement", then click "Next". |
  |
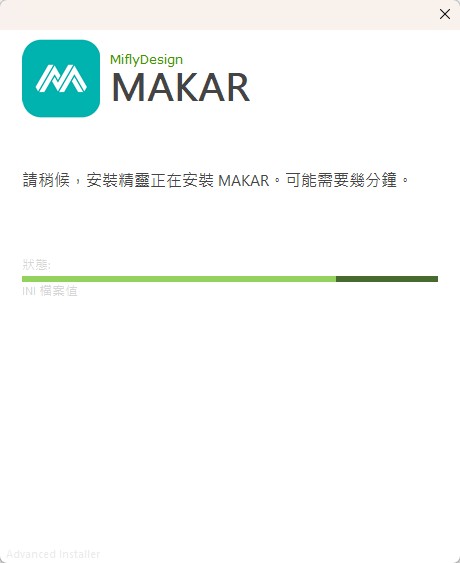  |
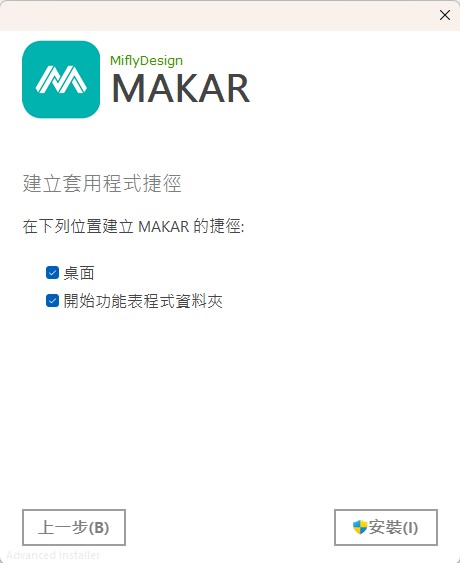
| 3. Check the shortcuts you want, then click "Install". | 4. MAKAR is installing. |
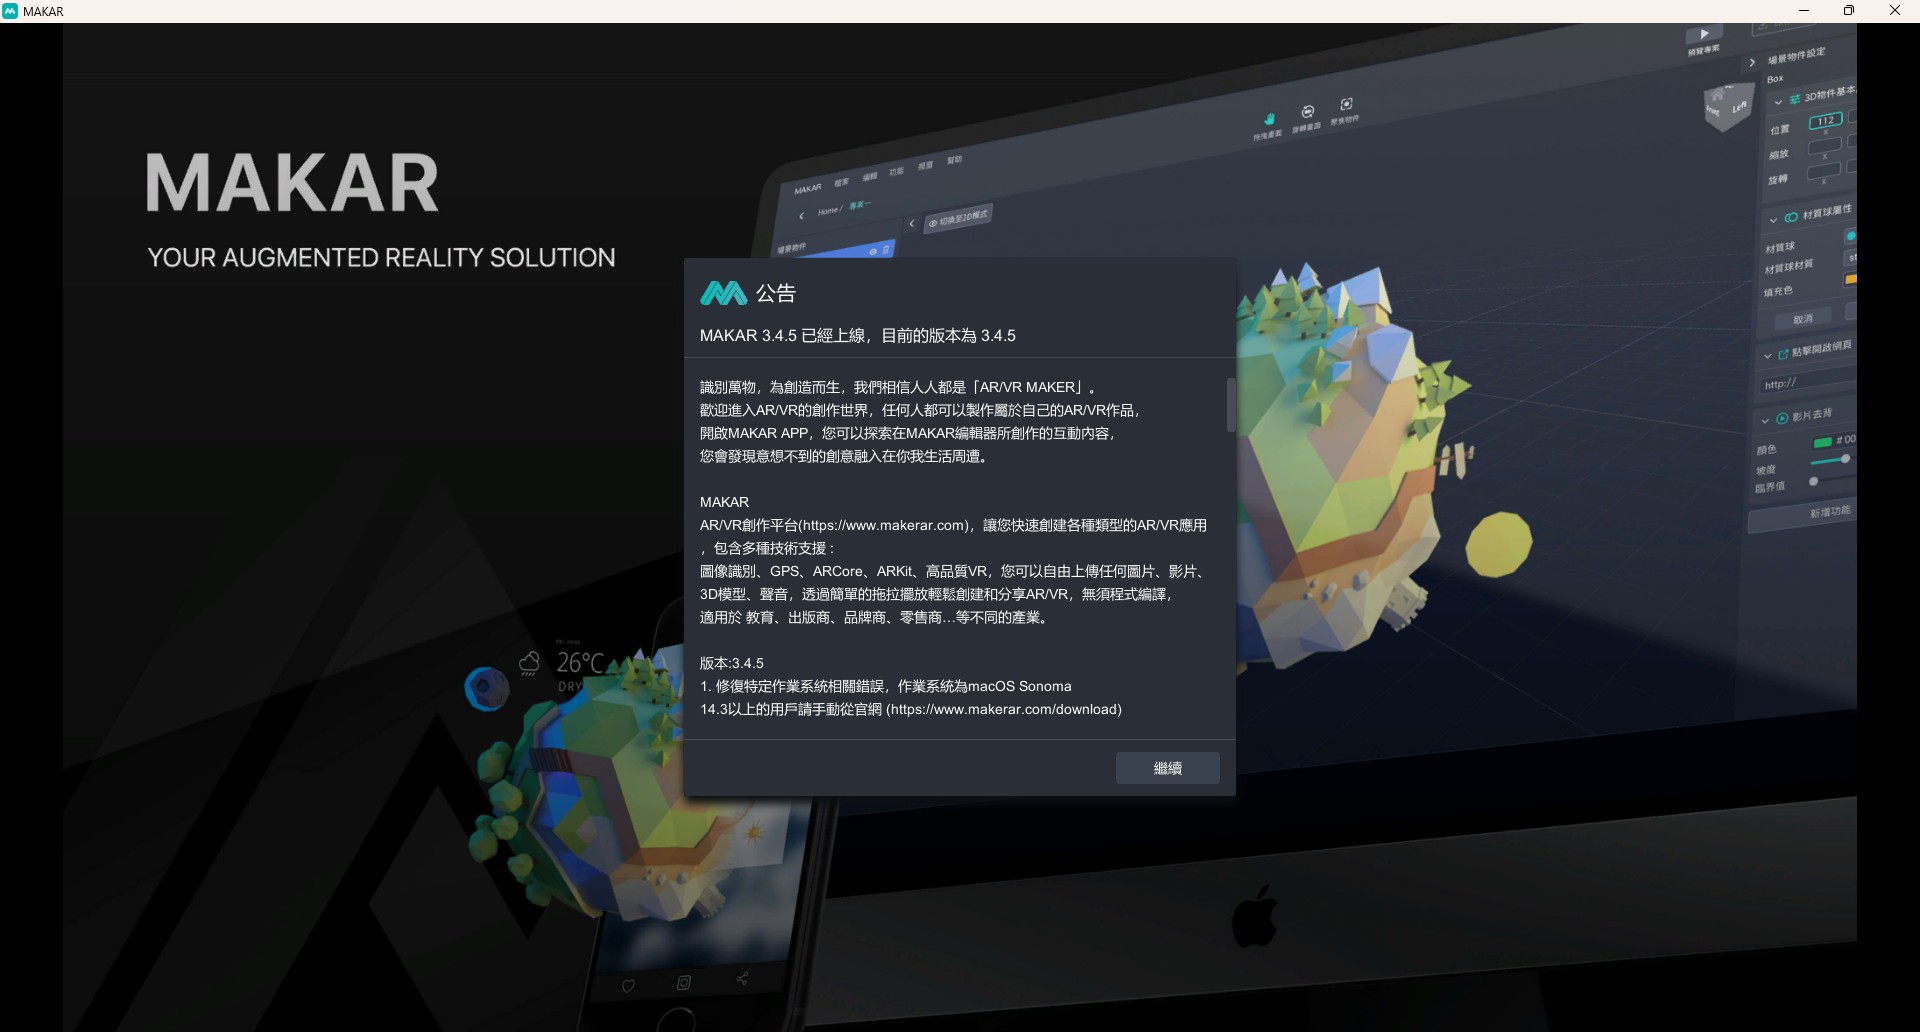
2. After the installation is complete, MAKAR Editor will automatically open. If it does not open automatically, you can click the icon on the desktop to open MAKAR Editor.

AR Envelope for Beginner –New Year Rabbit
|
Abstract: Introduction: This project is a response to the Eastern New Year culture, applying AR technology to red envelopes, so that they not only have traditional cultural significance but also incorporate modern technology. |
1. Image target
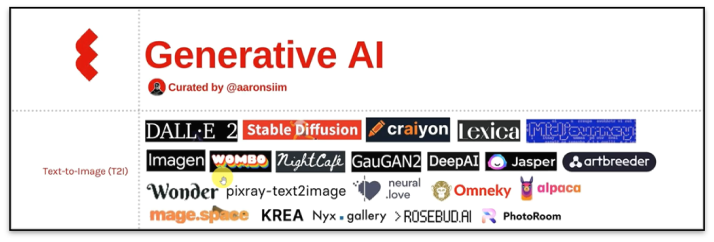
The image target for this project was created using Midjourney, an AI tool that generates images from text. This tutorial also introduces other similar tools and prompts currently available, as well as recent examples of people using ChatGPT to generate more complete prompts, and then incorporating Midjourney to create even better images.
The image target gets a five-star recognition in MAKAR editor.


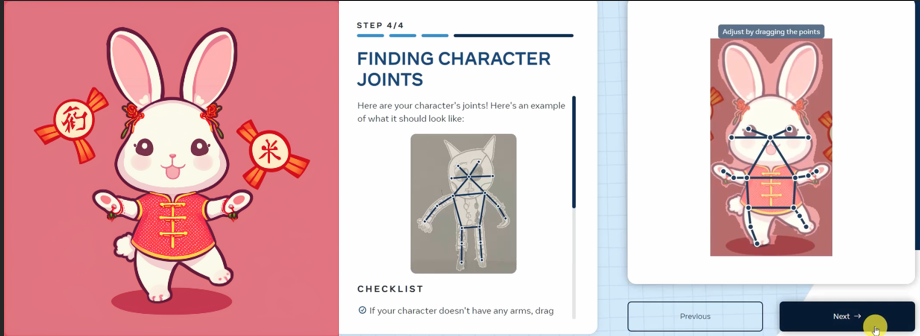
In order to add animated effects to the rabbit in the target, it was necessary to remove the rabbit from the original image. Here, we used an online and free AI tool called Magic Eraser to quickly erase unwanted objects or parts from the image. This tool automatically recognizes the background using AI and seamlessly fills in the removed parts, making it easy to remove unwanted objects from images.
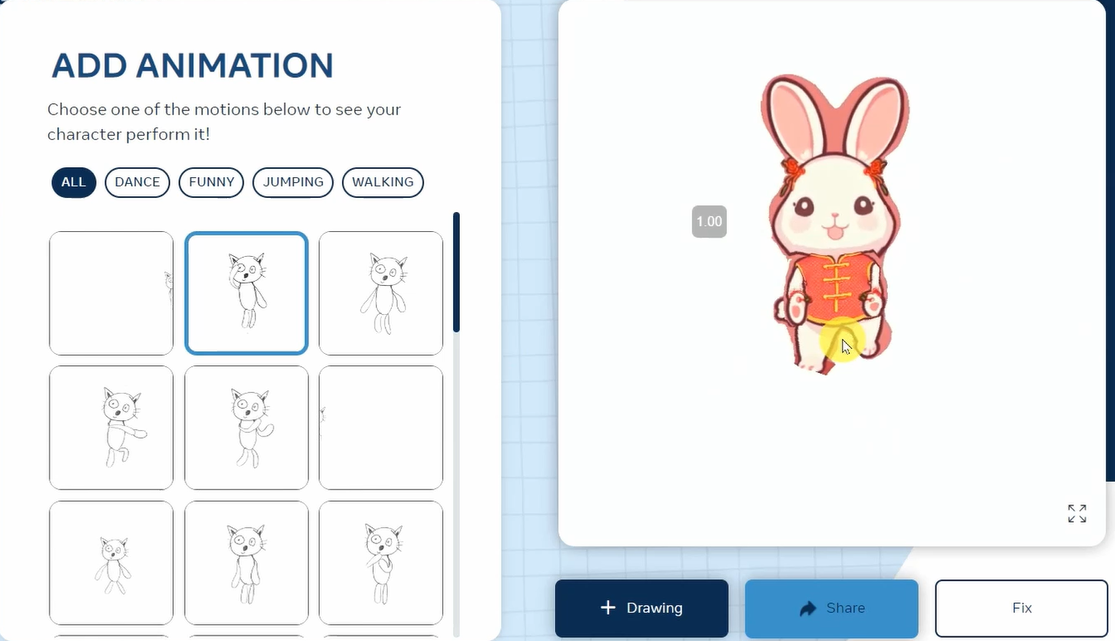
This is a free AI tool that can animate 2D images. By uploading a character image with similar human-like limbs to the website and going through simple processing, the website will bind a skeleton to the character. To increase the liveliness and interactivity of the project, Midjourney was used to generate a rabbit for 2D interaction.
By choosing the appropriate action, you can download the video. The video will have a white background, and you can use the "remove background" function in the MAKAR editor to make the background transparent after importing it.
3. MAKAR Editor
New project 🡪 AR 🡪 AR Target
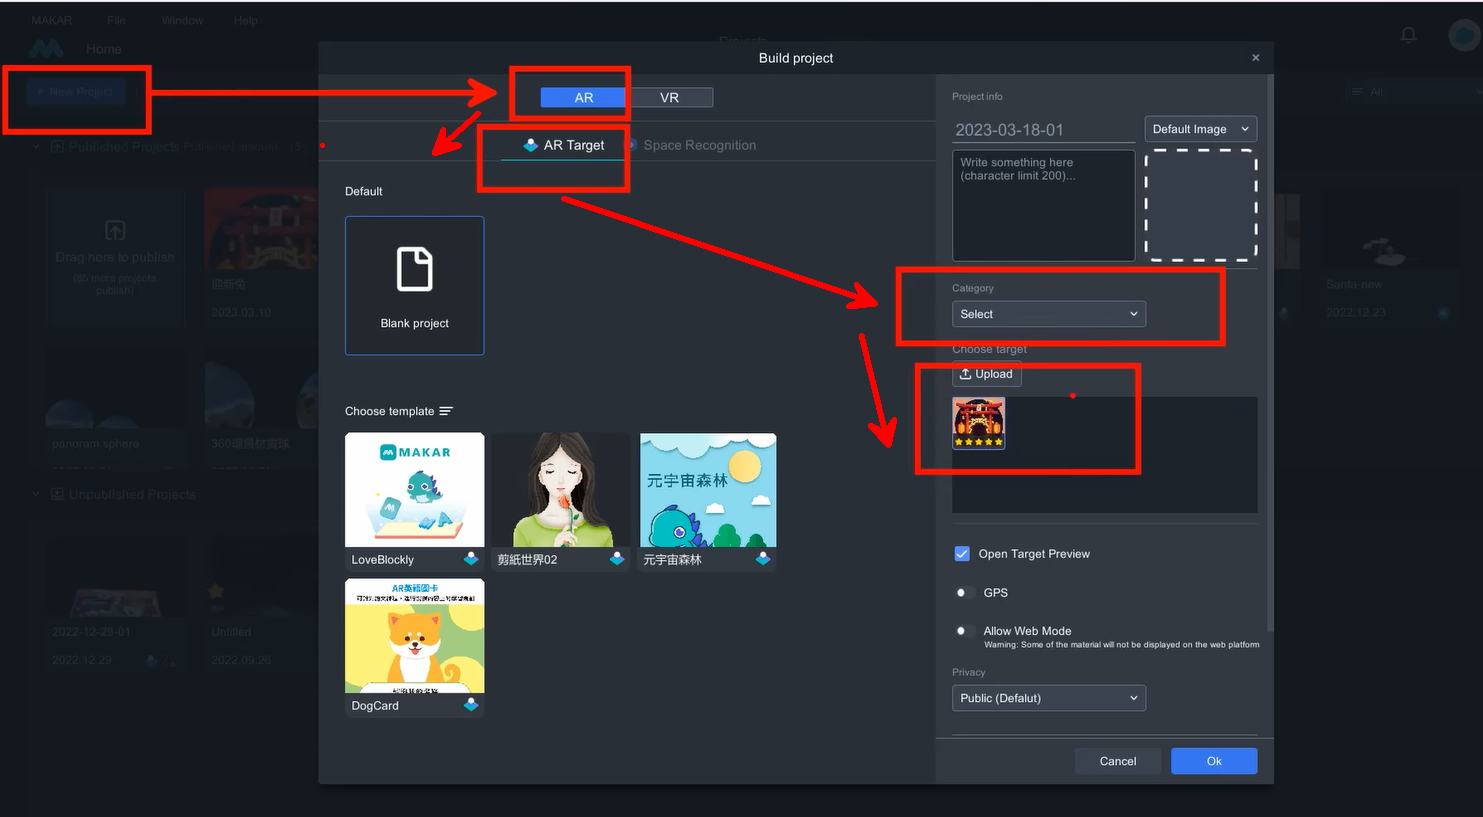
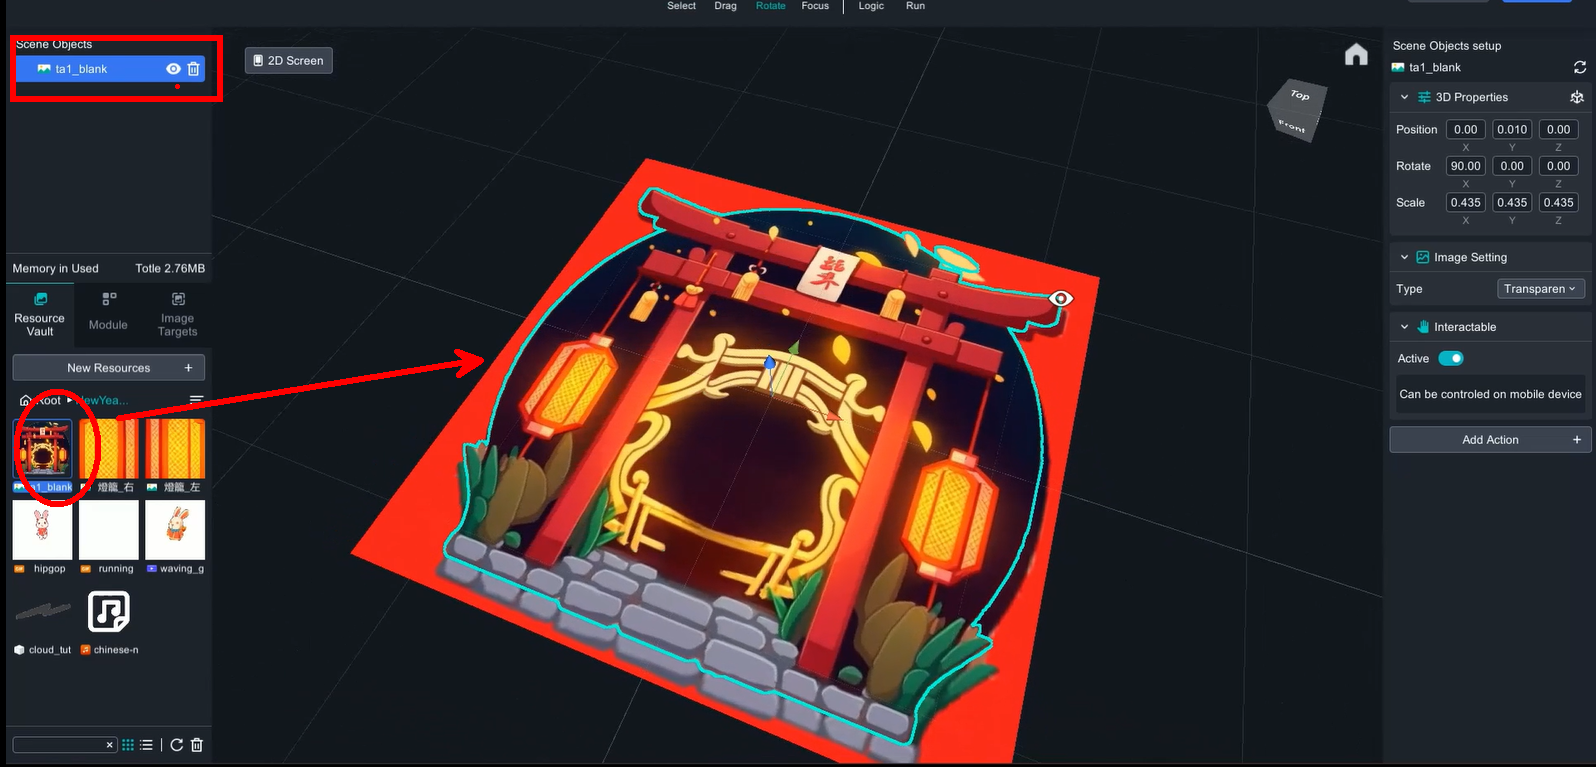
After creating the project, you can import materials, including images, videos, 3D models, and audio, to the resource vault.

Drag ta1_blank on top of the target to cover it.
Drag waving_guesture video in the scene, and use matting to remove background.
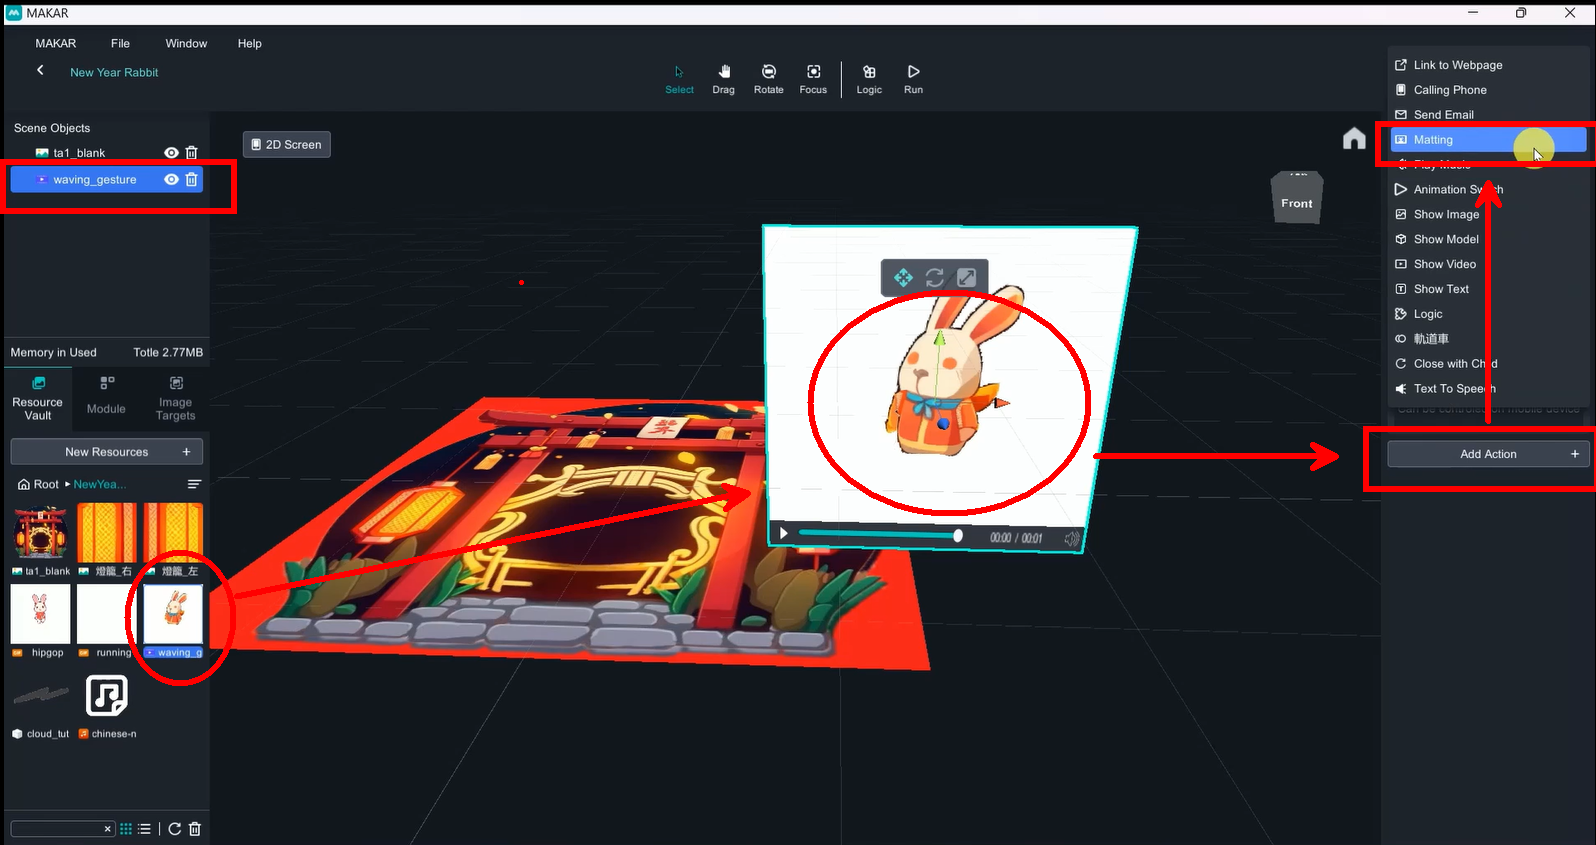
Matting value(Mode: RGB, Slope:1.00, threshold:0.43)
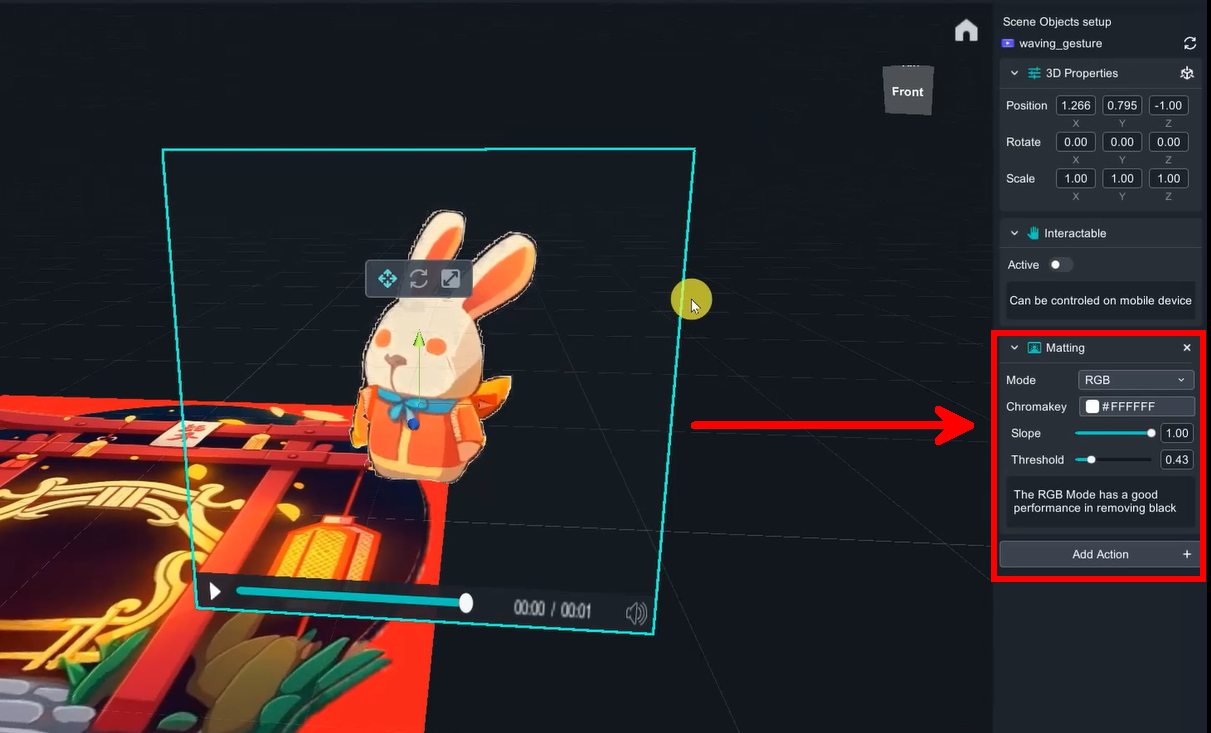
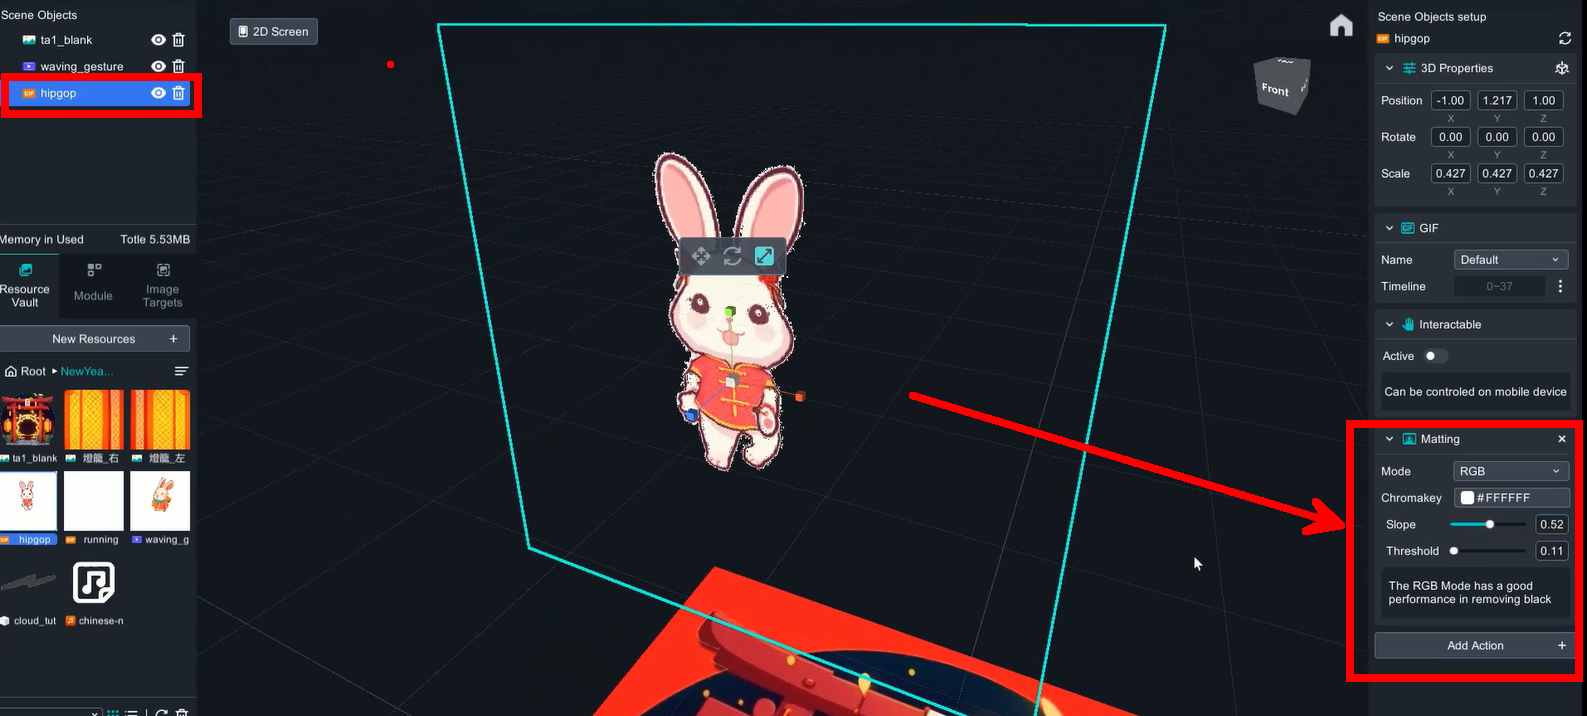
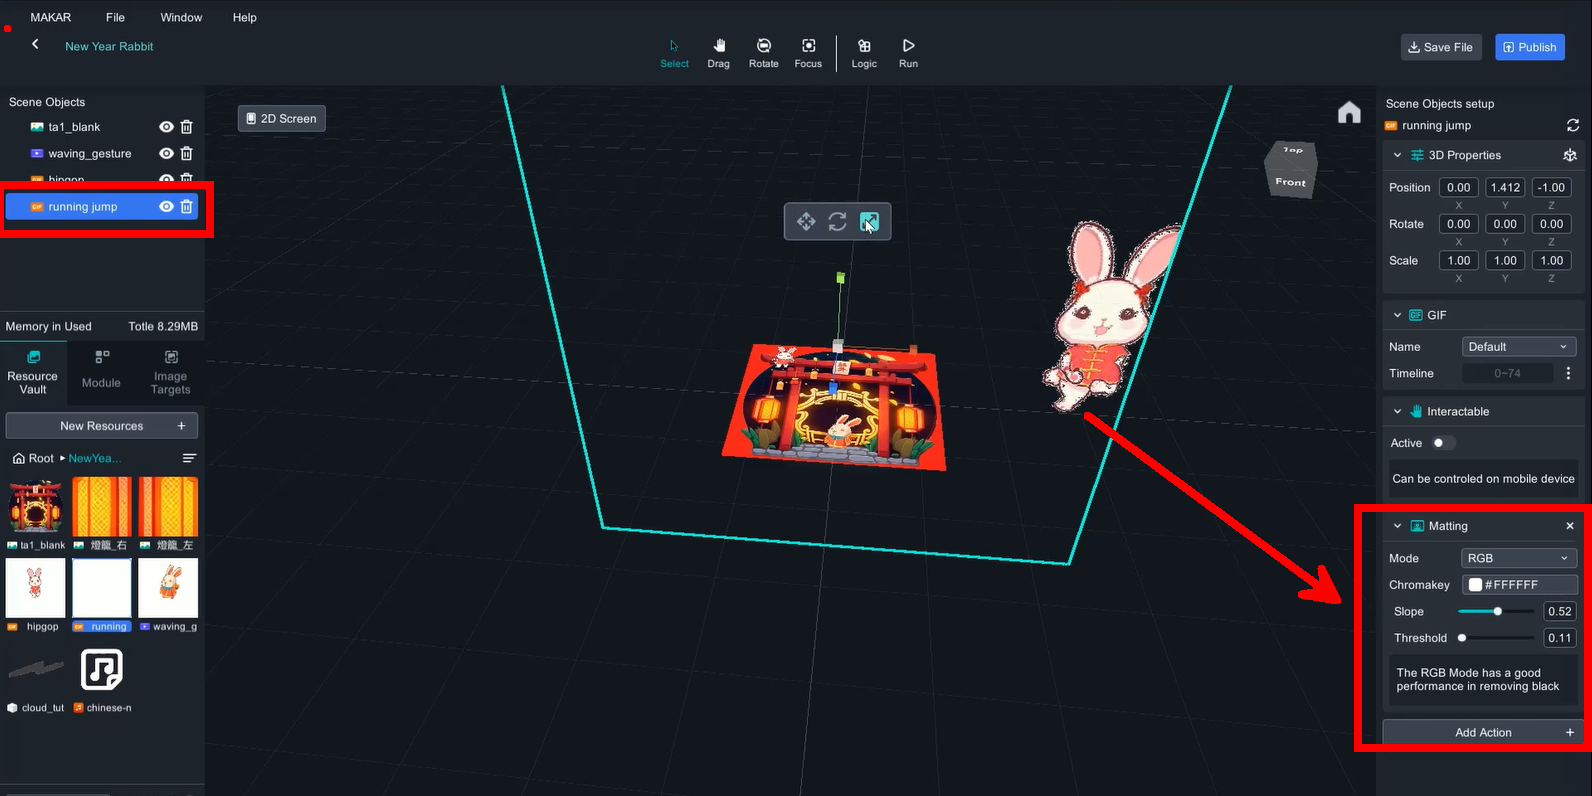
Rabbit (Hipgop) matting value(Mode: RGB, Slope:0.52, threshold:0.11)
Rabbit(running jump) matting value(Mode: RGB, Slope:0.52, threshold:0.11)
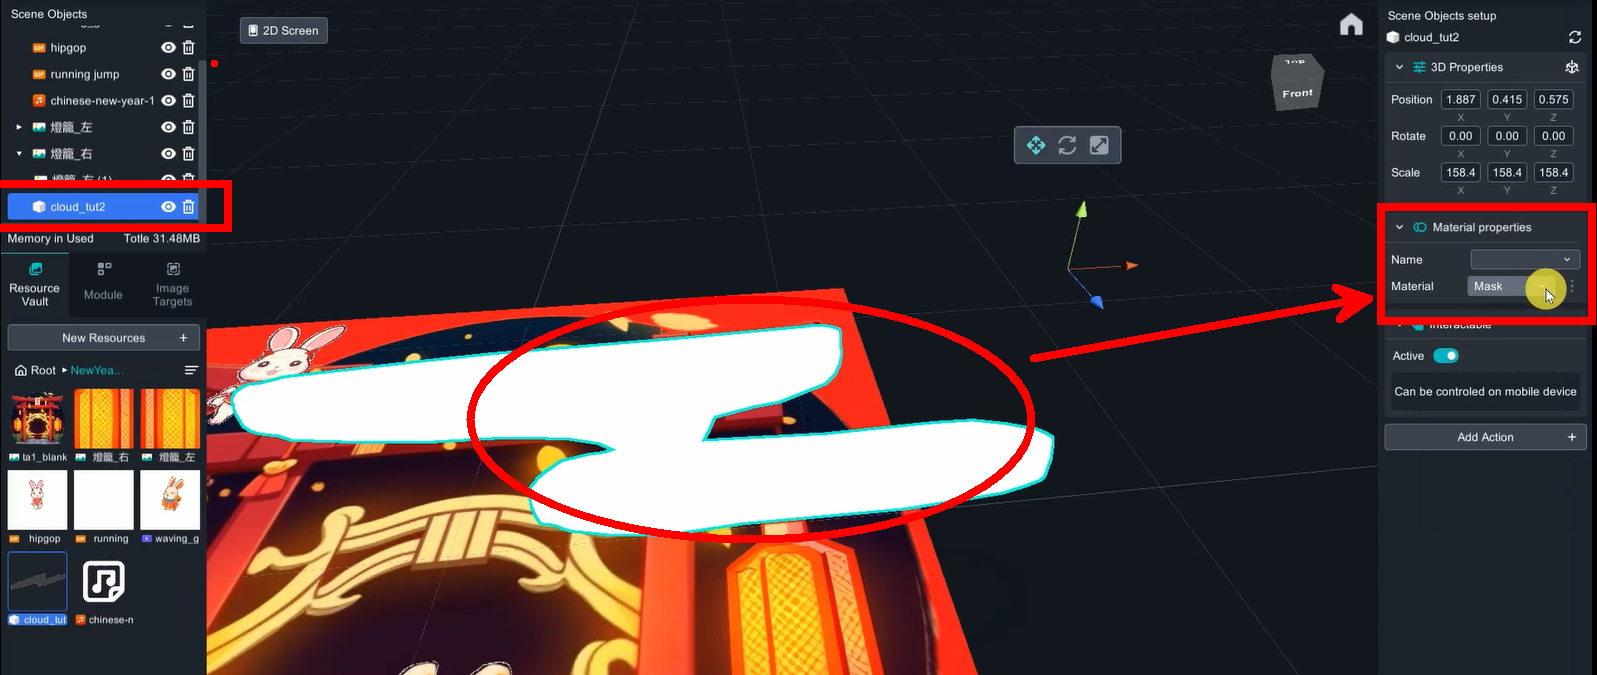
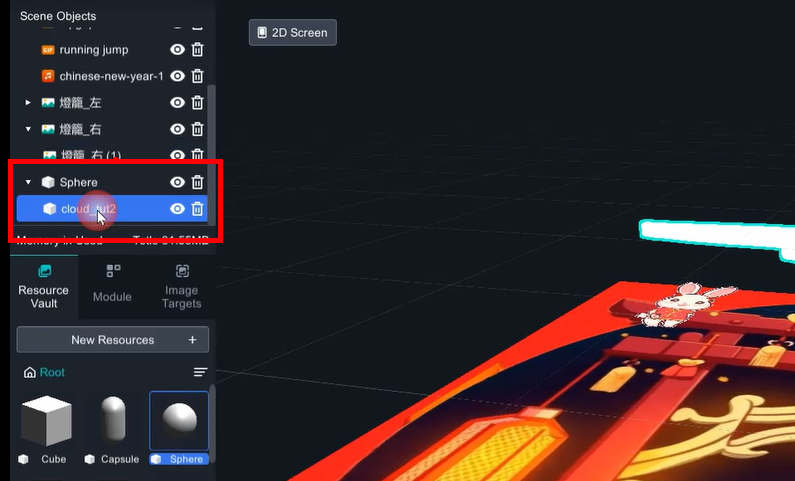
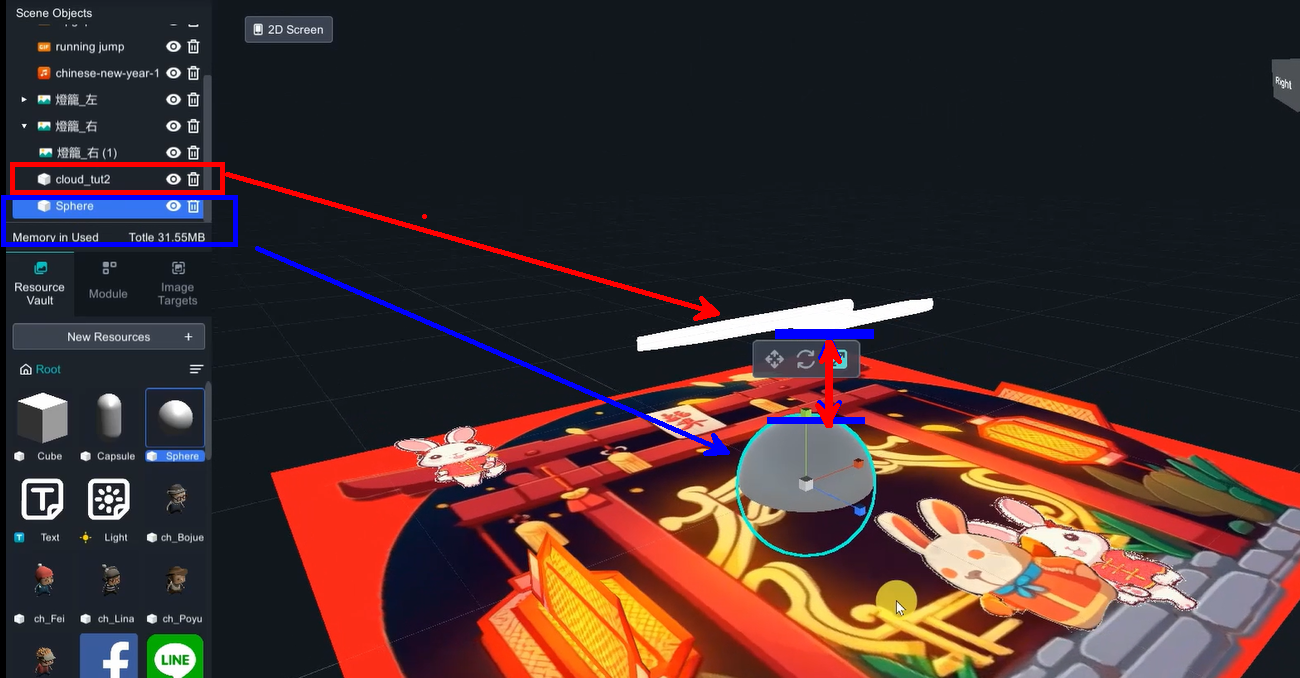
3D model (cloud): change material into Mask.
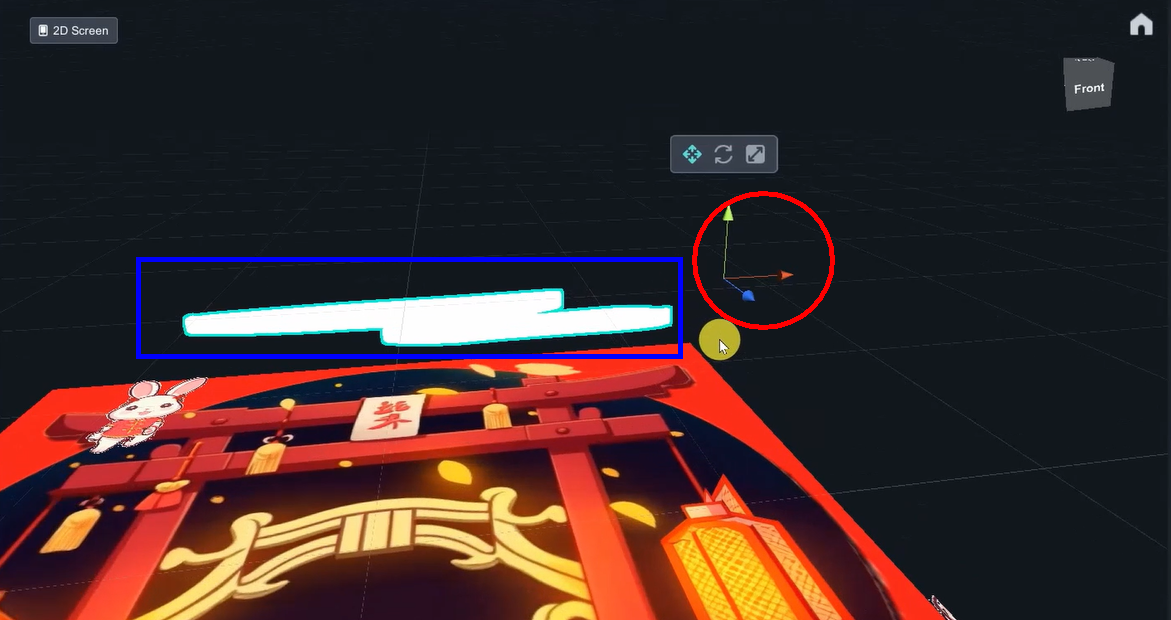
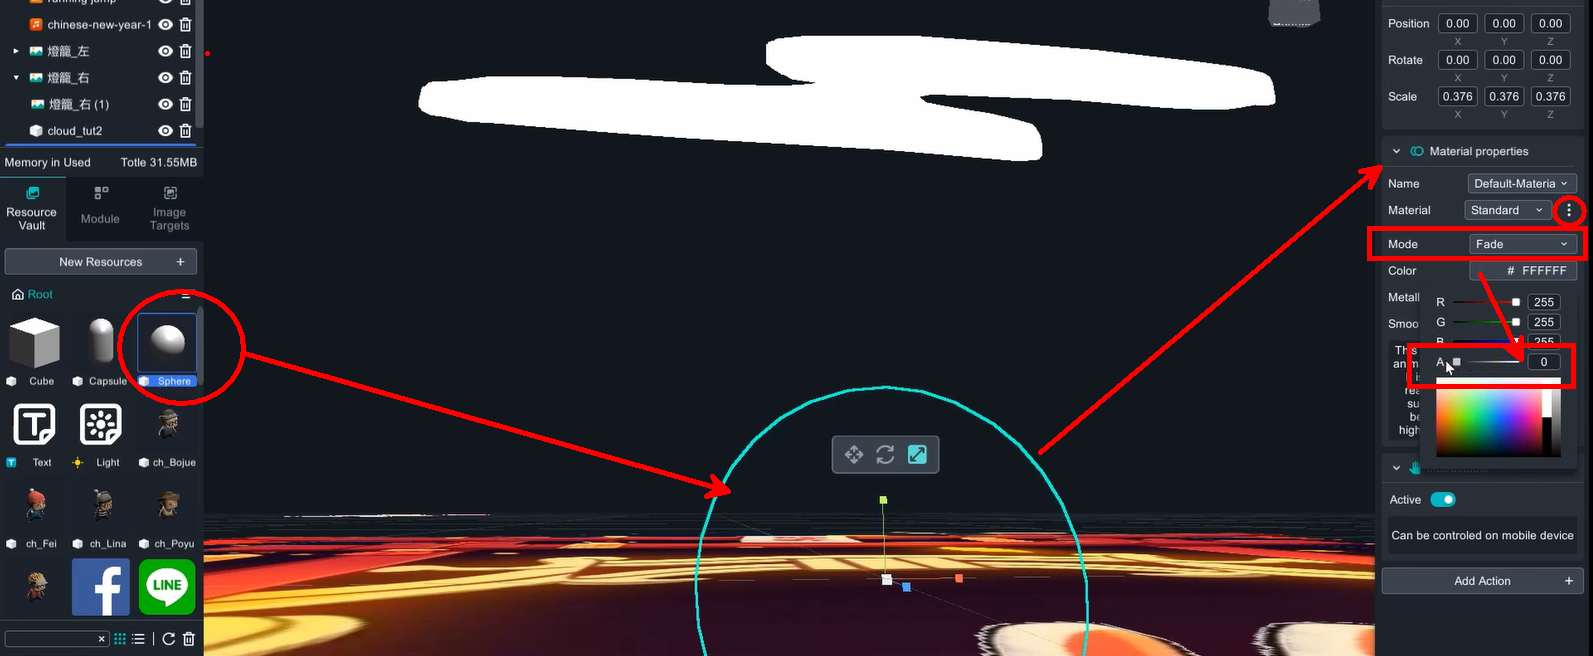
Due to a slight offset in the center point (the intersection point of the three axes) of this model, an additional transparent sphere was added to enclose the cloud for ease of control. Transparent sphere: Click the three dots on the right side of the material ball, change the mode to "Fade”, click on the color, decrease the A (alpha) value to 0.
In scene objects, drag cloud_tut2 into sphere to group them together.
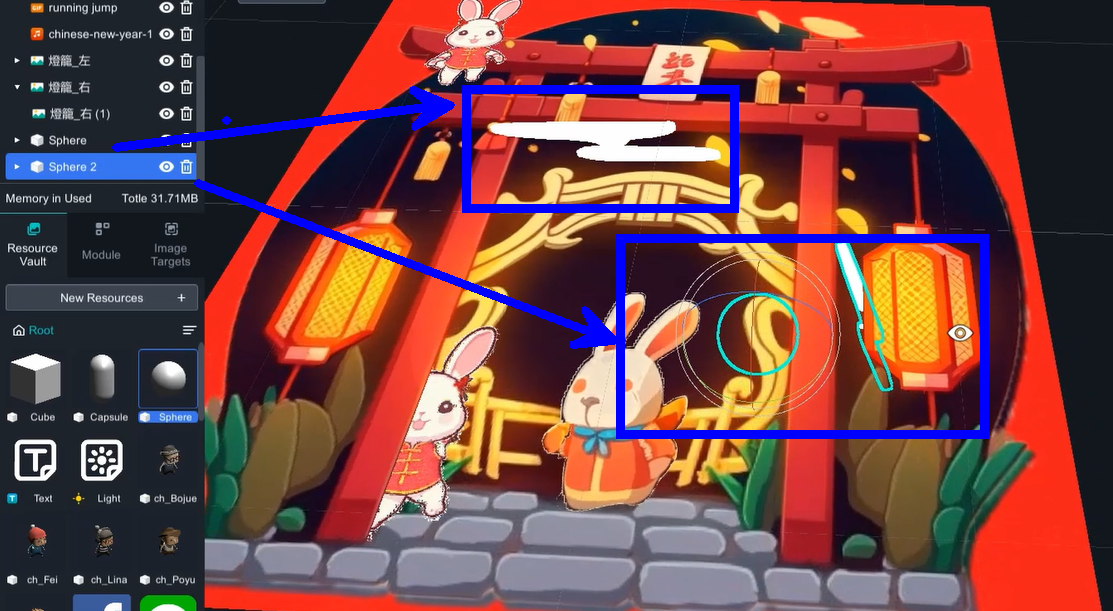
Two clouds will be created here, so you only need to duplicate the completed cloud and paste it. The pasted object will be separate, so it needs to be brought closer to the sphere again.
4. 2D image mimics 3D object
Drag the lantern image , cover perfectly on top of the lantern in target.
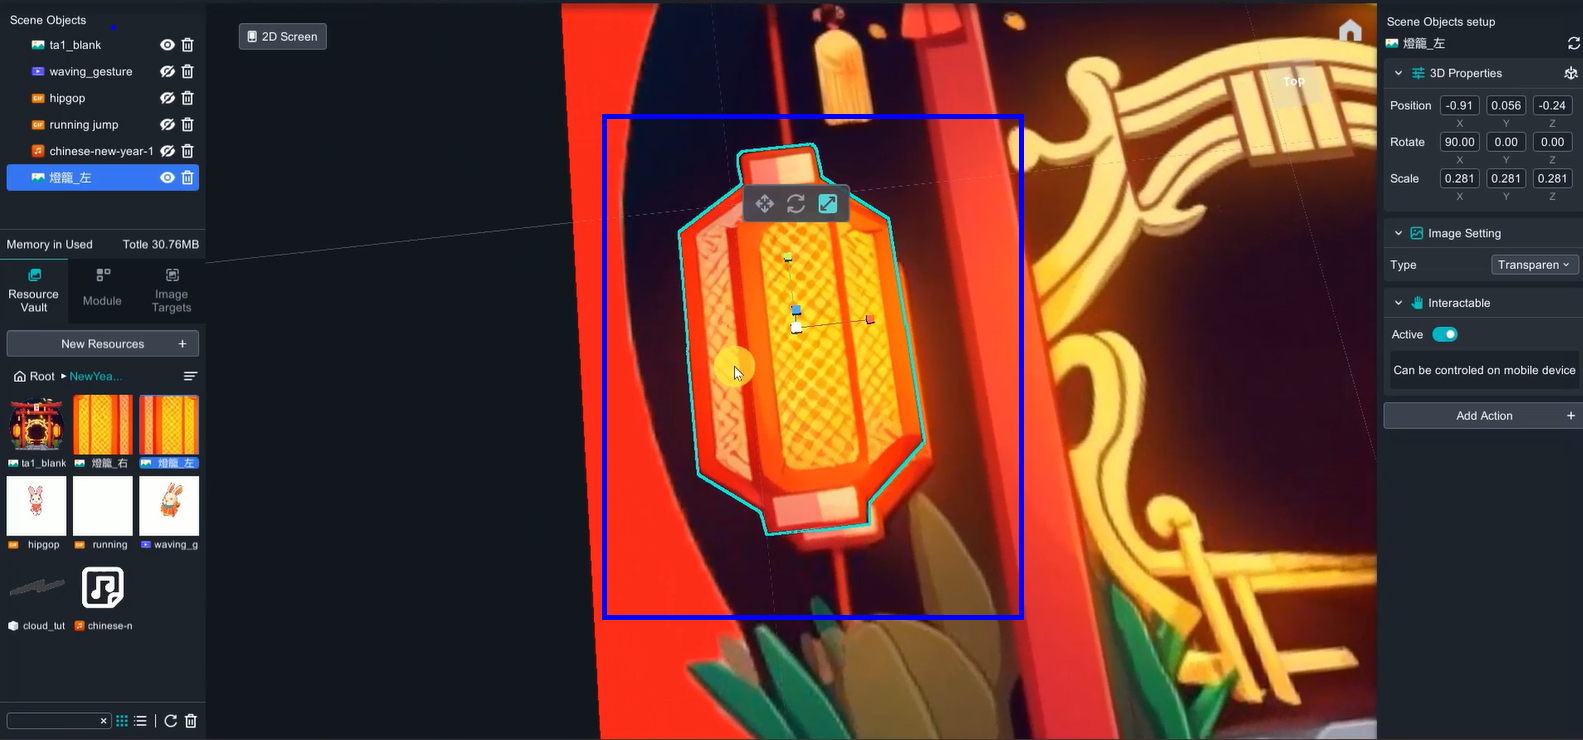
Duplicate another image, and rotate 90 degree, so that both images perpendicular to each other.
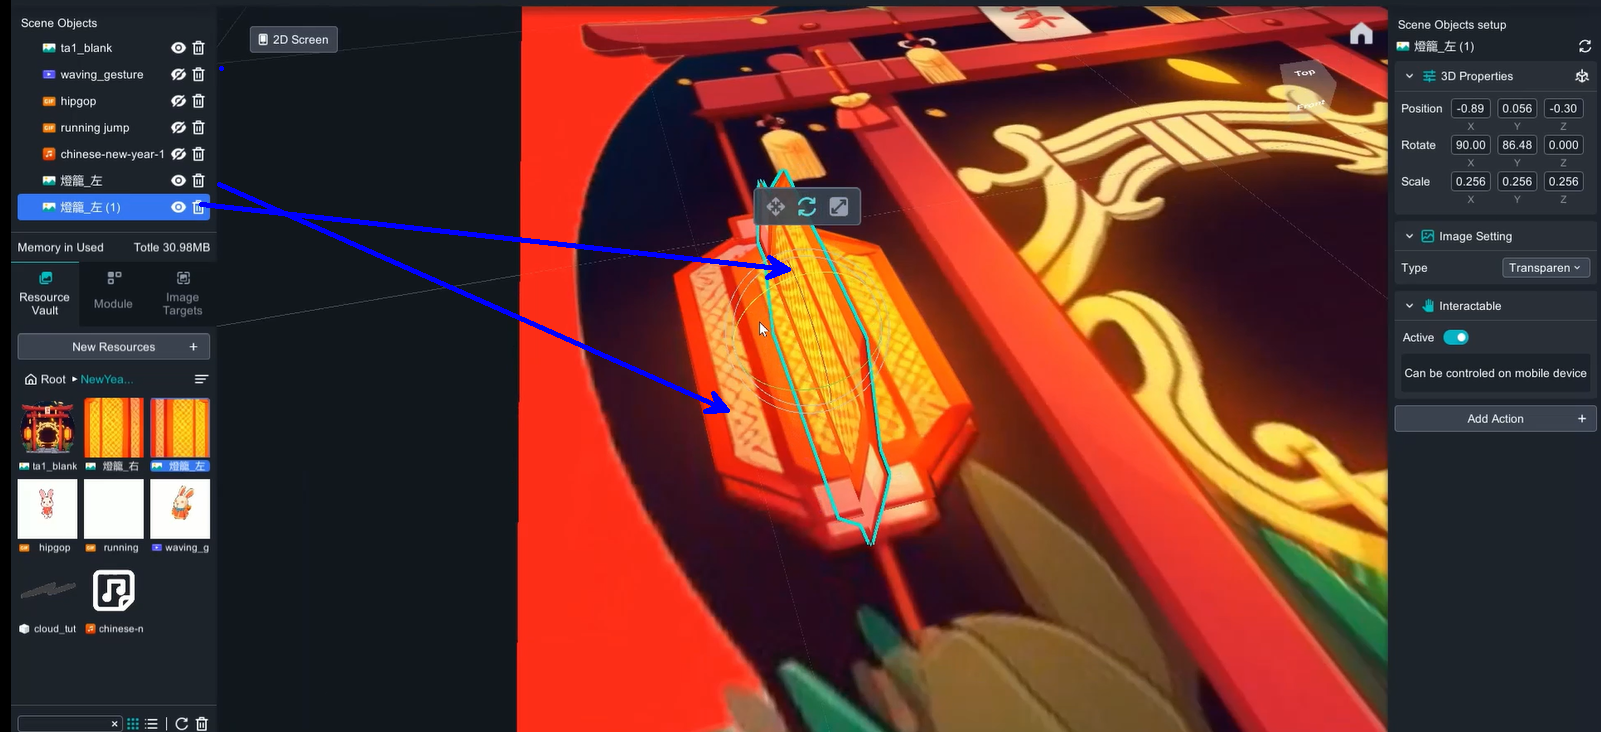
Drag the second image into the first one to group them.
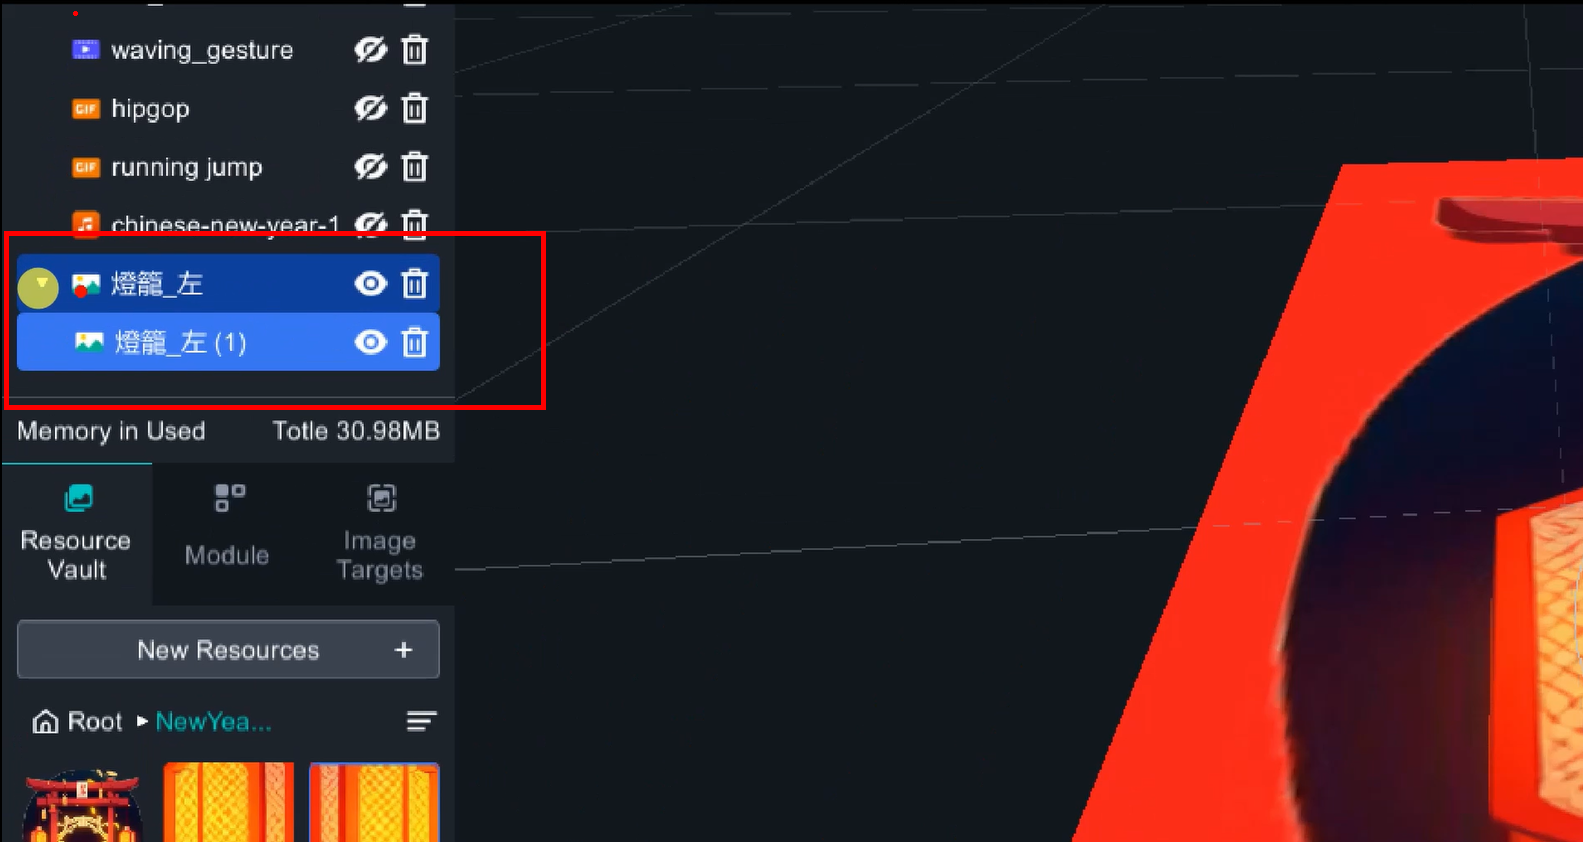
There are two lanterns in this project, and the method is the same.
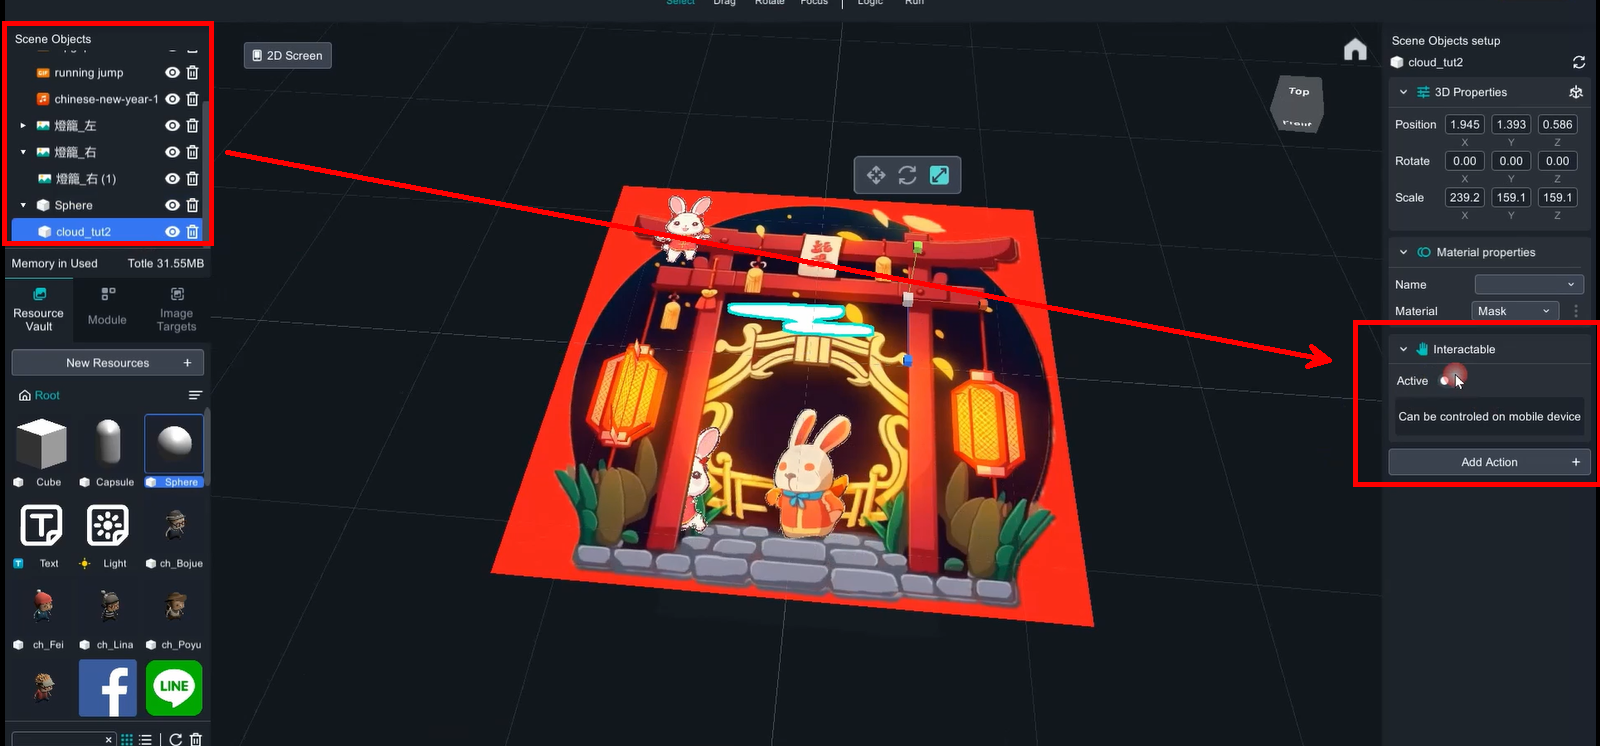
5. De-active interactable function
Interactable feature allows users to move, rotate, and scale the augmented objects by hand when they appear on the screen. However, this feature has been disabled here to prevent accidentally moving the objects while viewing and losing the best experience.
6. Logic function
Add logic function to all objects in the scene (Add Action -> Logic). For grouped objects (clouds, lanterns), only the outermost layer (with the white triangle) needs to be given a logic function, while the elements inside the group do not need it.
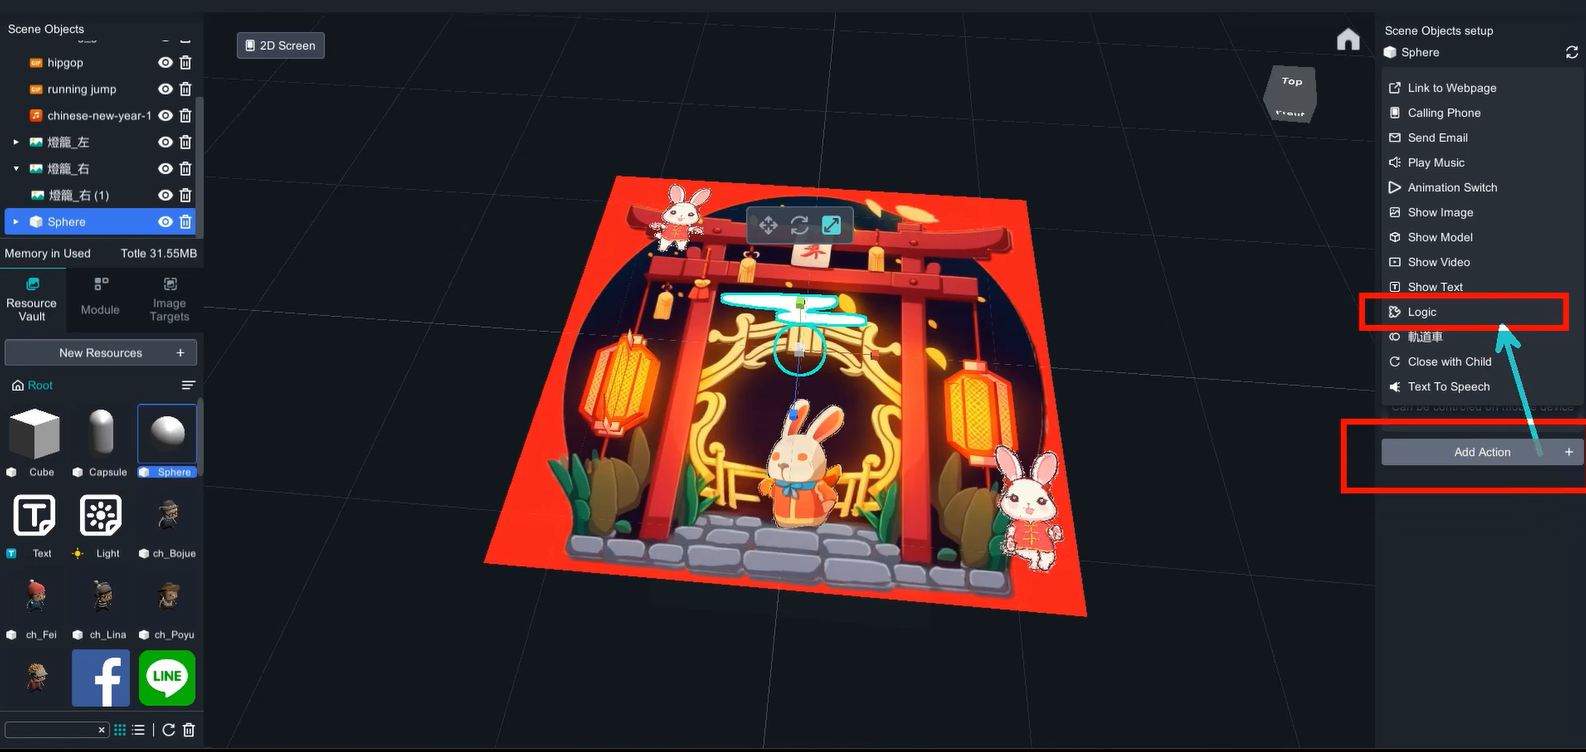
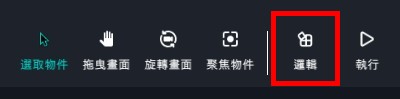
Click the Logic on top menu to open logic editor.
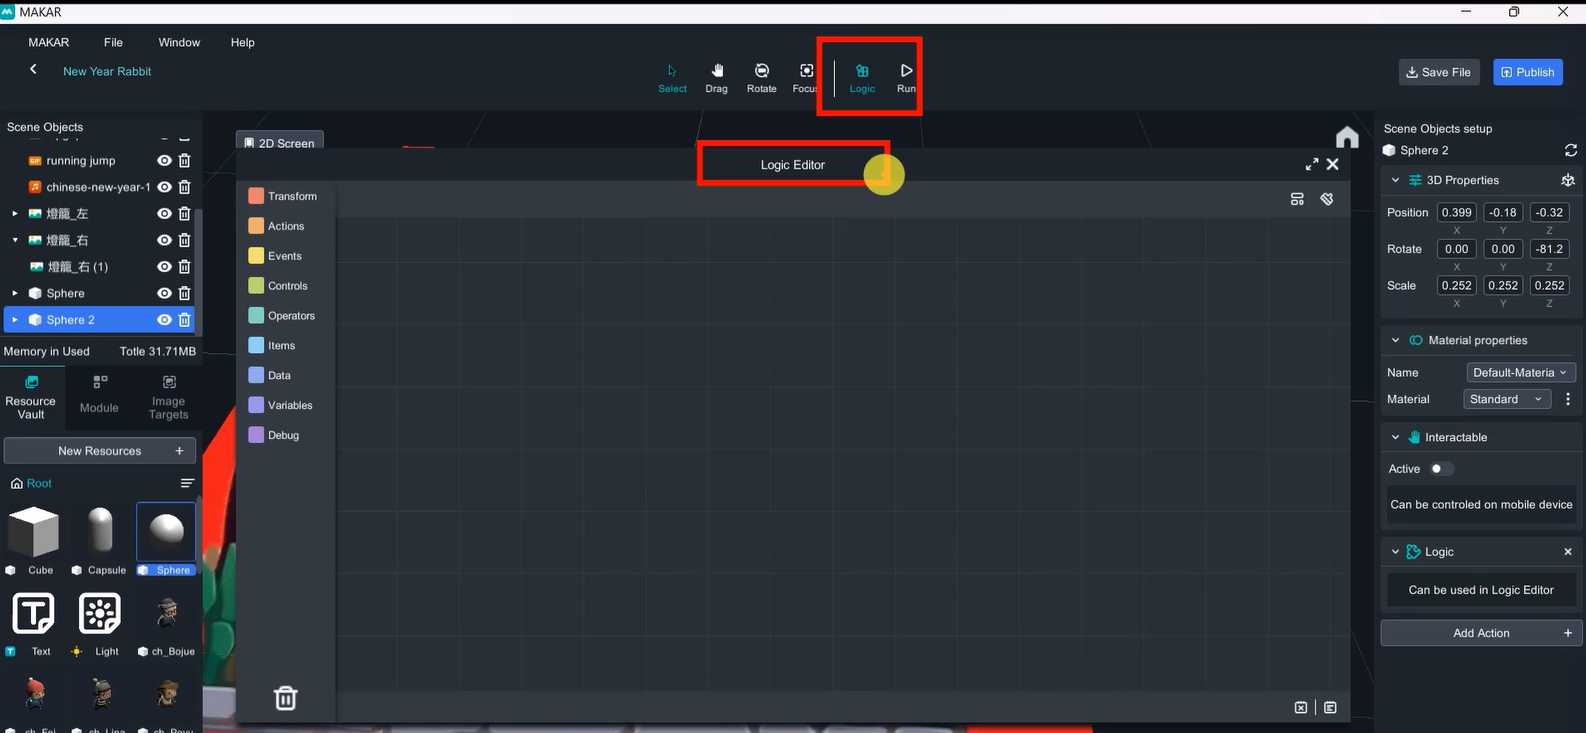
a. Cloud
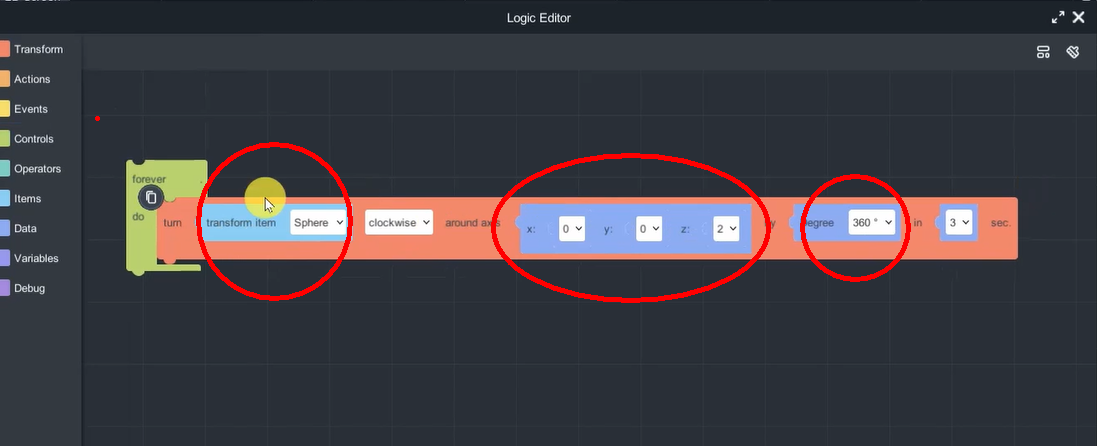
Transform 🡪 Transitions 🡪 the sixth blockly
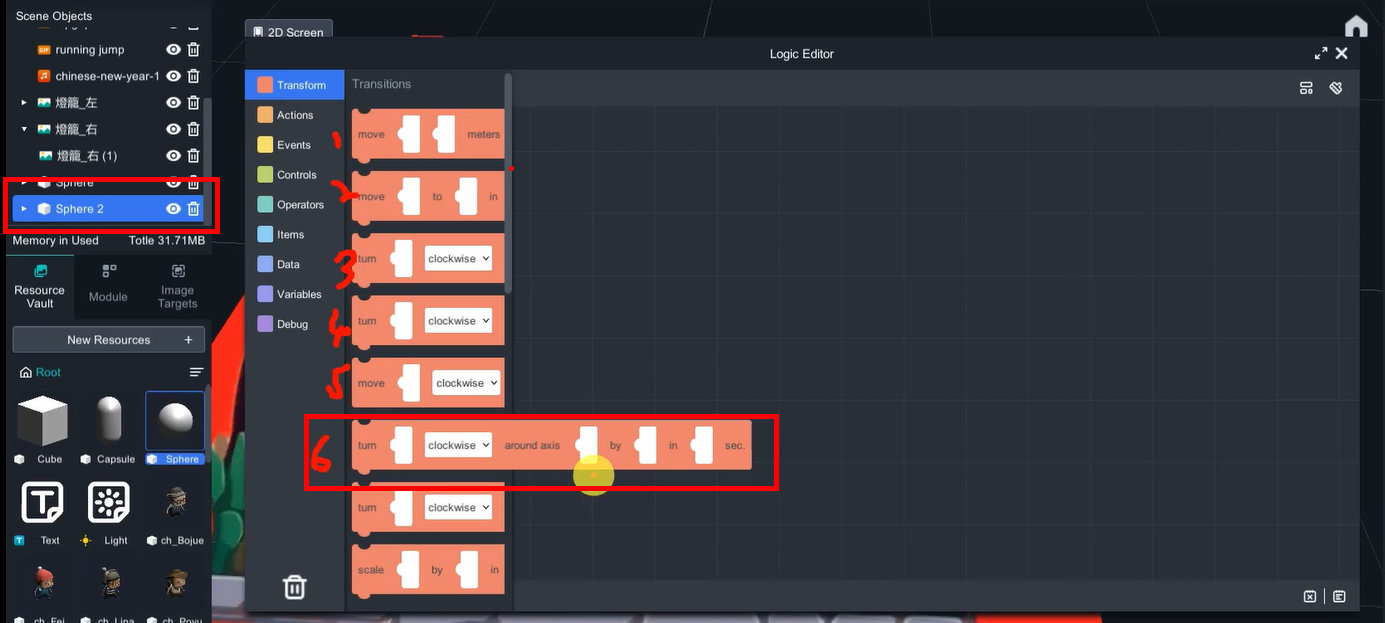
Transform item: sphere, rotate axis(0,0,2) by 360 degree.
Add a " Forever do" loop outside(Control🡪Loops🡪 first blockly)
〈Little detail〉
To create the effect of clouds appearing and disappearing, the distance between the clouds and the sphere was increased, which in turn increased the rotation radius.
To create a sense of visual hierarchy between the two clouds appearing at different times, one of the clouds can be rotated 90 degrees.
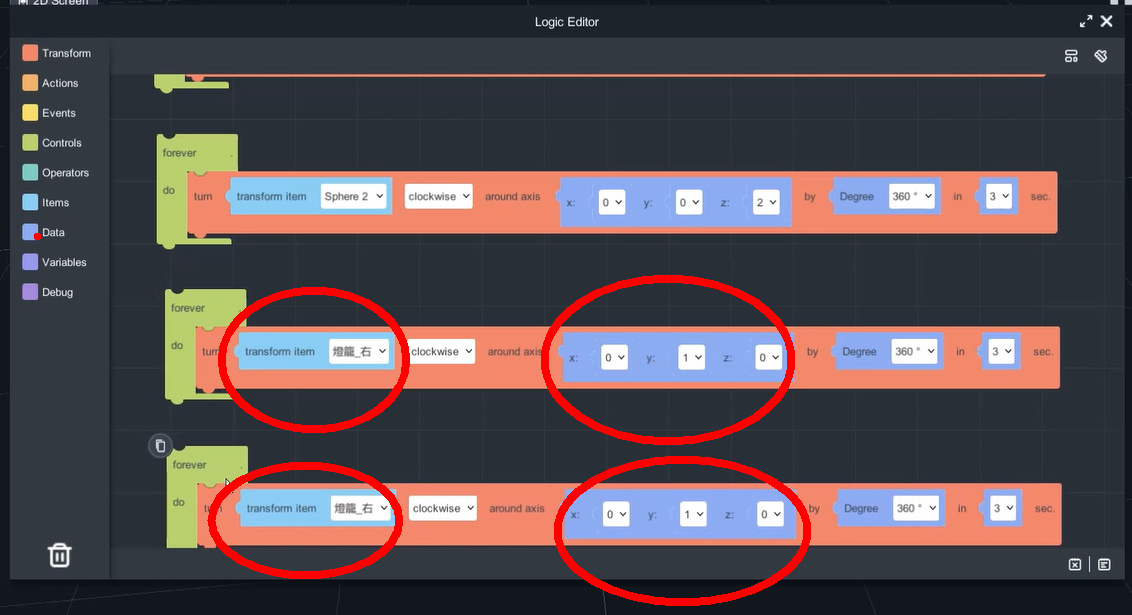
b. Lanterns:
Duplicate the blocklys from cloud, and change the transform item and rotate axis(0,1,0).
c. Audio:
Drag audio into scene and de-active interactable and add logic function.
Actions 🡪 Sound 🡪 first blockly
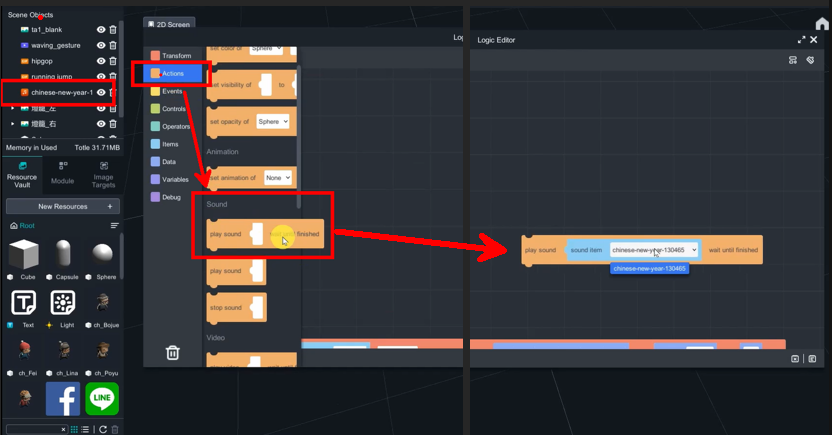
d. Video:
Waving_guesture video: Actions 🡪 Vidoe 🡪 first blockly

Finally, disable the visibilty of all the item in the scene objects, except audio material. And use the blockly to control all the item.
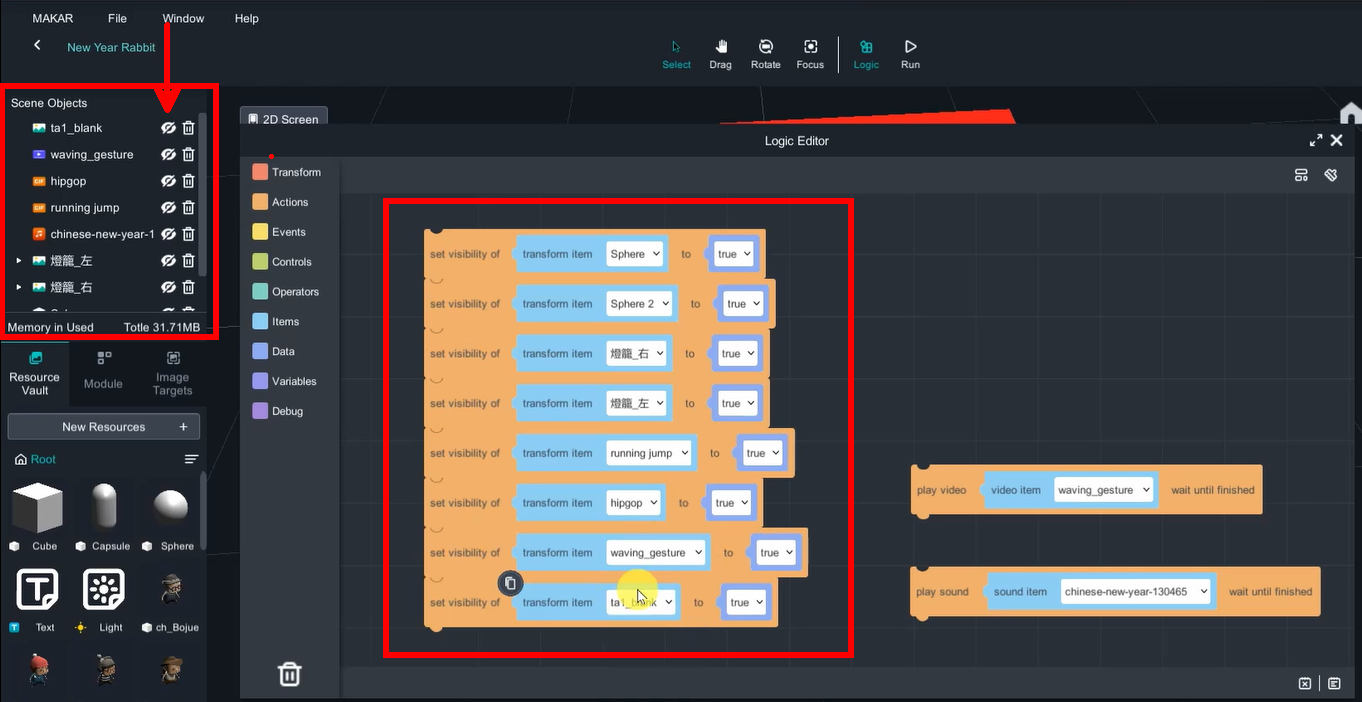
This method ensures that no augmented objects will appear on the screen when the mobile camera is not pointing at the target image.
The project is now complete and ready for publishing.
How to play
Click the application, type in the ID or scan the QR code to experience the AR/VR !
1. Install MAKAR application
2. Scan QRcodec or search ID: class06


3. Select「迎新兔」project,click「experience」to active and put the camera face forward the poster.


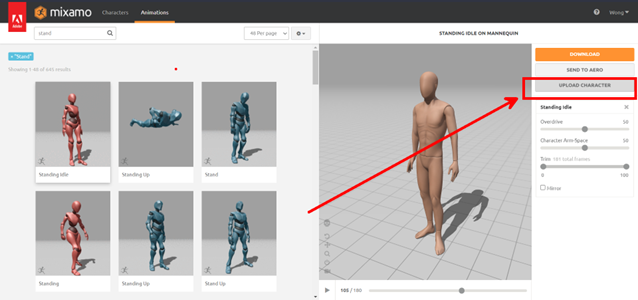
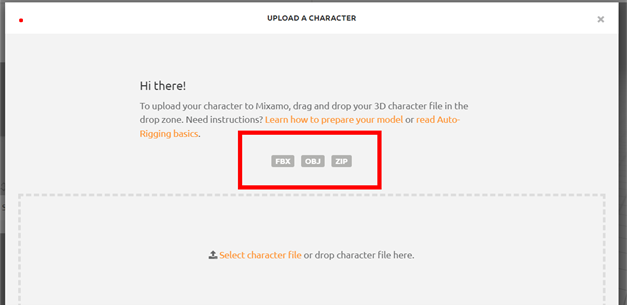
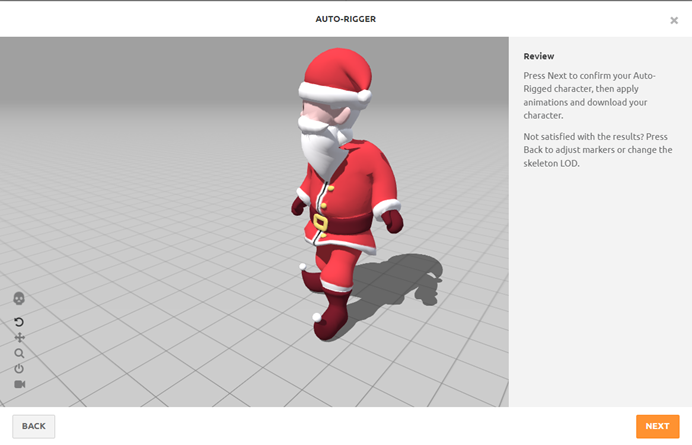
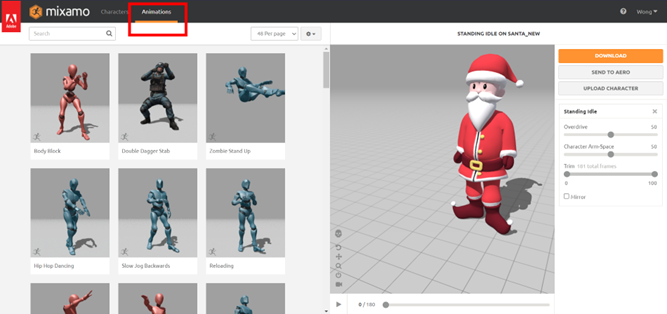
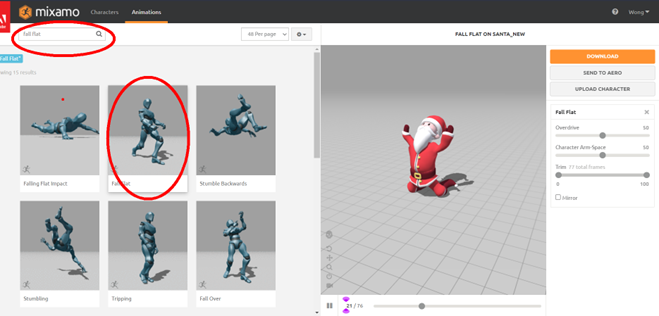
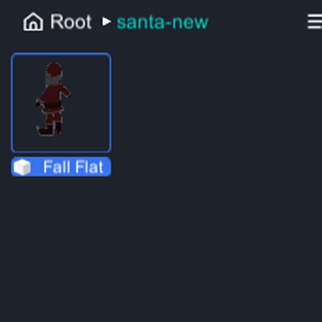
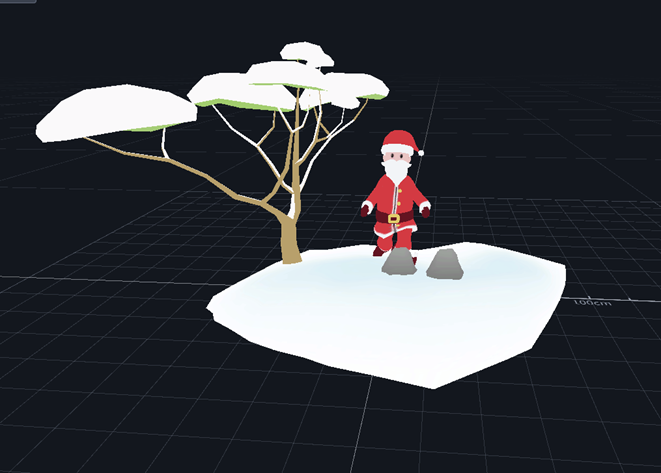
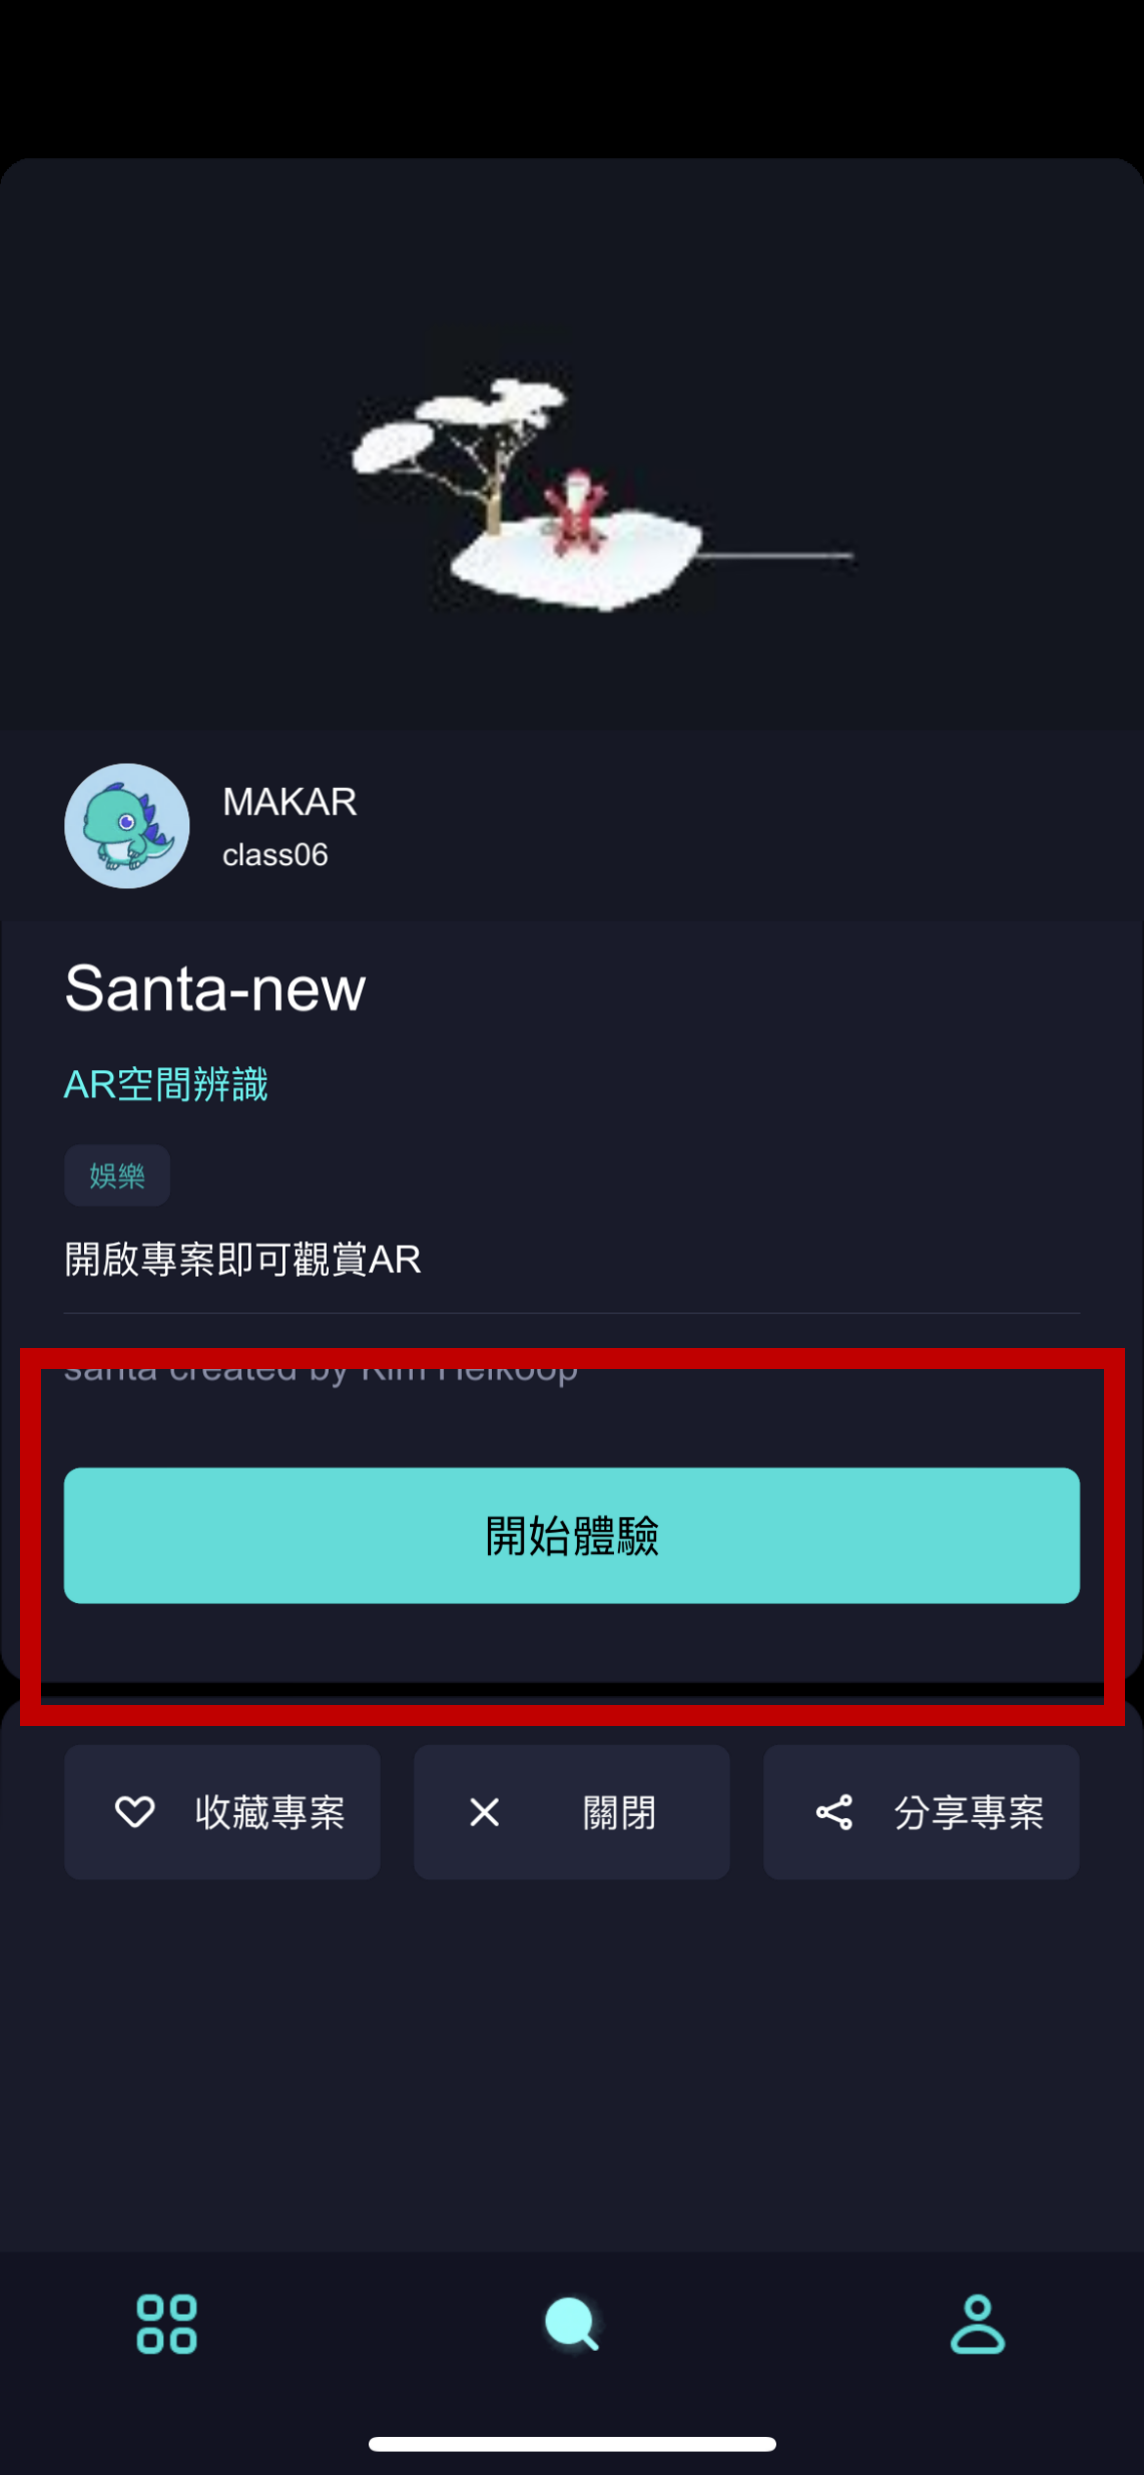
MAKAR Santa Claus - boning
Lesson: This lesson shows that how to add animation in a model and make the project.
Situation:
Complete model of three-dimensional is a huge project, including drawing, modeling, bone, rigging, texture, so that it could add every animation for models.
Thanks for technology, now some platforms offer modular free services, so you can save lots of time and costs. This time we will show how to make model of animation step by step.
The theme is Christmas this time, so find a Santa Claus which can be downloaded at model platform. Checking its copyright to make sure that creation could using.
Using material: https://skfb.ly/oBPpU
Copyrights: CC Attribution


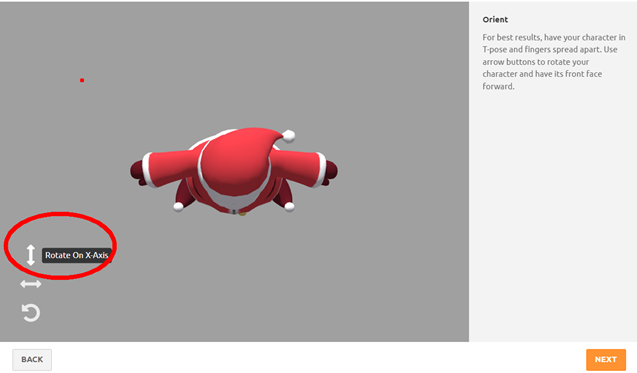
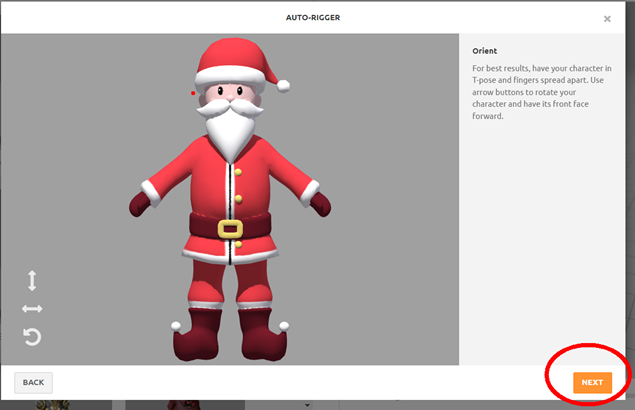
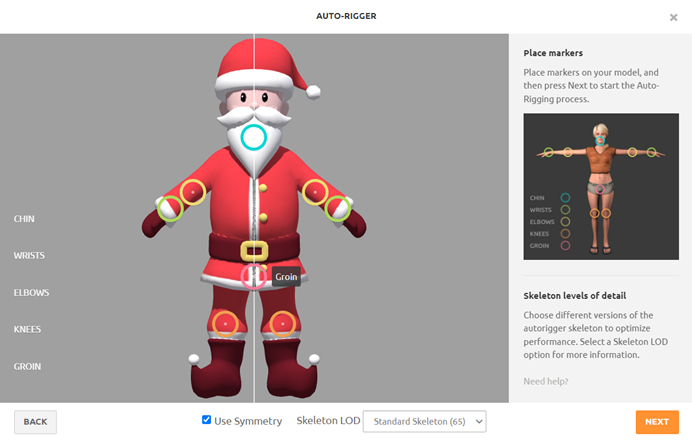
Notice: after MAKAR v3.4 you must choose category to be published.
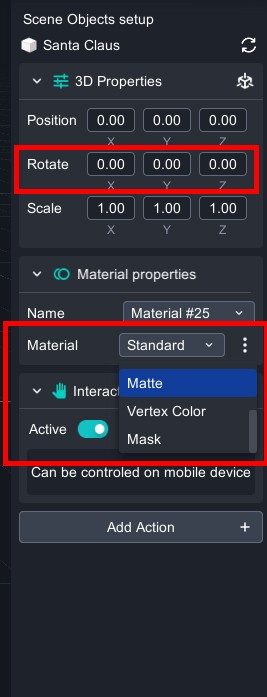
Rotate Y to 180°to make it on the front. Edit material properties to “Matte”.
Christmas sound: Magical Christmas by AlexiAction from Pixabay.
(https://pixabay.com/music/christmas-magical-christmas-127318/ )


Metaverse Draw Lots-Using Variable and Lists of MR Project
This tutorial includes logic of "Transform, Actions, Controls, Events, Events and List".We will learn about:
Keep from simultaneous click,
Come up draw lots after setting visibility to false
Randomly come up lot after clicking the box
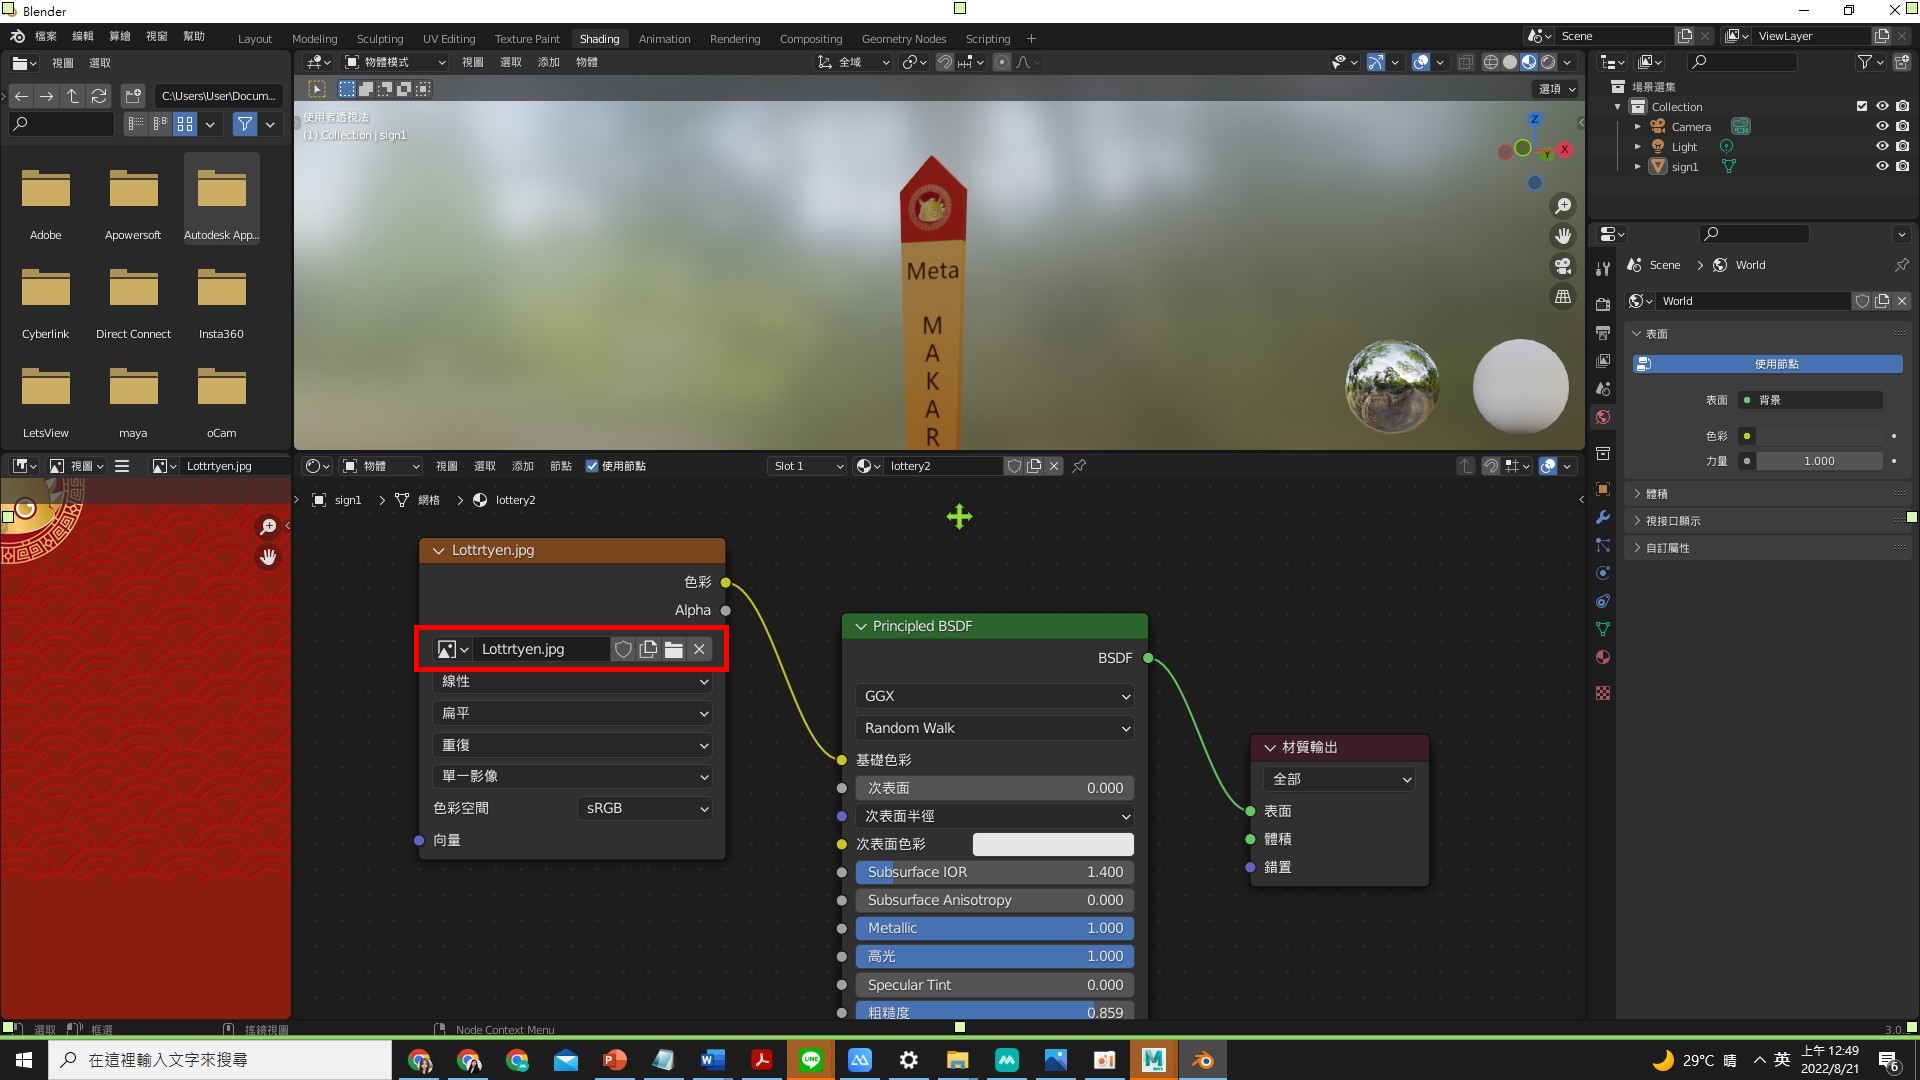
- Open PowerPoint, edit image and export it.
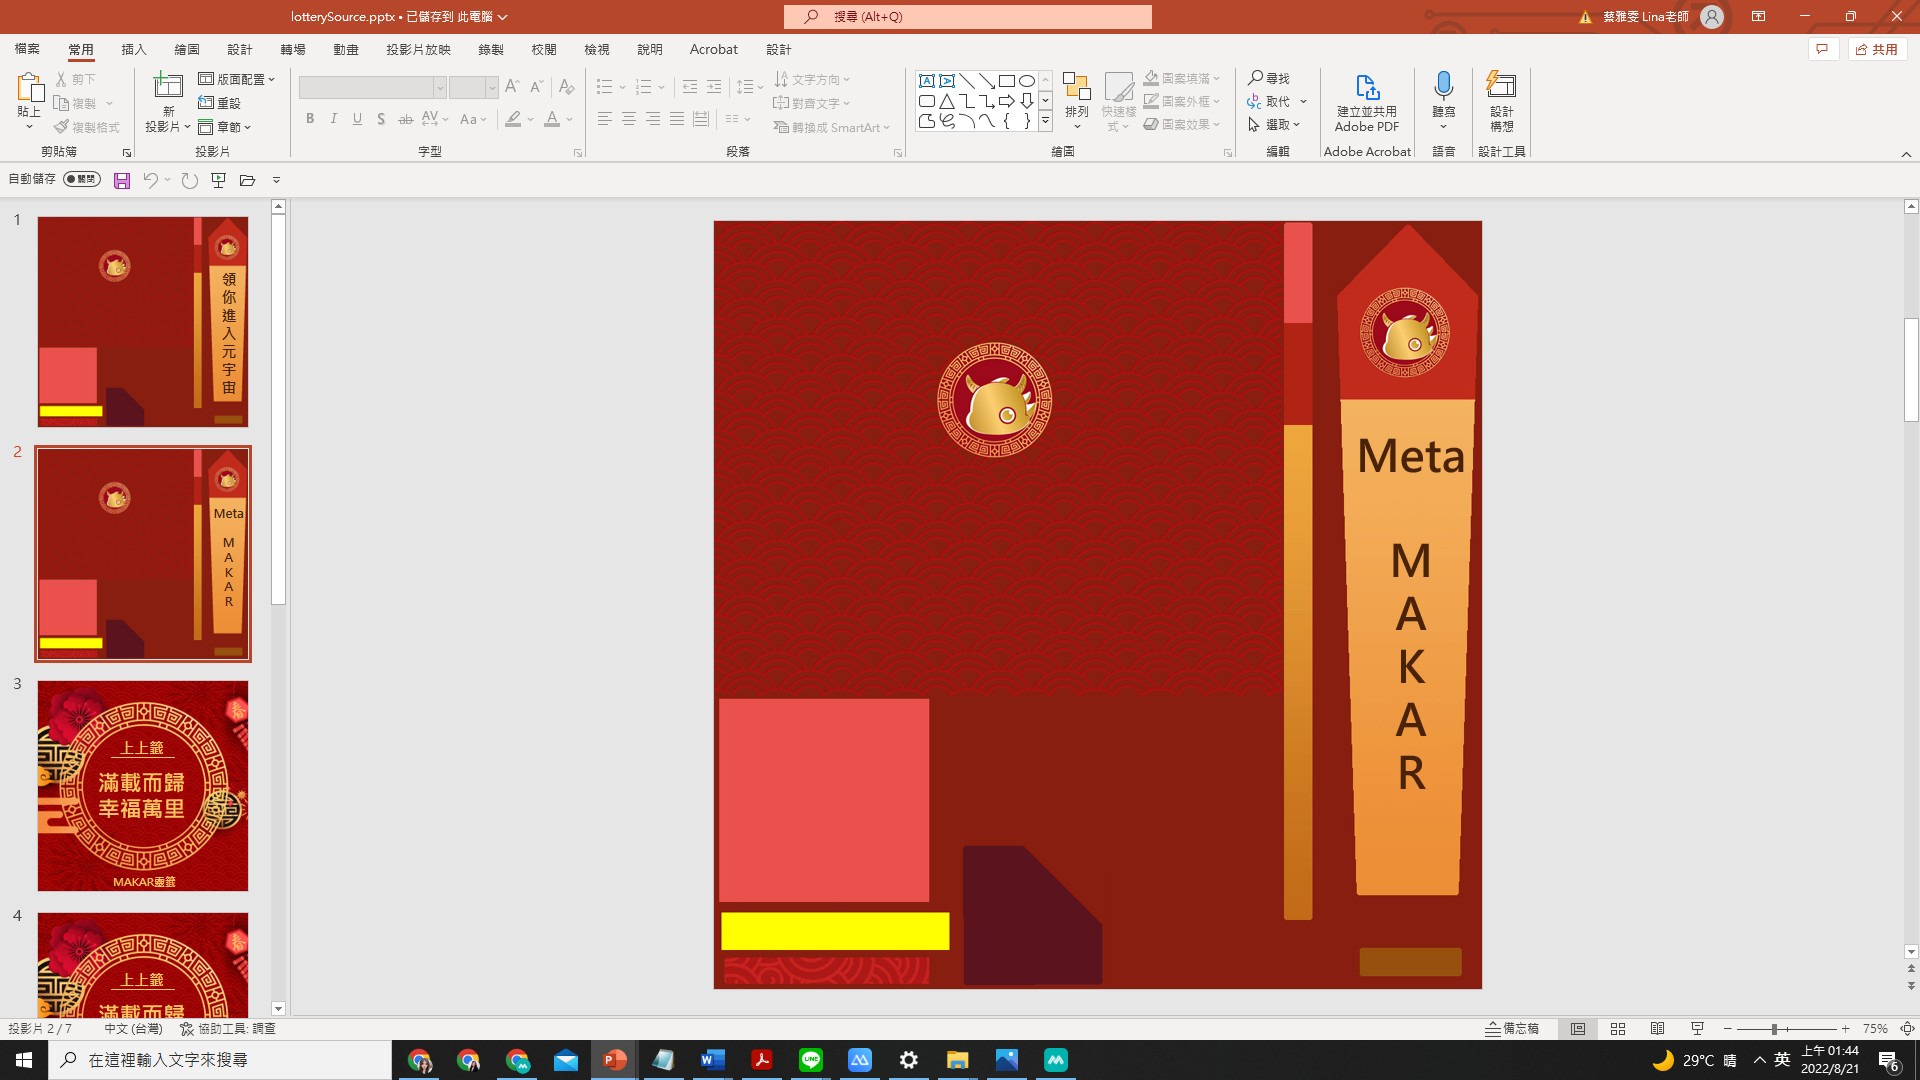
- file>save it to jpg
- open Blender>import FBX>shift to Shading>change the image
Object's basic setting
- Drag 3 model to the scene.
Add text of "correct " and "wrong".
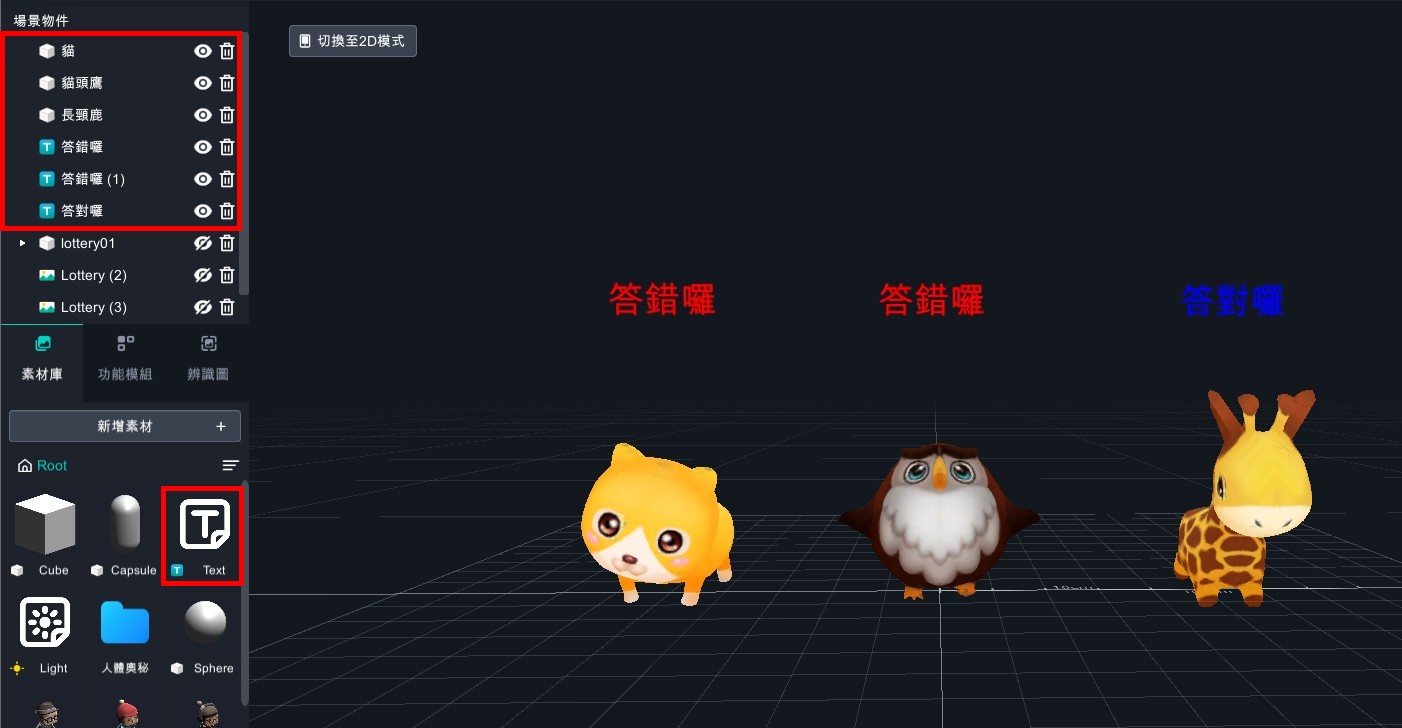
- Drag box to the scene, and put "lottery02、lottery02(1)、lottery02(2)" to lottery01.
- Put lots to the box and adjust the angle in needs.

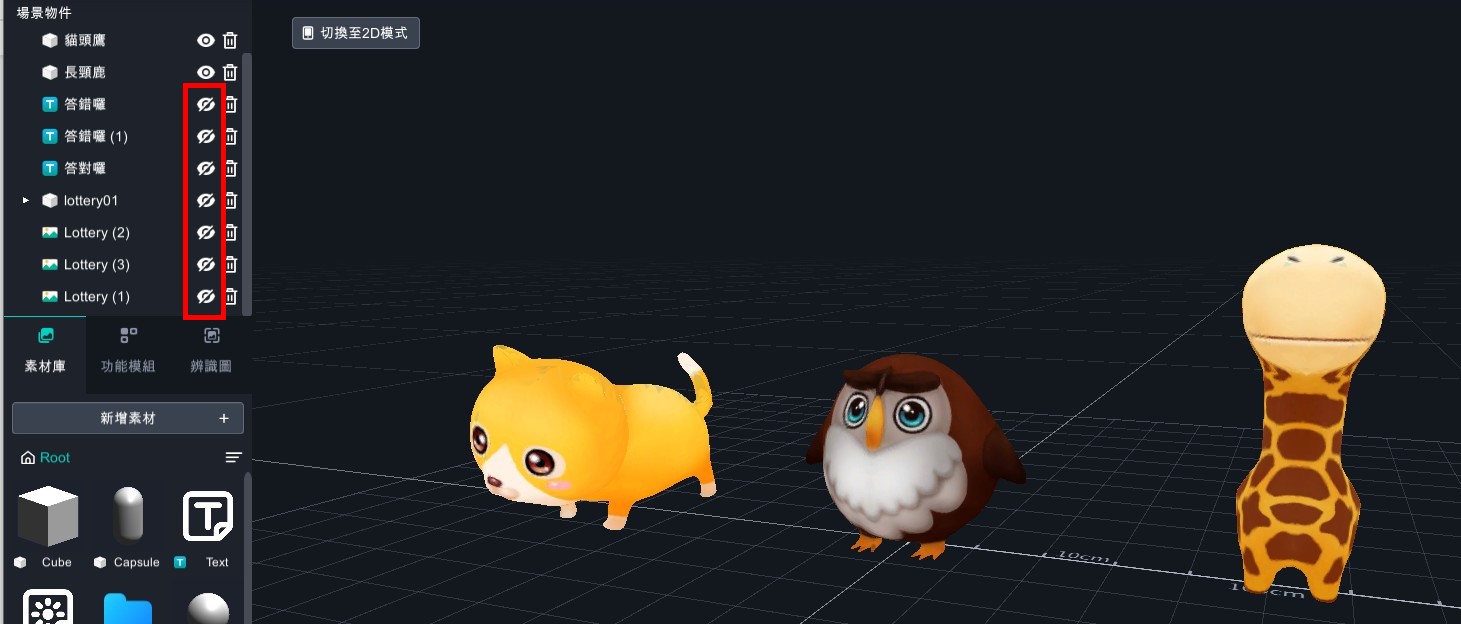
- Close the objects besides 3 models.
- Add all of object logic.
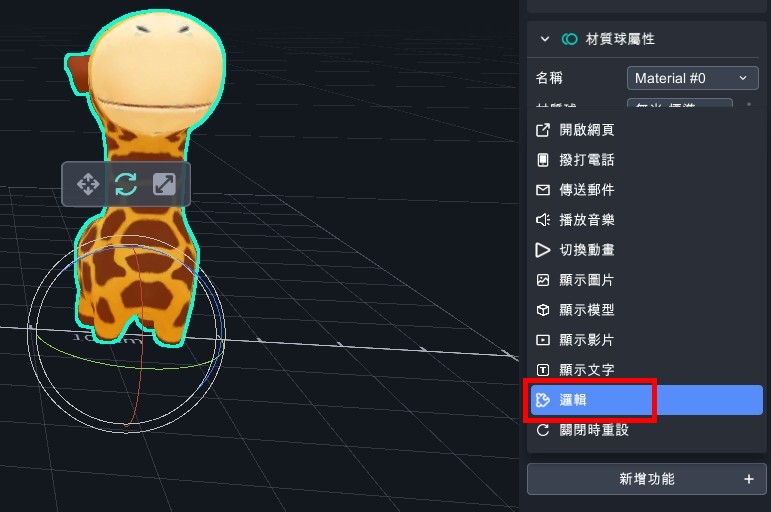
- Open the logic.
- Set the object's visibility to true.
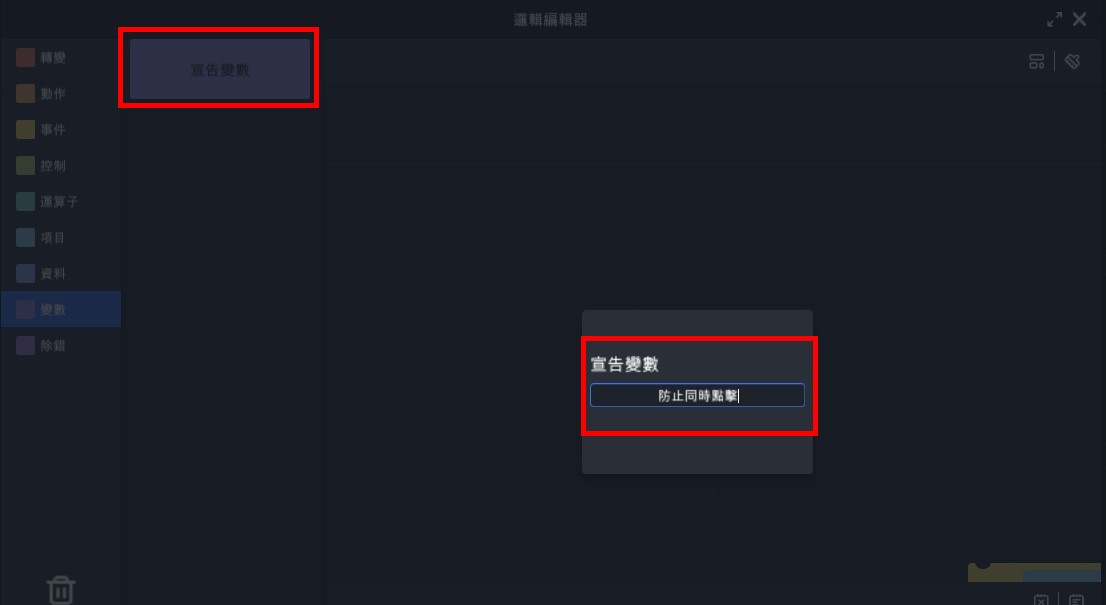
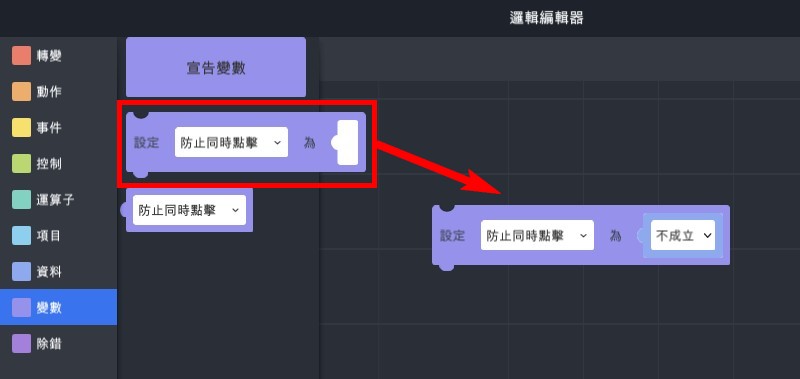
- Add variable>keep from simultaneous click and set the visibility to false.
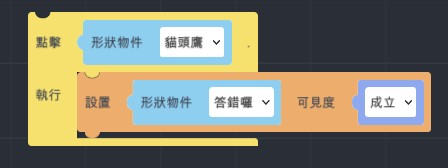
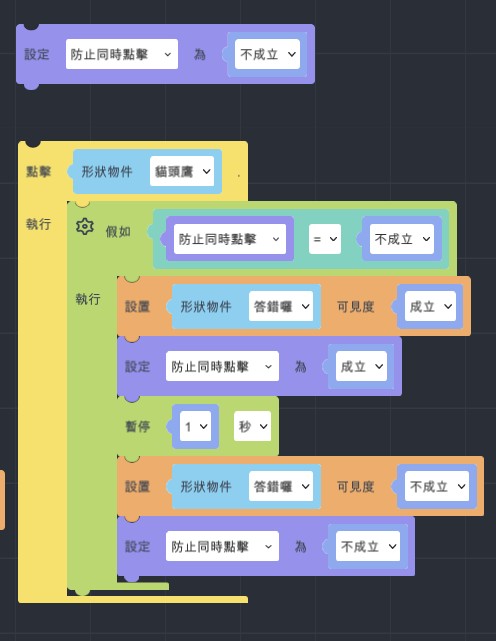
- Add "If…do" logic.
(2). Set object's visibility to true.
Note: add text of "wrong".
(3). Add variable "keep from simultaneous click=false".
Note: you can not click the objects before step4.
(4). Wait for 1 second.
(5). Set object's visibility to false.
Note: close the text of "wrong".
(6). Set "keep from simultaneous click=false".
Note: close the situation that can not click objects.
(7). Copy 2 and adjust the other object's trigger situation.
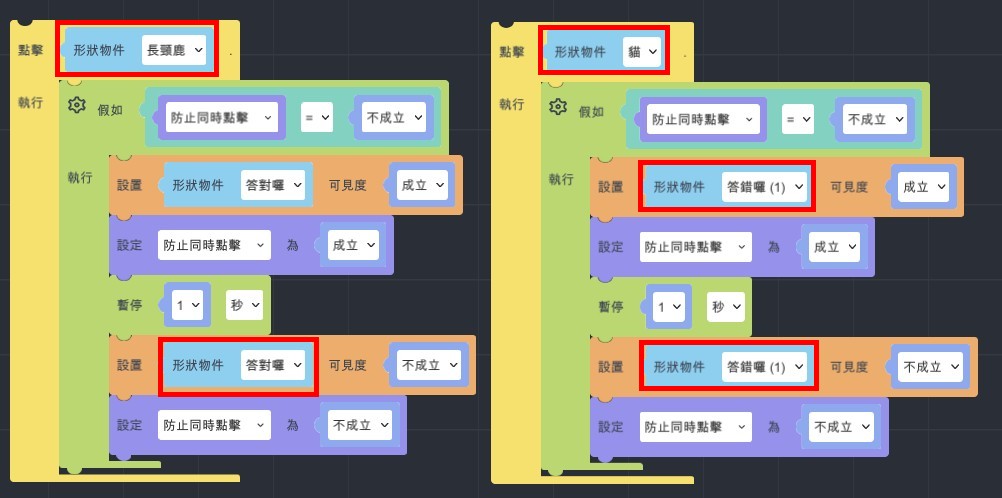
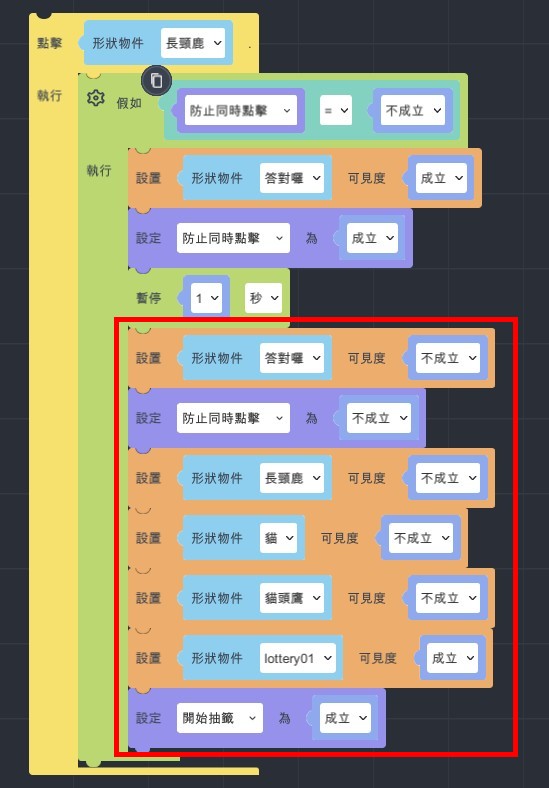
- Take the model of giraffe for example.
- Copy three model and set their visibility to false.
- Set lottery01 visibility to true.
- Add variables>start to draw lots >true.
Draw Lots Setting
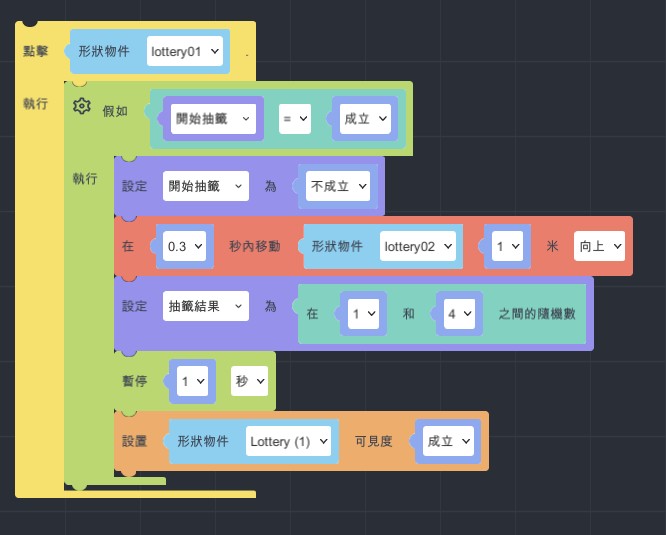
- Add "When…is clicked" >set the up moving animation.
- Add "If…do">set variable of start to draw lots to true. You can repeatedly click.
- Set click for once, add variable to false and put it on the animation's top.
- Add variable : lot result.
- Set lot result: operators>random number from …to…
- Set random number from 0 to 5.
- Set random number from 0 to 5 (01234) in logic.
- EX1: set 0~5, it will be 01234.
- EX2: set1~6, it will be 12345.
- EX3: set6~9, it will be 678.
- When setting lot’s visibility, you could know that the coming up of animation and lot is too close, so add wait for 1 sec.
- Add "create empty list" and add "MyList" to variable.
- Add data>lists> add transform item to MyList.
- Copy 3 and put them behind create empty list.
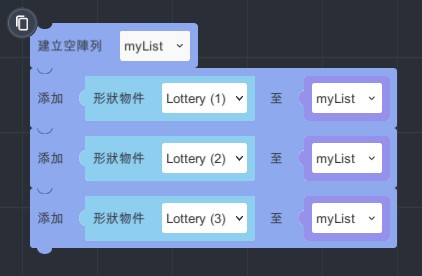
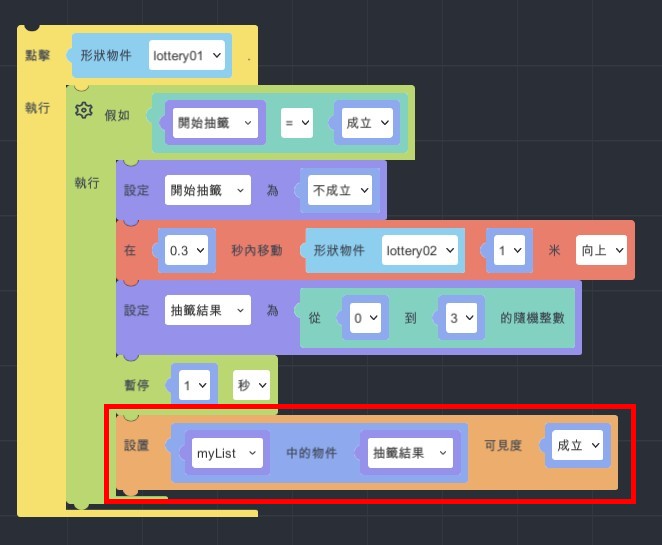
- Data>list>set set "add my list to lot result" visibility to true.
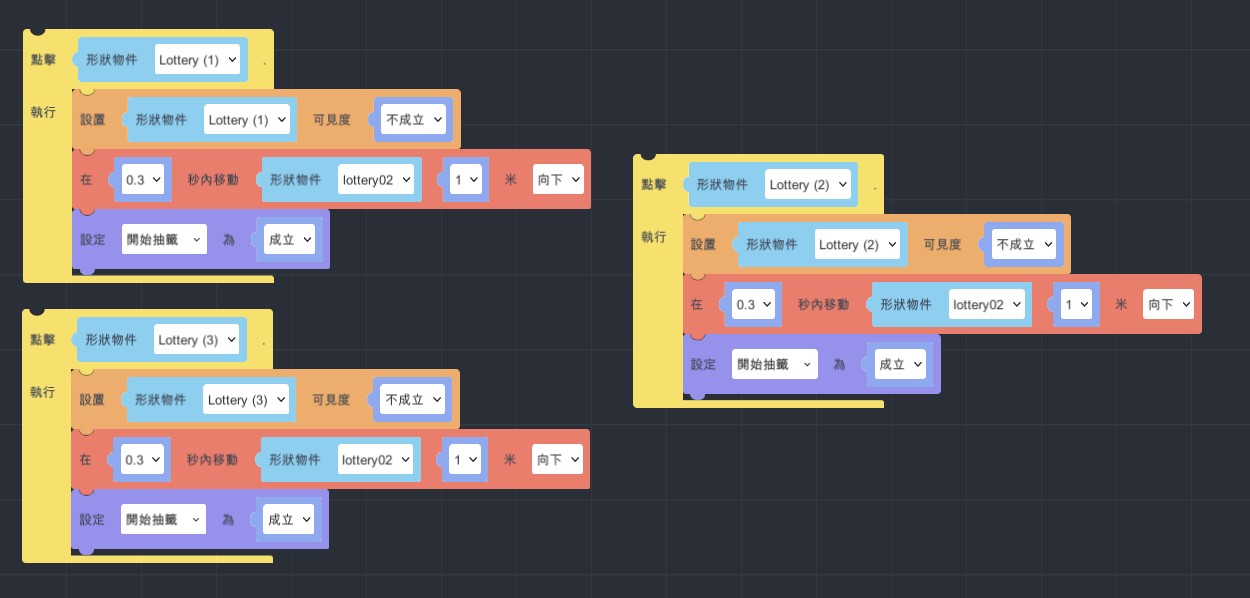
- Repeatedly click setting
- Event>when…is clicked.
- Set Lottery (1) visibility to false.
- Copy animation and change it to moving down.
- Set "start to draw lots" to true.
- Finish and start to experience!
Cooperative Learning in MAKAR_Portal
Abstract
This tutorial gives an example of connecting different projects via project link, and it can be achieved the purpose of cooperative learning.
1. Introduction
In the past, it’s not available to have multiple creators to create a huge or complex task in the same project at the same time. Therefore, here is another method you can do. Separate a big project into several small parts, and link each other with “portal ”. This method may help to decrease the loading compared with only one person is responsible for making the entire project.
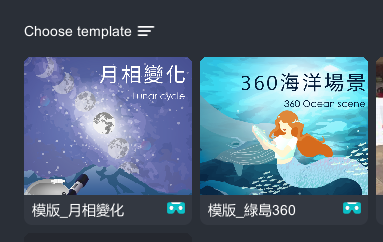
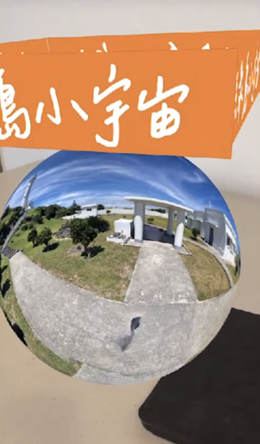
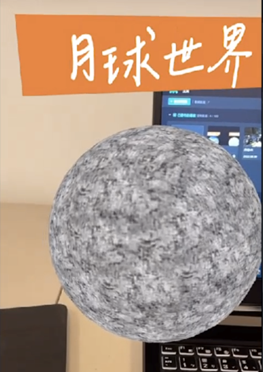
For the demonstration, there three students (A, B, C). Student A and B are individually create two VR projects. We used the templates in MAKAR editor for this tutorial(Green Island & Moon Phase).
2. Project link
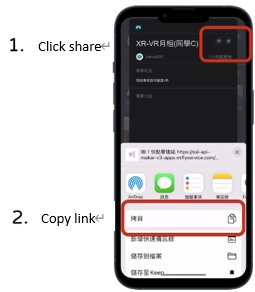
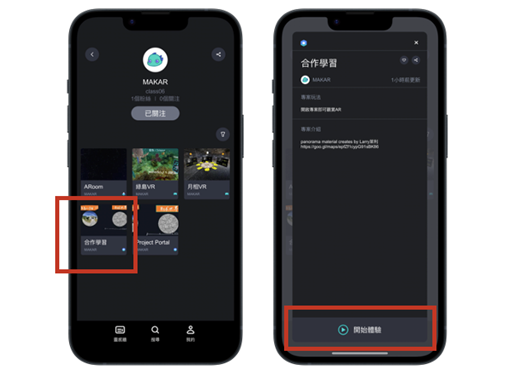
On mobile device(iPad/iphone), after selecting the project. There is a “sharing button” on the top right corner, then you can copy the link after you tapped the sharing button. And send this link to the student who is responsible for integrating the whole project(student C).
Student A(Green Island):https://is.gd/WdjCSk
Student B(Moon Phase):https://is.gd/zj1Rg5
3. Create an integrate project
Click top left corner, “+New Project”
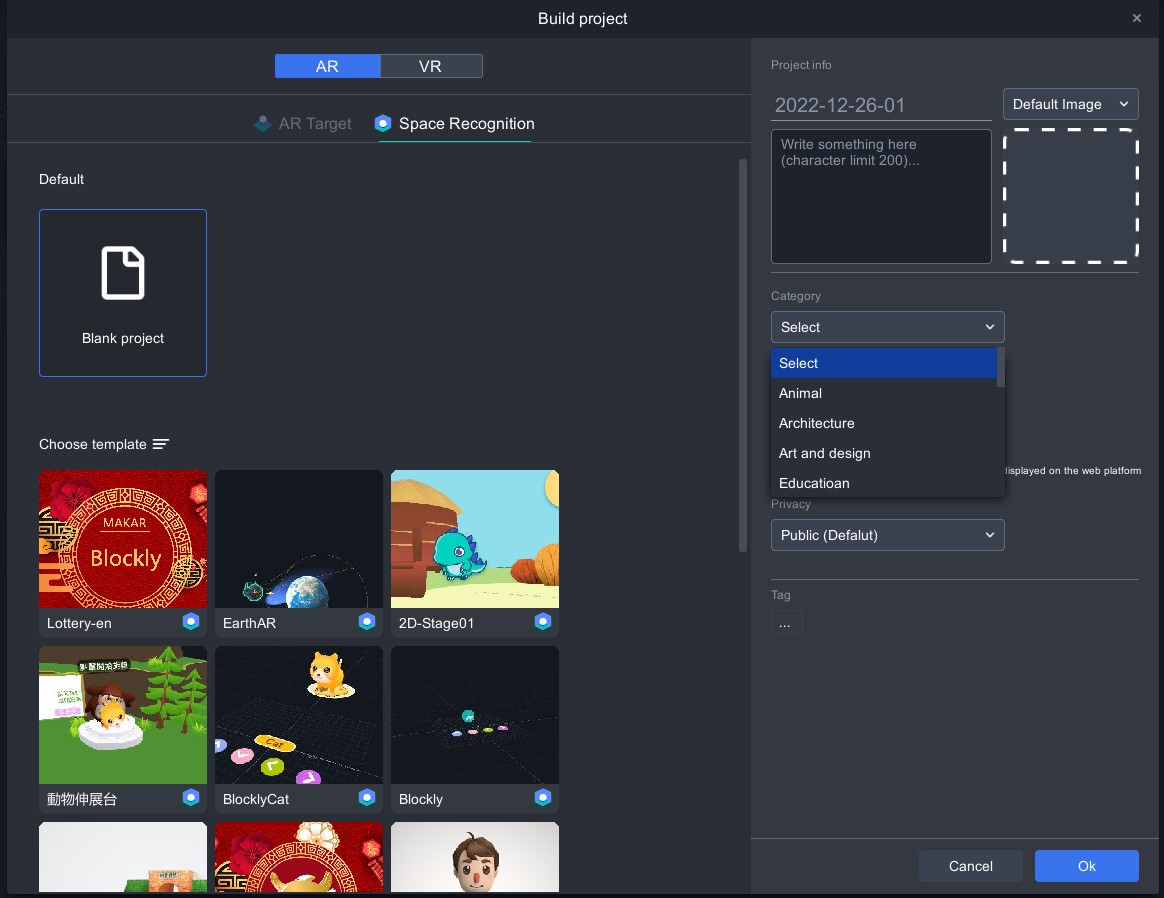
4. Space Recognition
In AR area, chose space recognition for this project, then click “ok” button

5. Import material
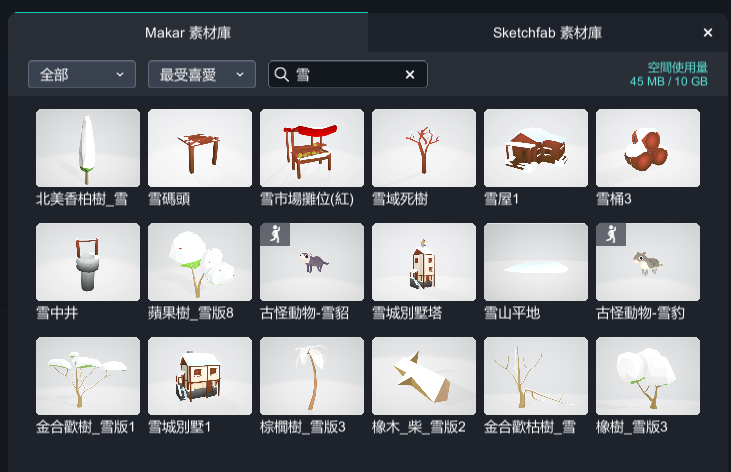
Material download link:
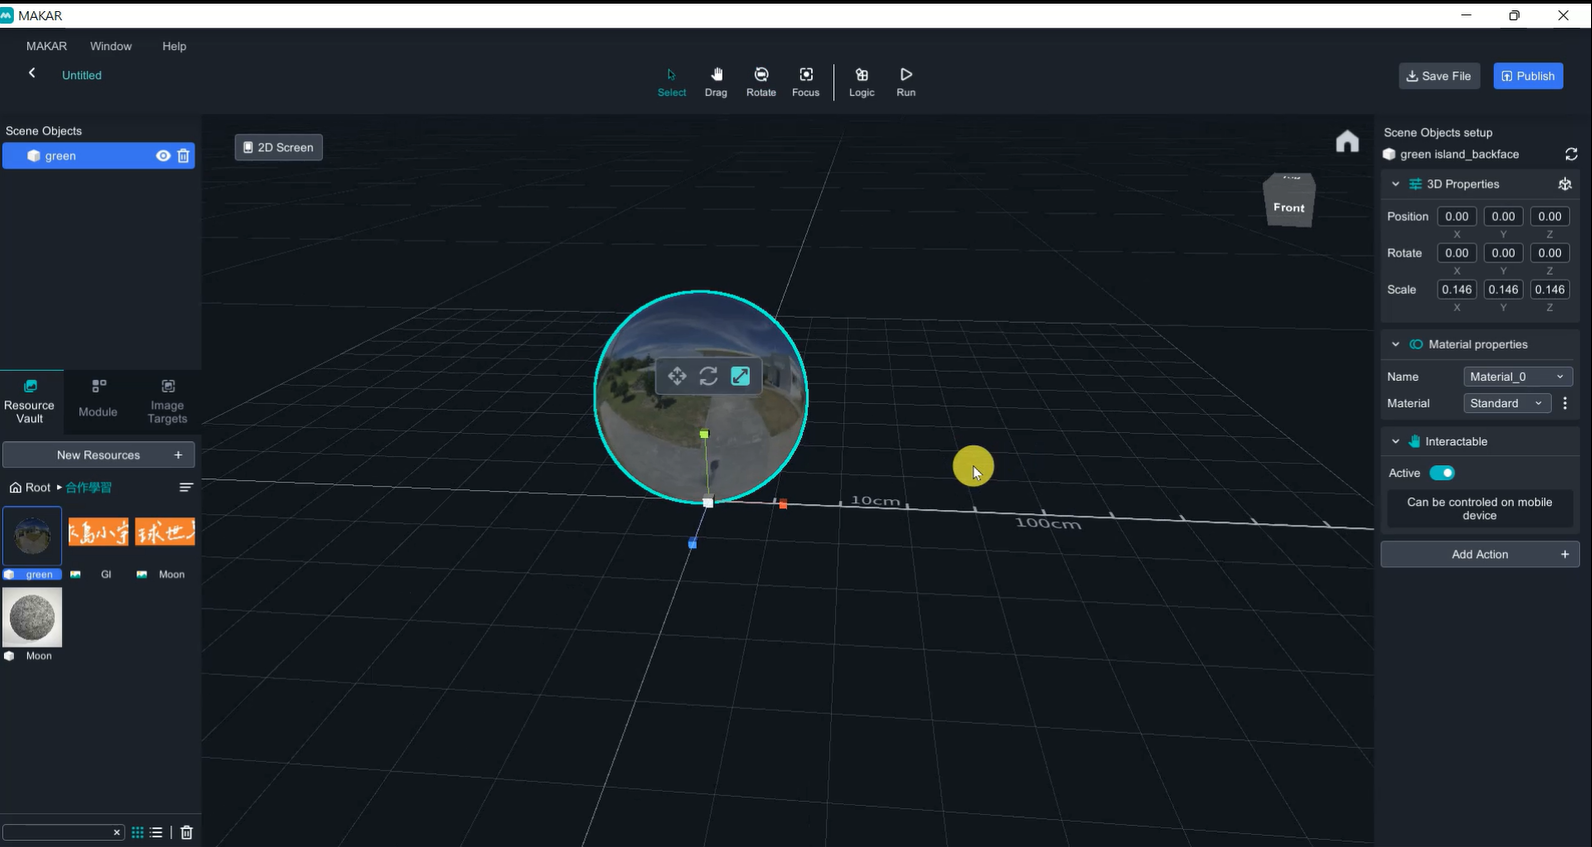
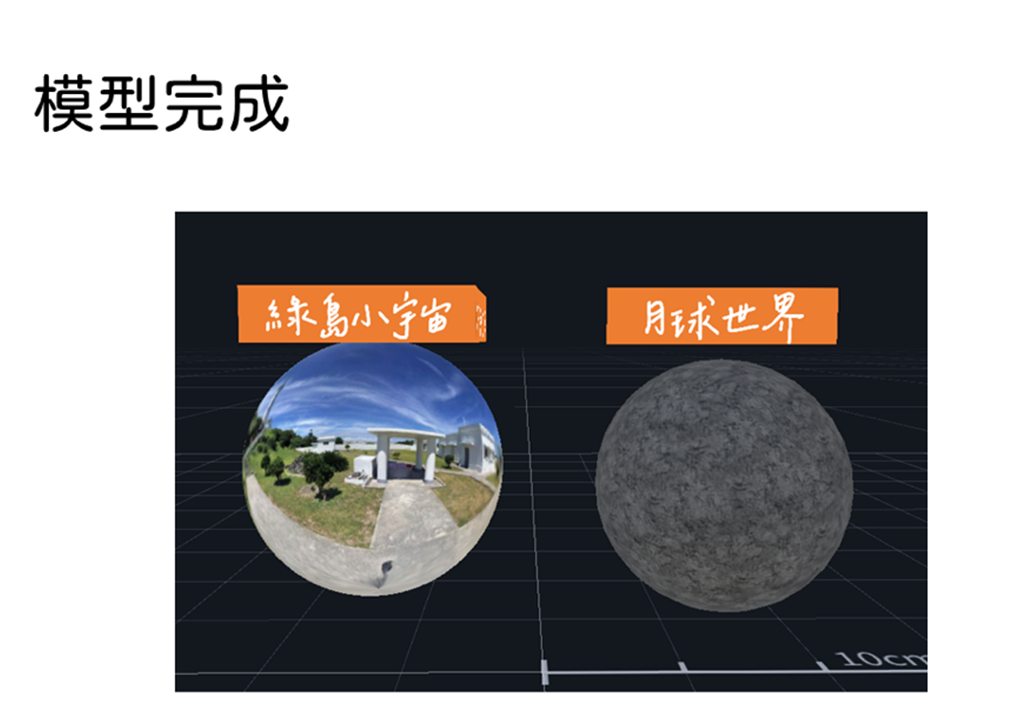
(a) In this tutorial, I will use sphere as a trigger. A panorama sphere is for Green Island project ( panorama image: https://goo.gl/maps/epfZf1cypG91sBK86 by Larry); Moon Phase project will use the 3D model provided by MAKAR online resource.
(b) Image material: there are created by PowerPoint.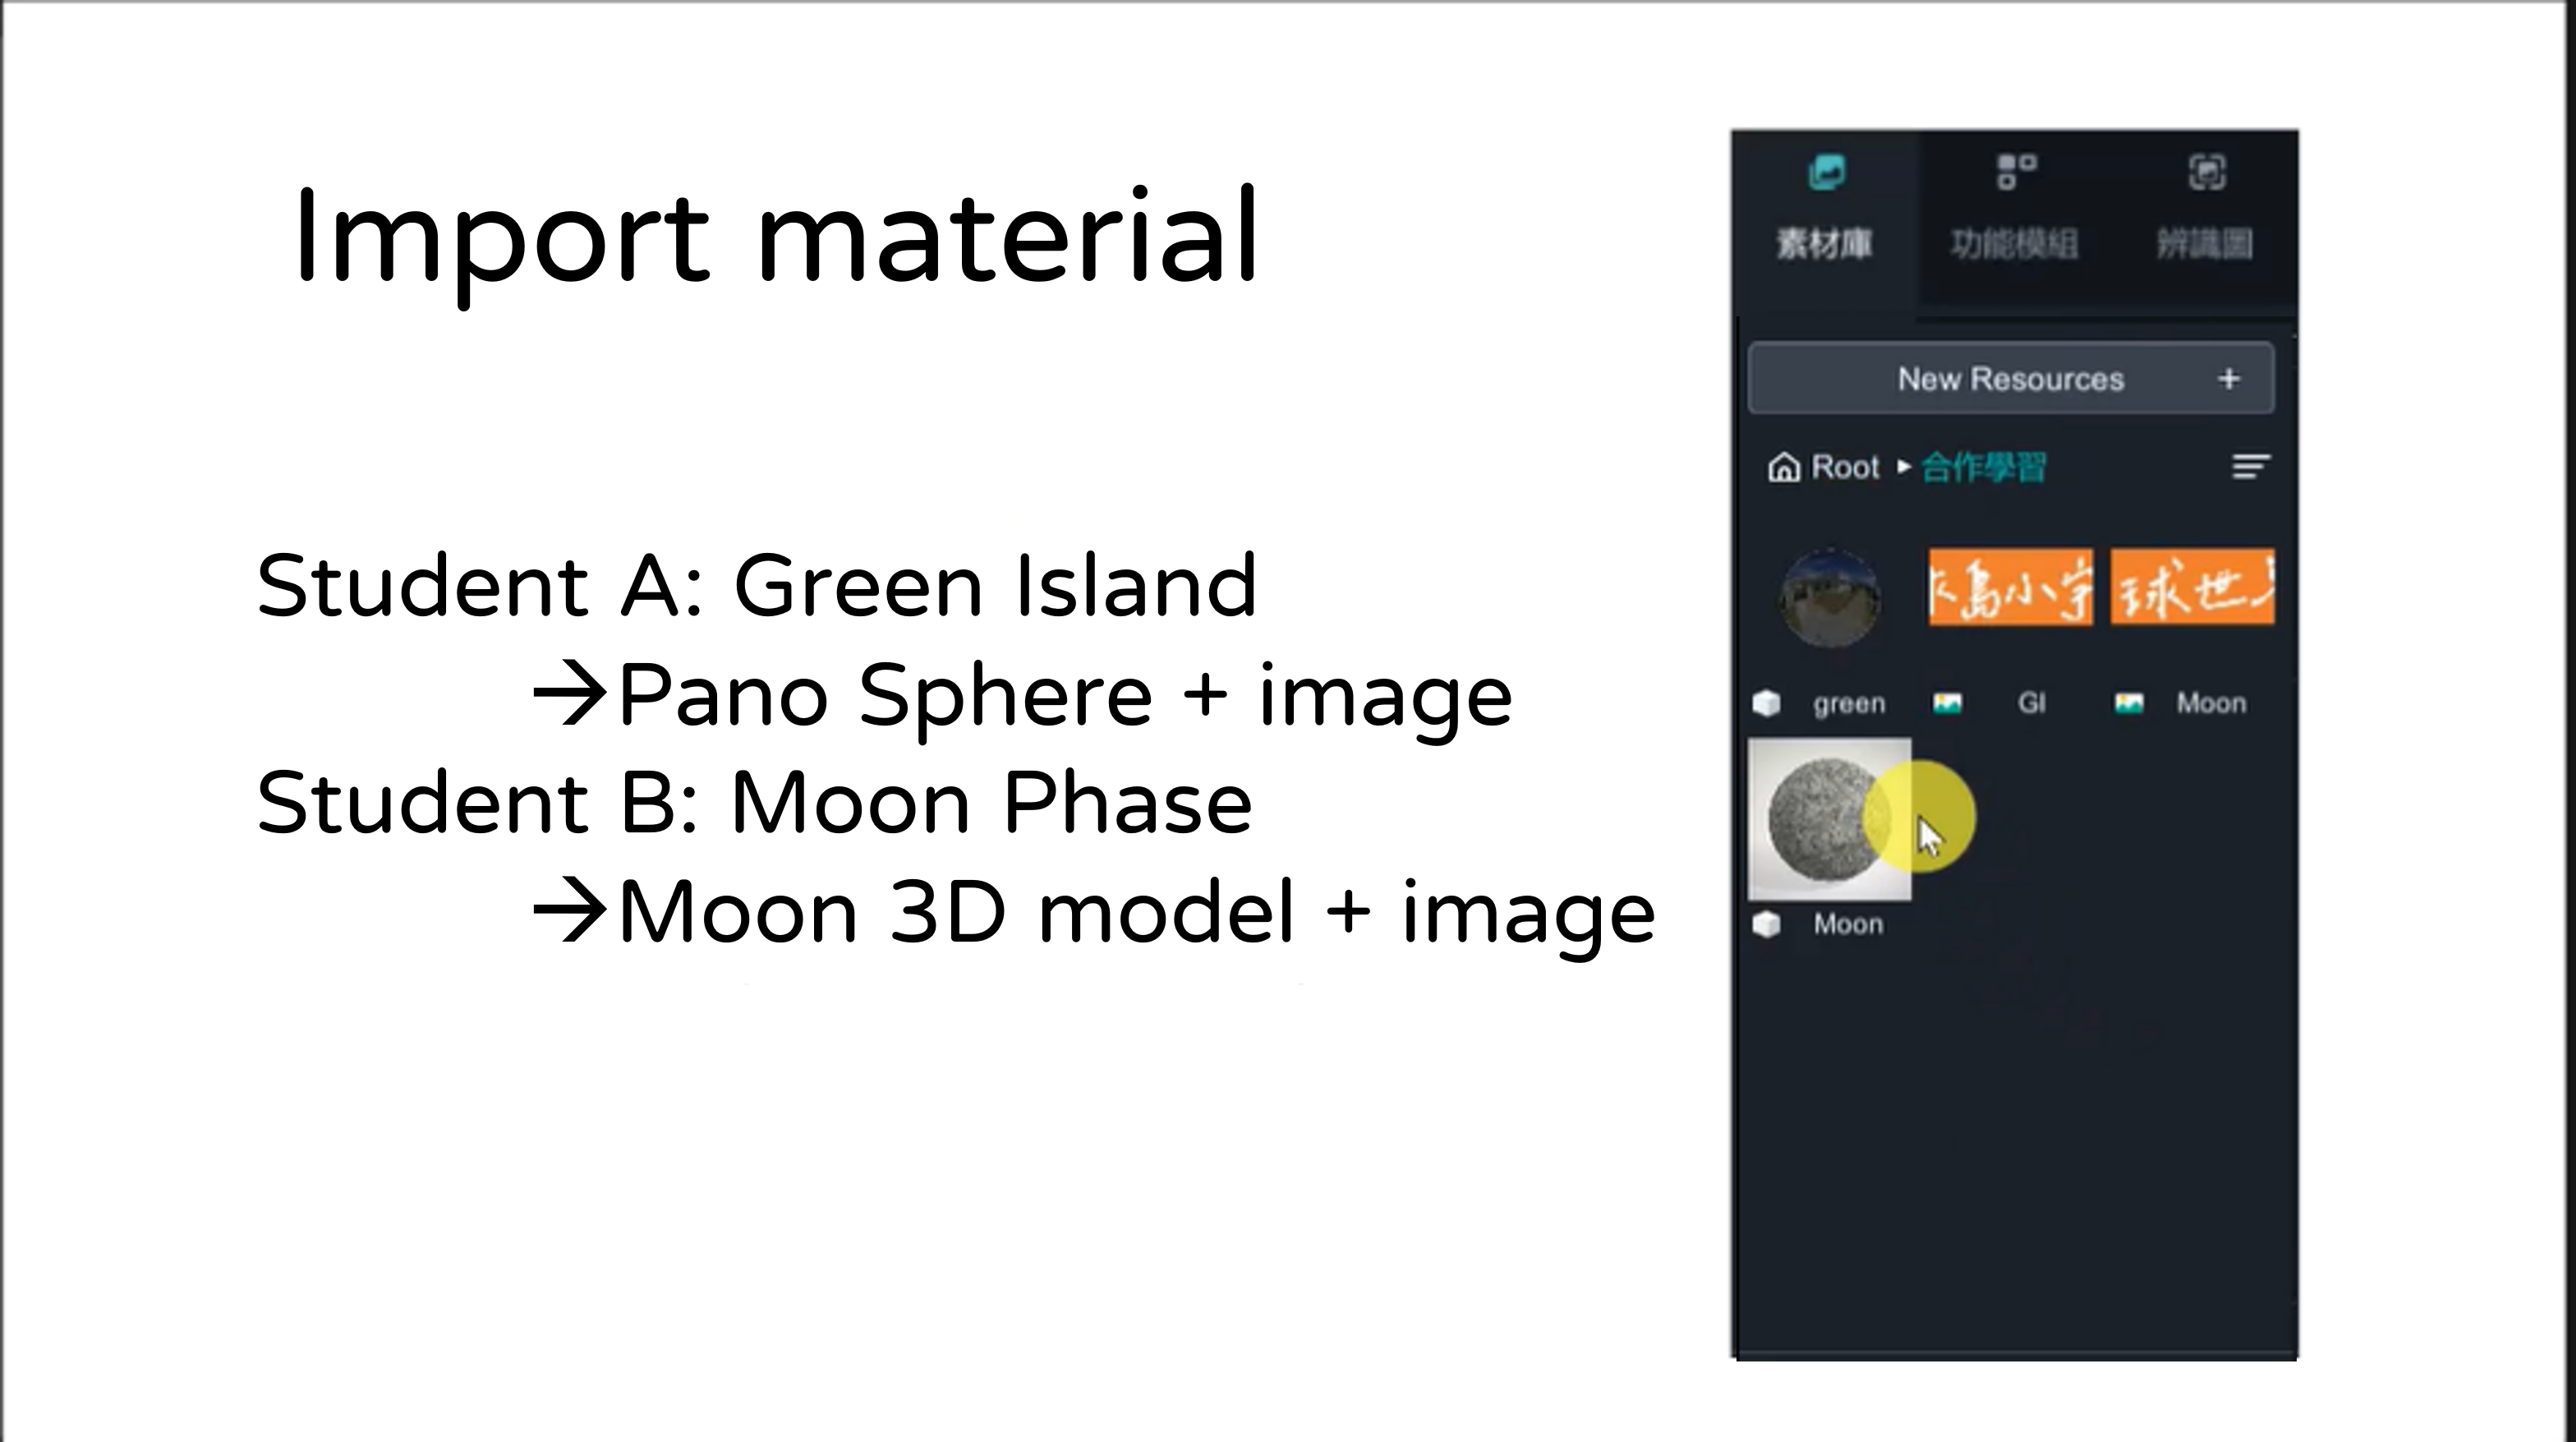
(c) Put 3D models in the canvas, rescale(Hotkey” R ”) their diameter around 10 cm may easily demonstrate on ordinary table. There is a scale in the center of the canvas if you zoom in. Later, if you need to demonstrate for full size, such as human body, then you can group them all and rescale them.
(d) Model action
- Tap the sphere to show image: Select sphere🡪 Add action🡪 Show image 🡪 select the image
- Tap the image to teleport to another project: Select image🡪 Add action🡪 Link to Webpage🡪 Paste the project link.

Material Link
Student A(Green Island):https://is.gd/WdjCSk
Student B(Moon Phase):https://is.gd/zj1Rg5
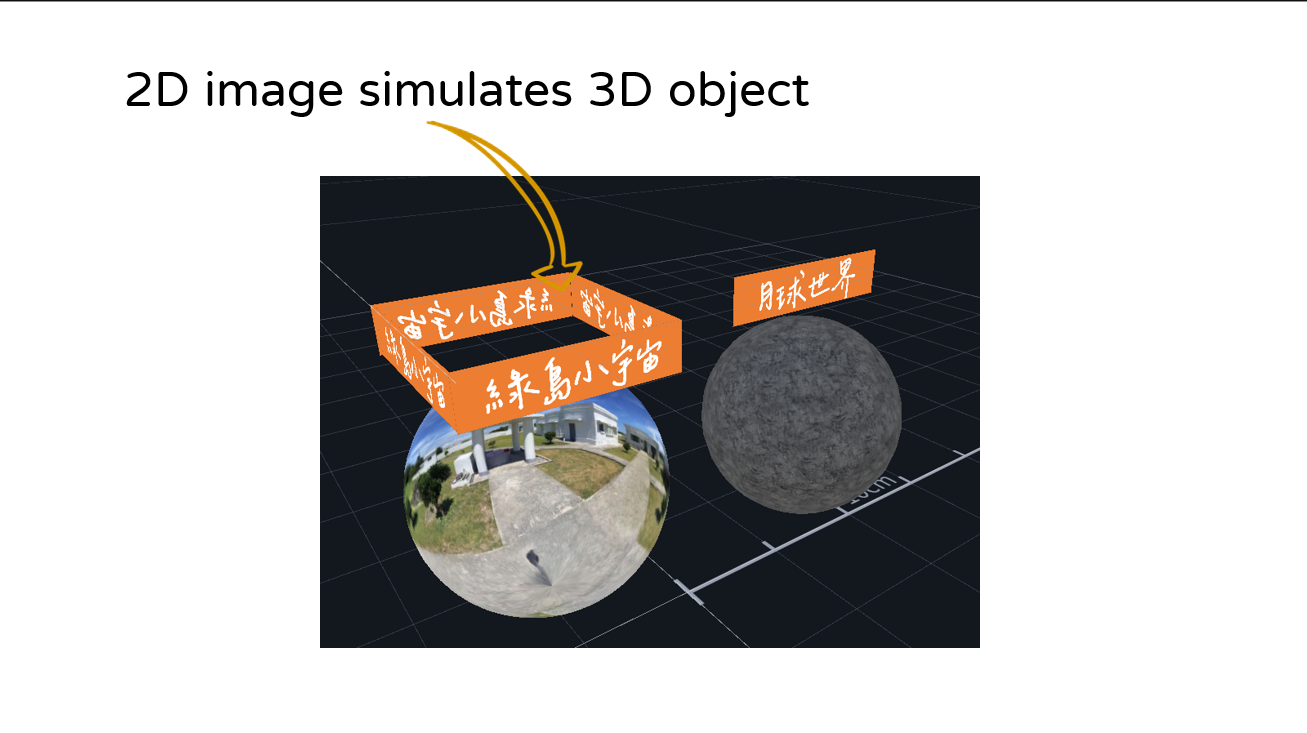
(e) 2D image simulates 3D object
2D image only shows full information in certain angle in 3 Dimensional world, which is very angle sensitive. Therefore, if we create a box with 2D images to mimic 3D object, it can almost cover every angle.
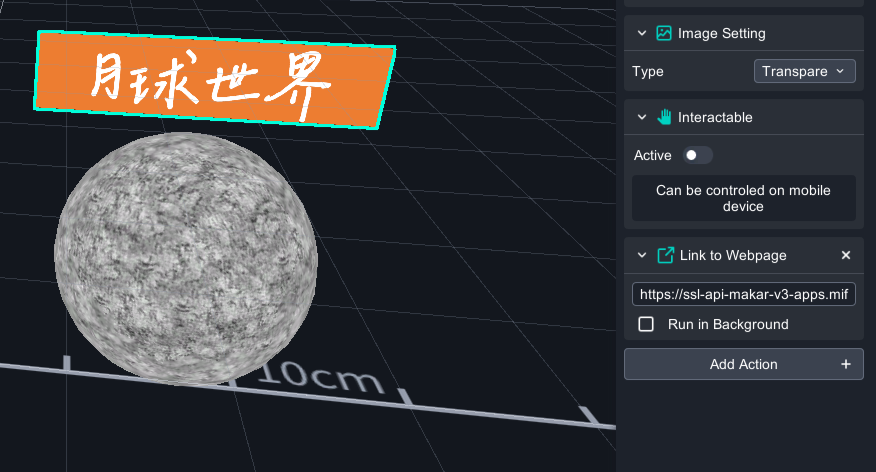
(f) Forbid image movement
Inactive the interactable will forbid the object be moved , it will reduce user accidently change the object in the canvas. Once the interactable is lucked, the action can still work, such as link to webpage and logic programming function.
(g) Finish
How to play
Click the application, type in the ID or scan the QR code to experience the AR/VR !
1. Install MAKAR application2. Scan QRcodec or search ID: class06

3. Select“ Project portal”, Click “ Start ”to activate.
Demo
※ Please keep in mind
1. The portal trick is only for IOS device so far, it’s unavailable for Android device.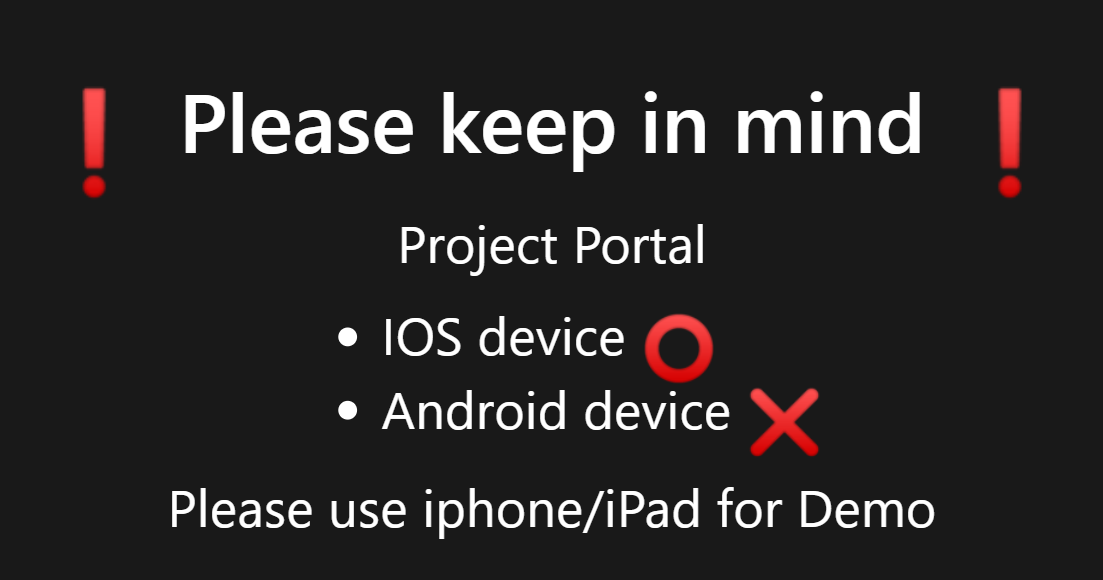
2. Project portal (Available)
- Account:Projects in same account, Projects in different account
- Project type:AR(AR target), AR(space recognition), VR are all available for teleporting to each other
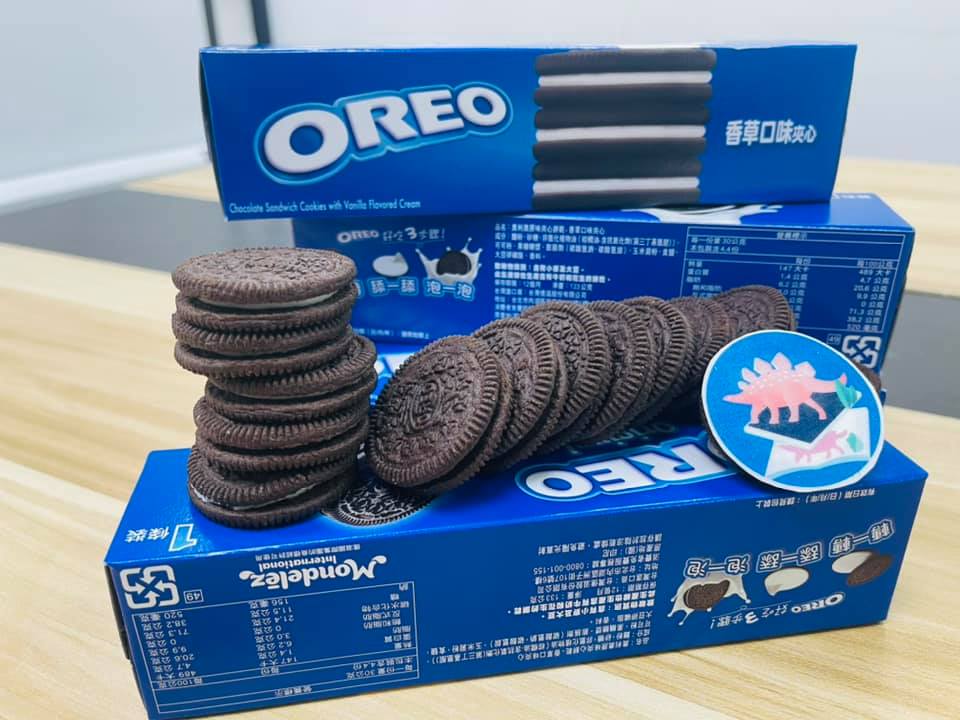
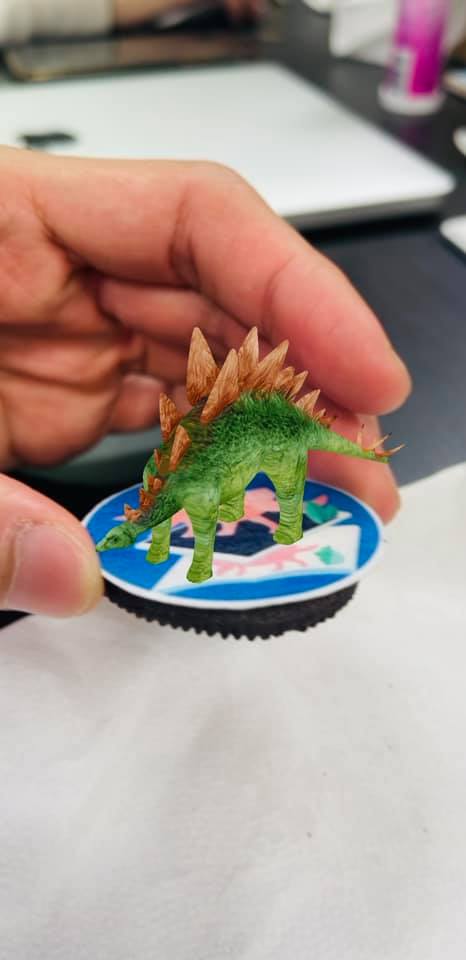
Tutorial of 3D AR Dinosaur Oreo!
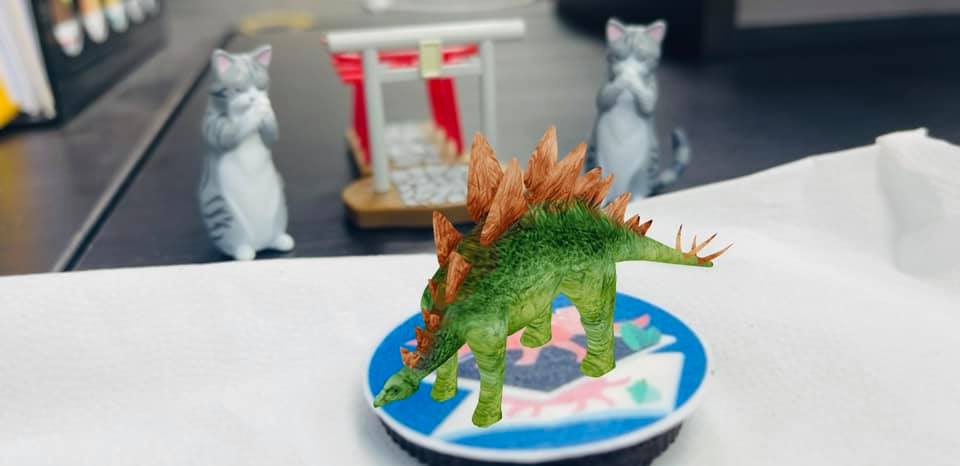
Can you believe?We can eat oreo with ARtech!
Just use Oblatum with dinosaur AR target image, and stick it on oreo, we can call out AR dinosaur and make the sound while clicking on it.
Let's see how to make it!
Plan
time: about 2hr
item: scissors, Pad or cellphone, your favorite cookies![]()
Please download the AR resource here
-
Download MAKAR (download here )
- Log in your Google Account
- Upload target image
-
Download 3D dinosaur and its voice
-
Tailoring Oblatum and stick it onto cookies
-
Experience this AR dinosaur project and enjoy your cookie!
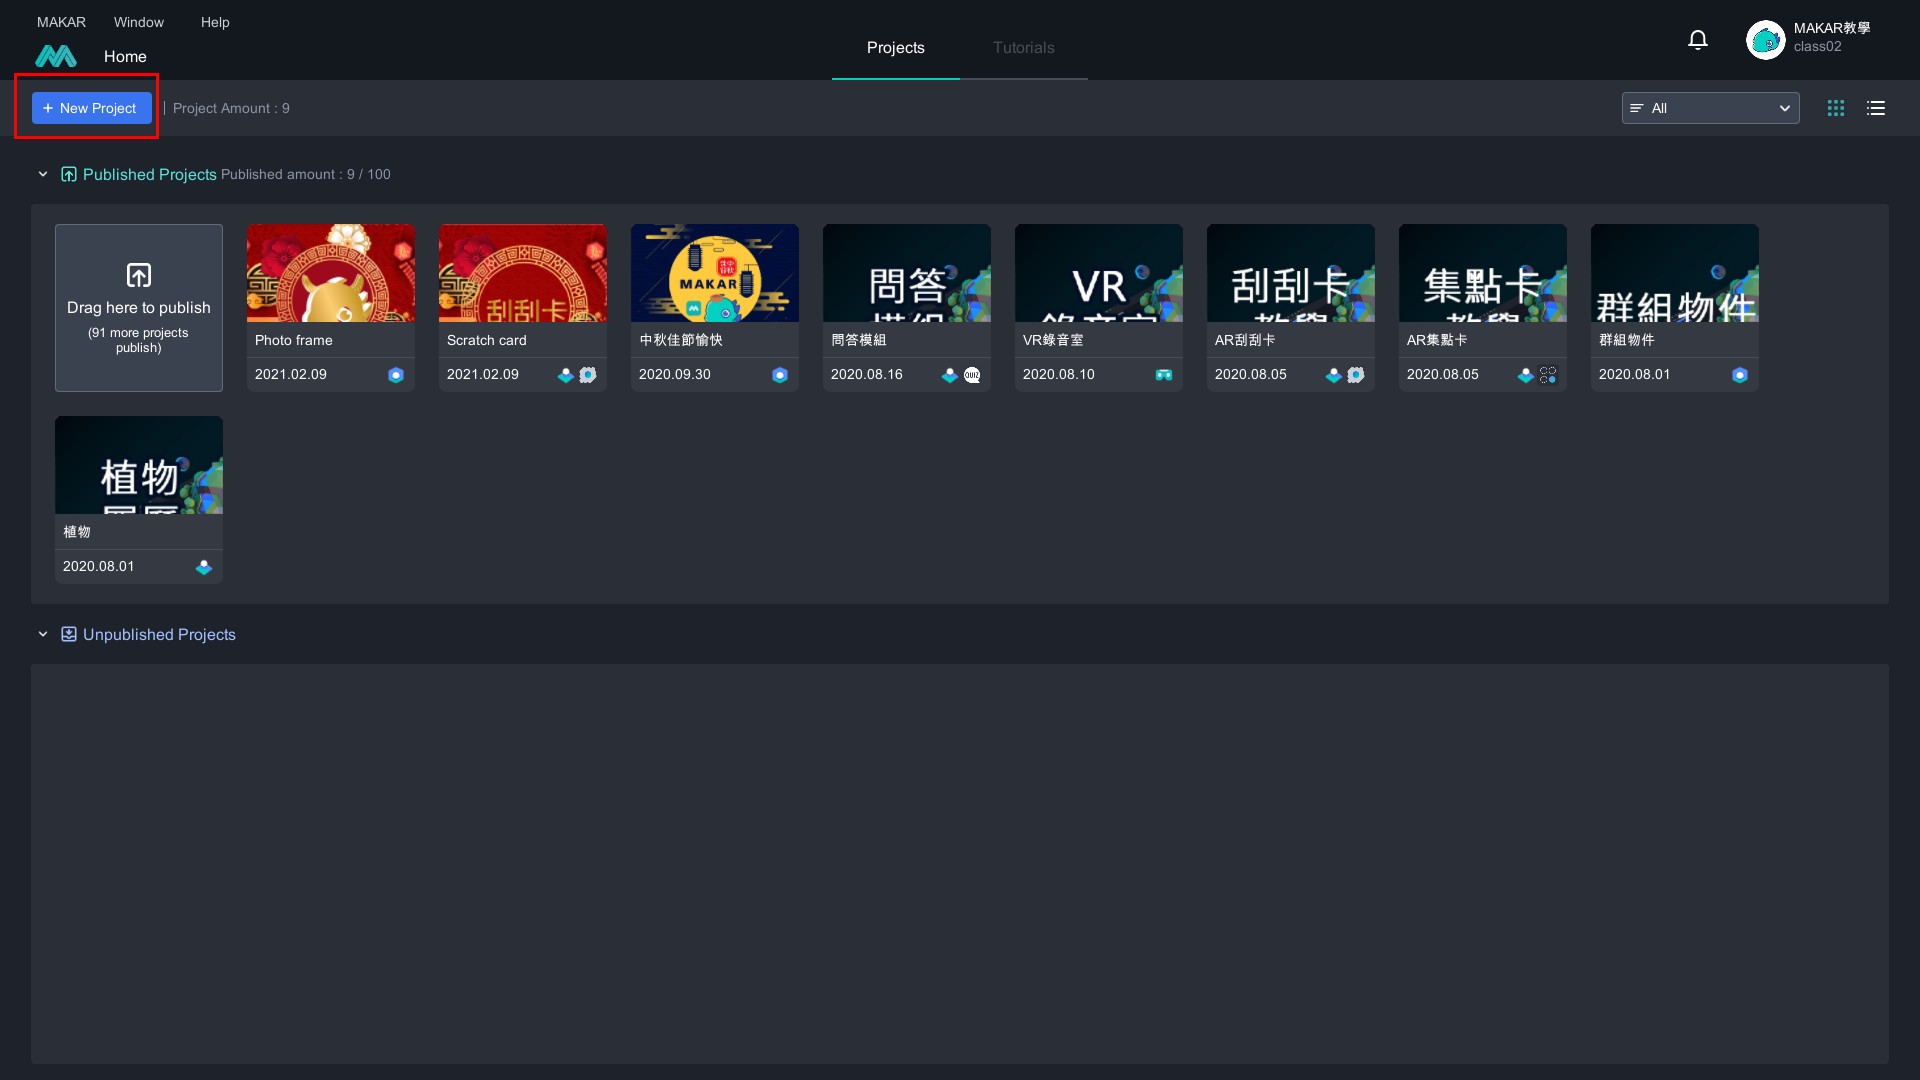
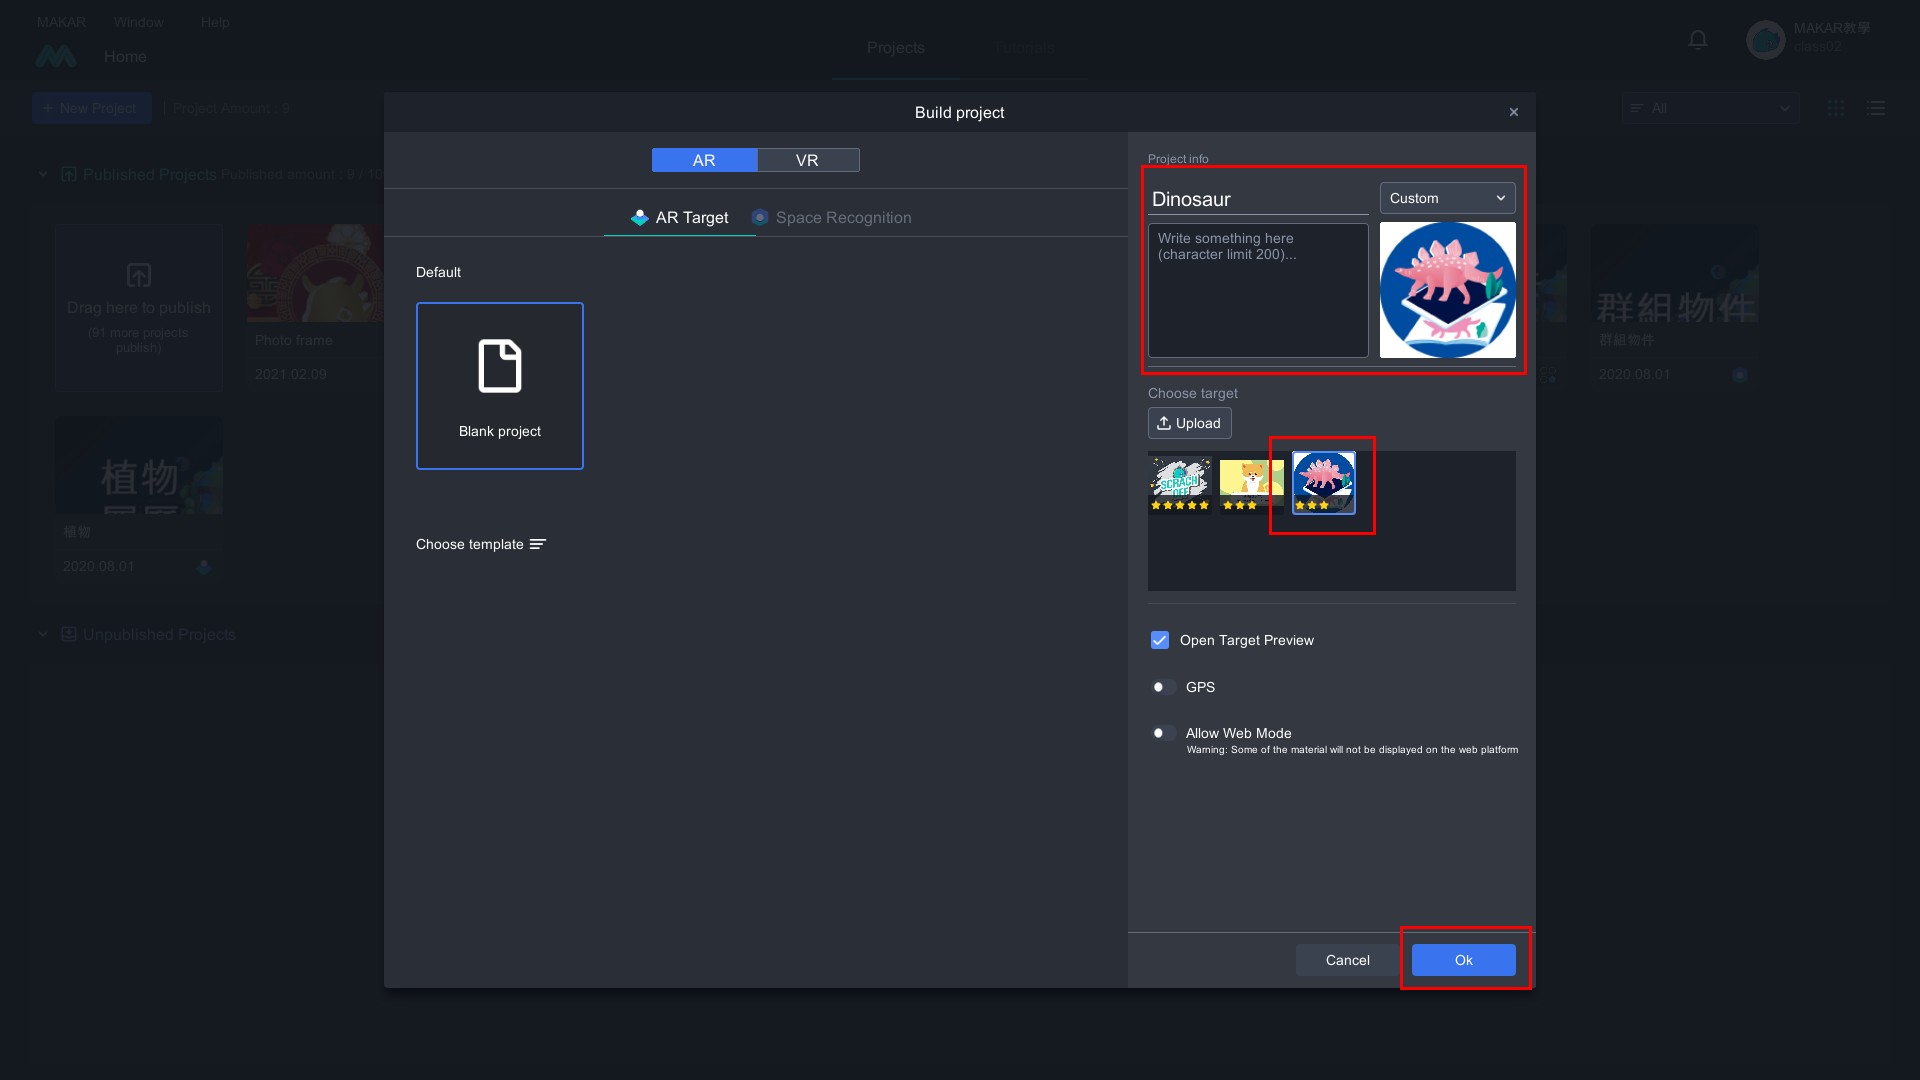
Steps on MAKAR editor
- Build up new project
- Create project's name, and upload target image, then click "OK"
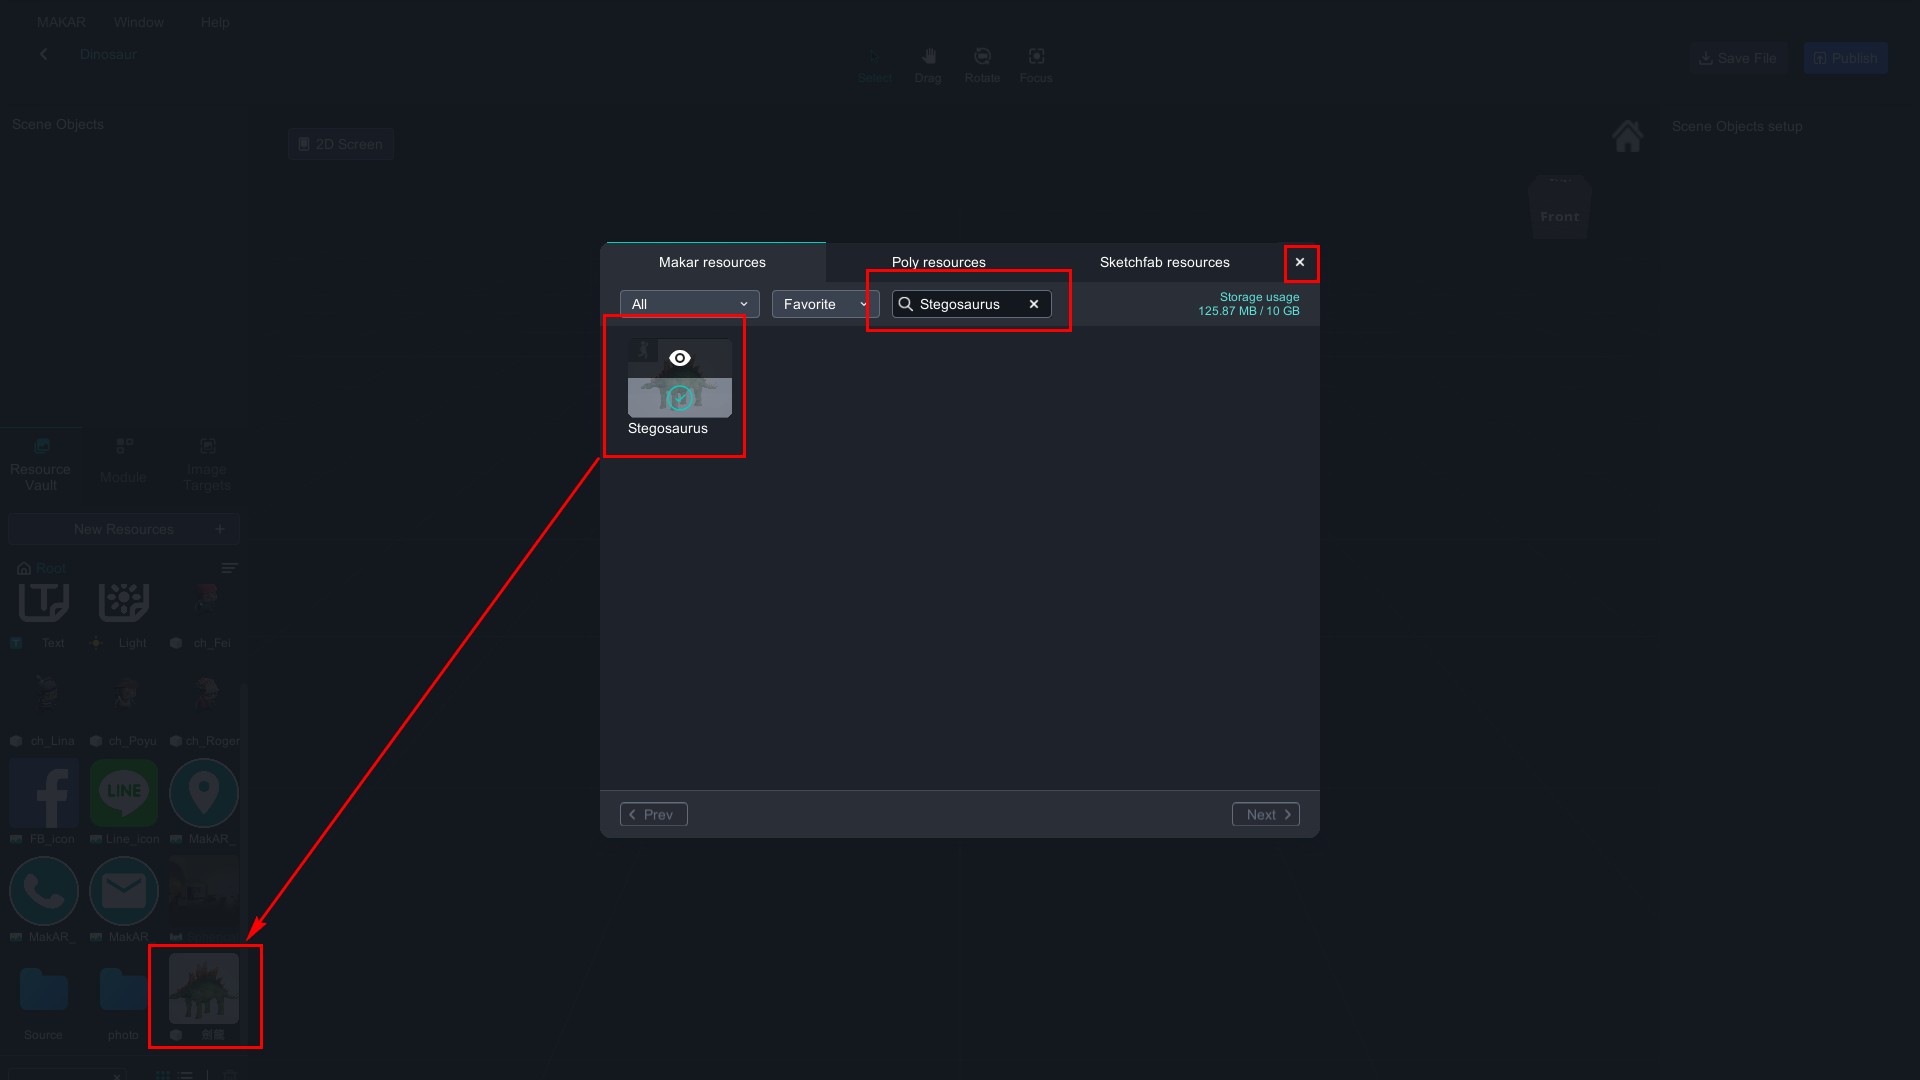
- Add online resources
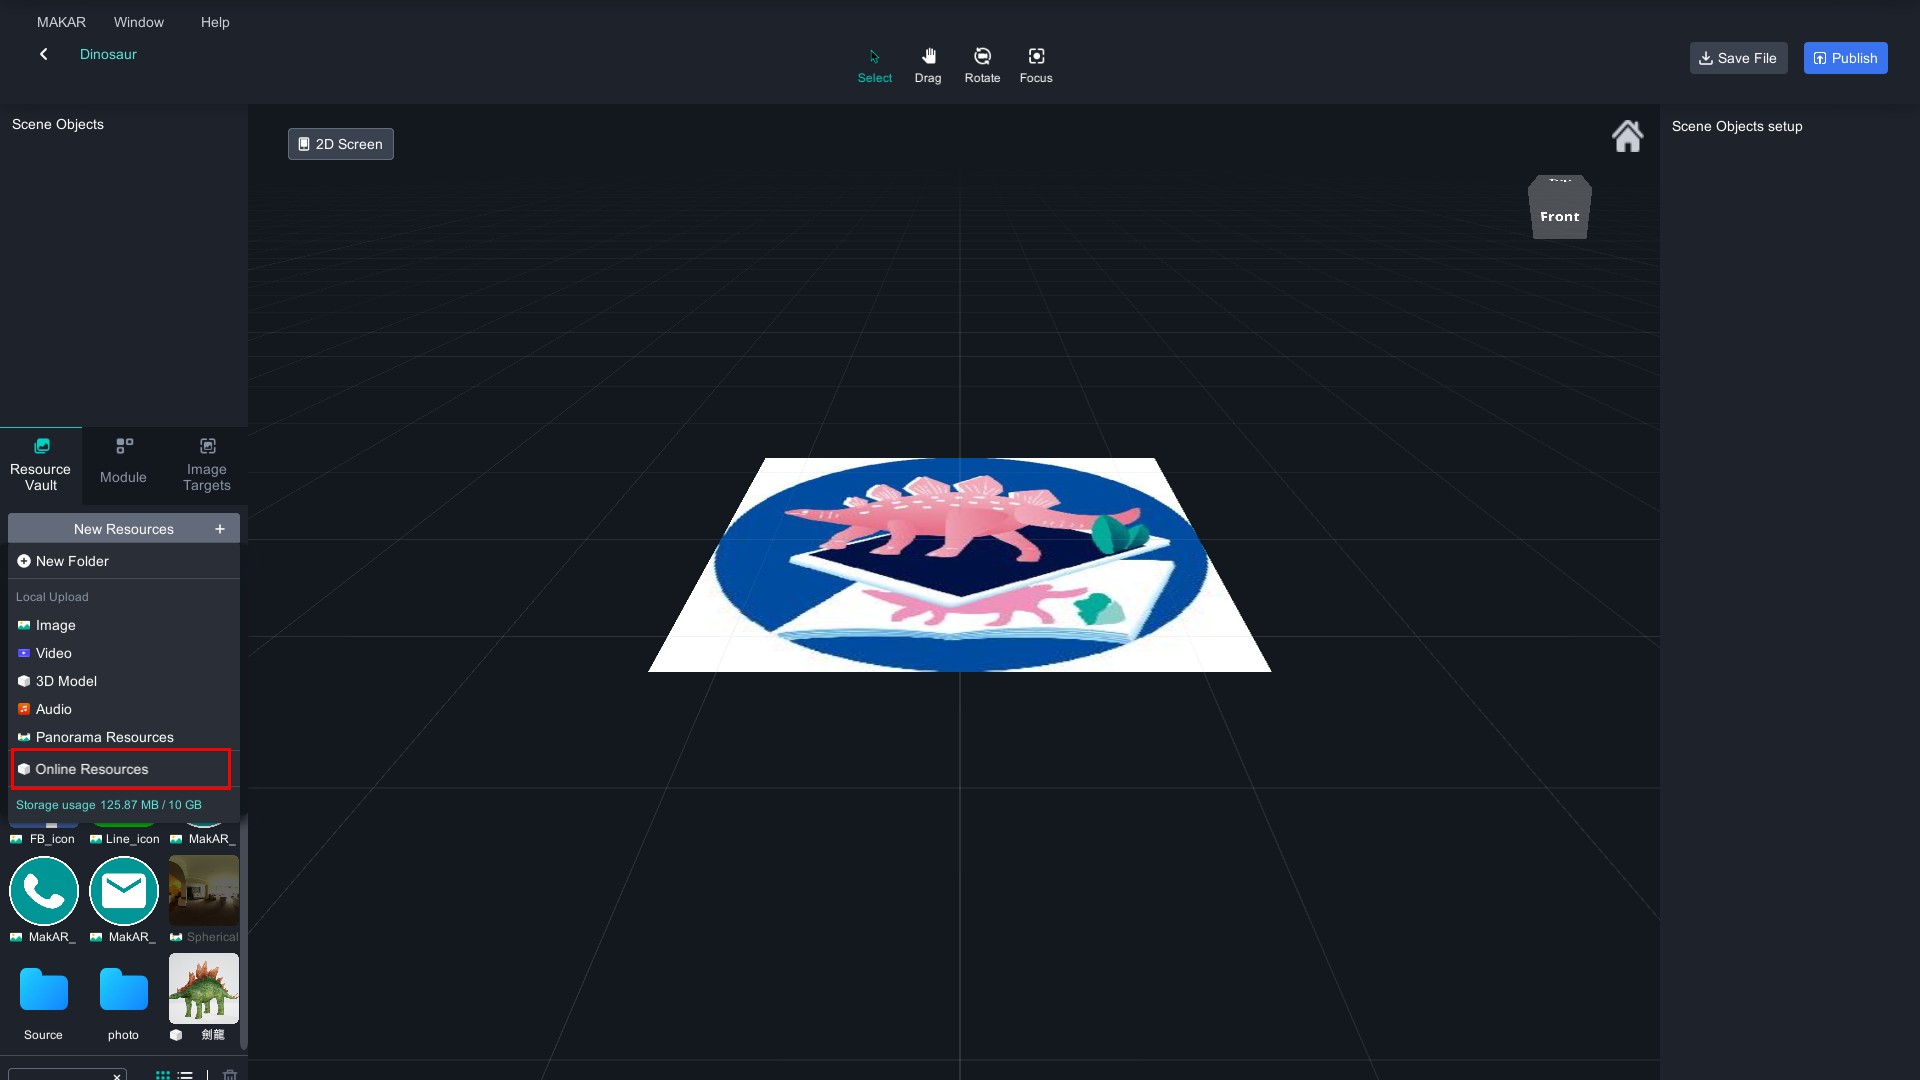
- Find out "Stegosaurus" and download. There's implication of Stegosaurus on the left-column
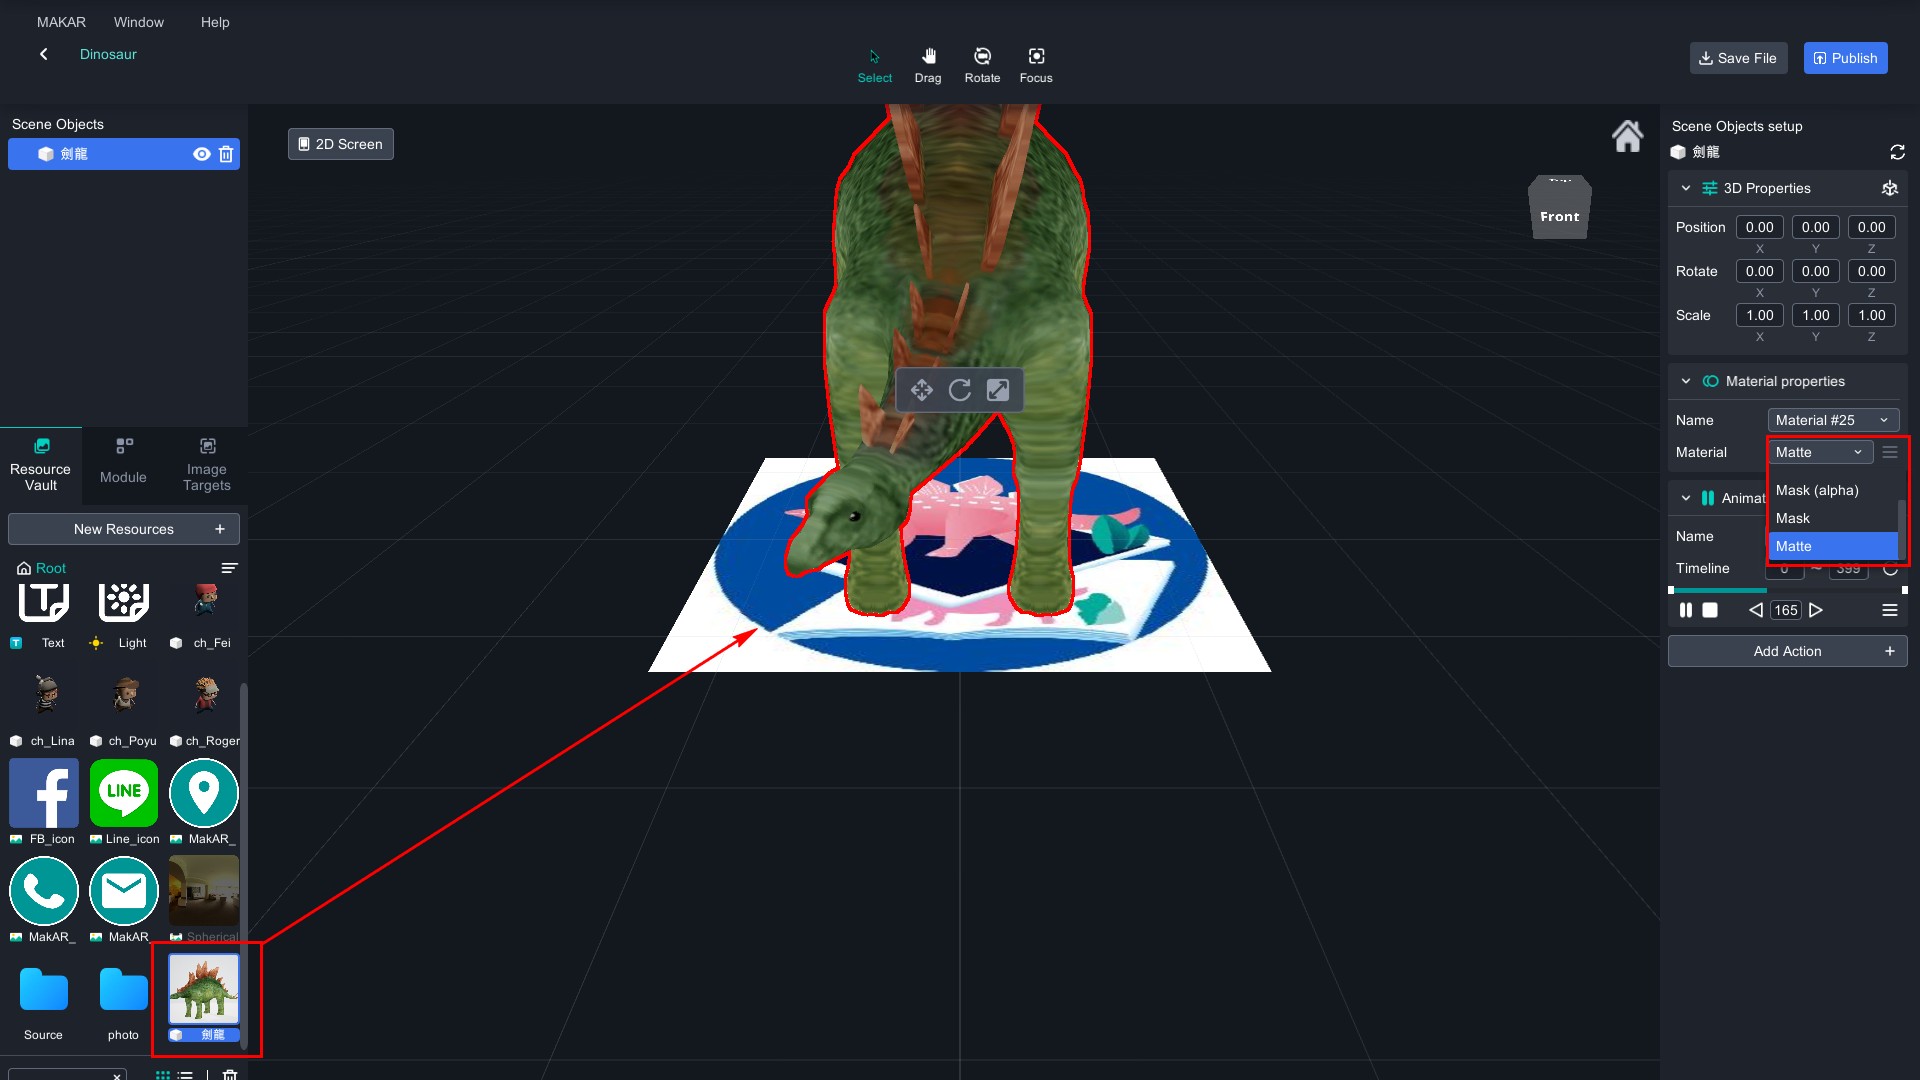
- Drag Stegosaurus to the interface and select "Matte" form
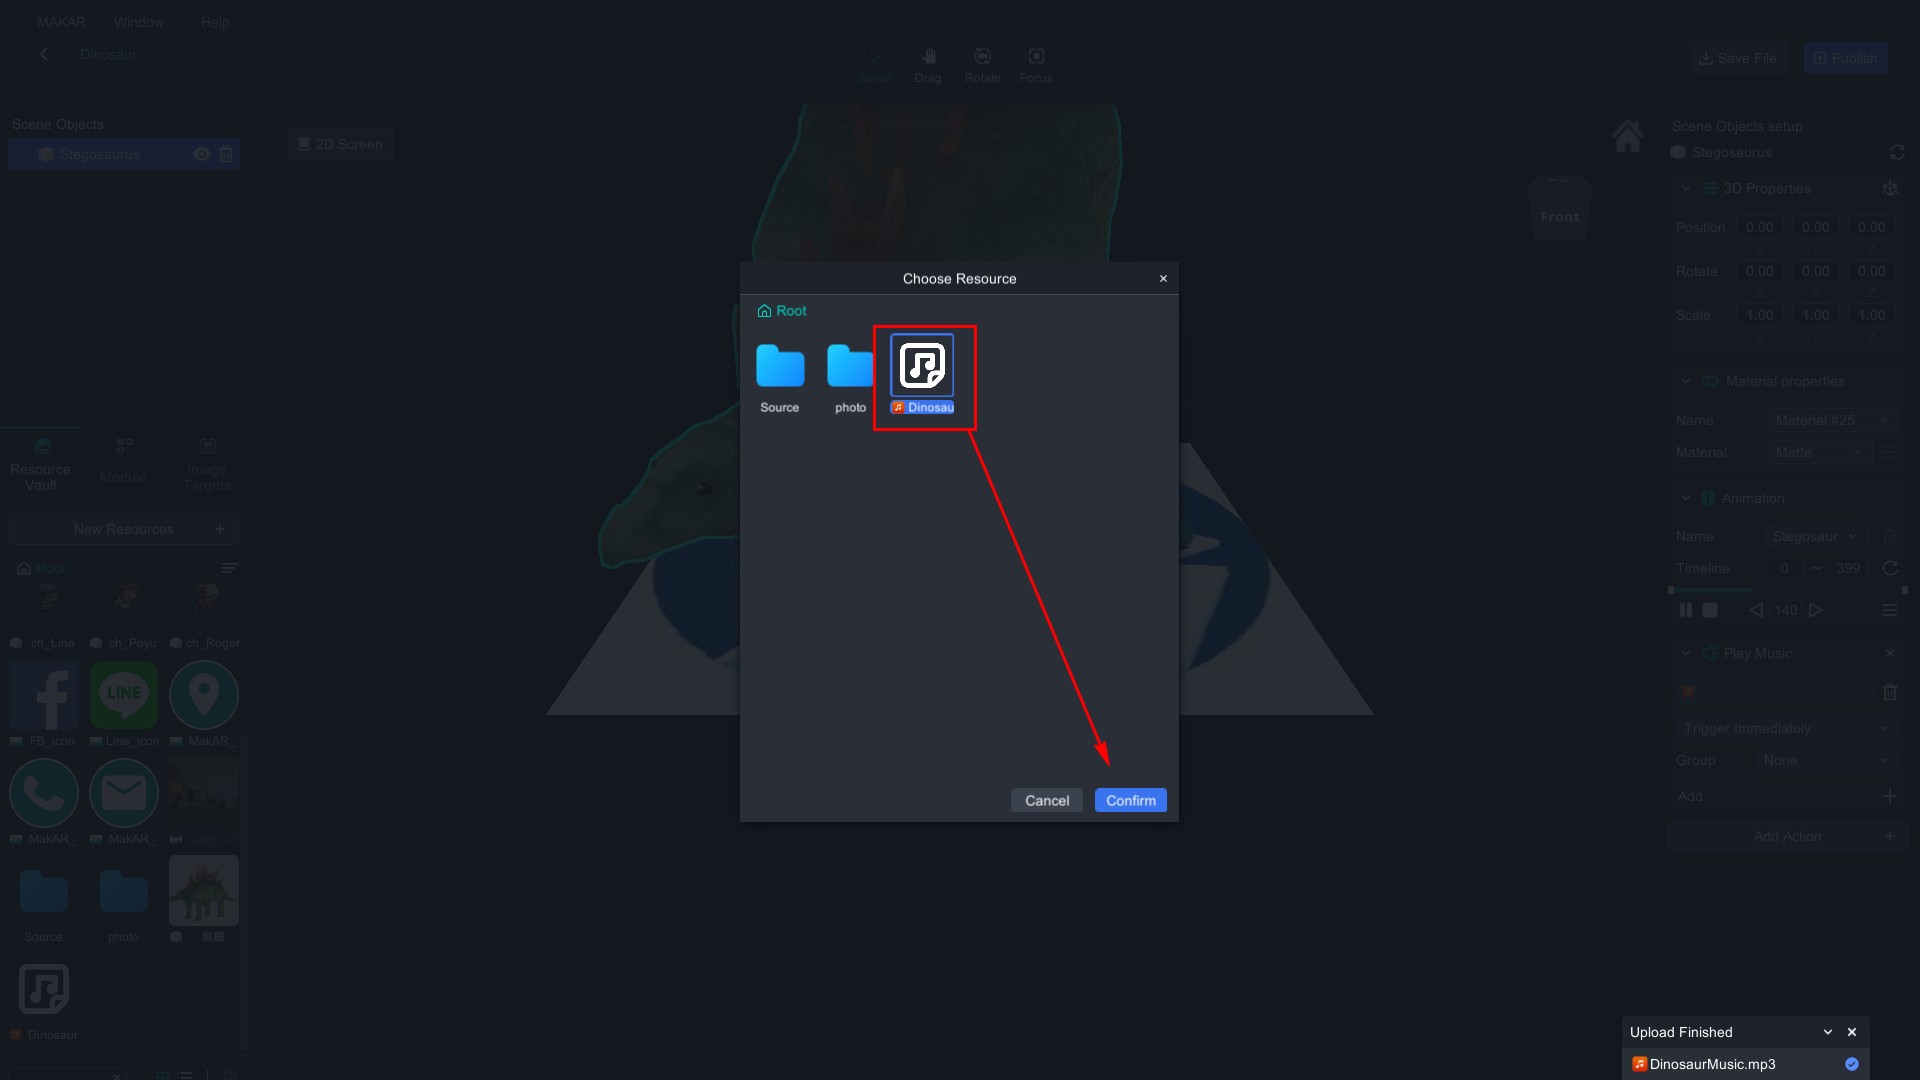
- To "Auto" and upload "DinosaurMusic.mp3"
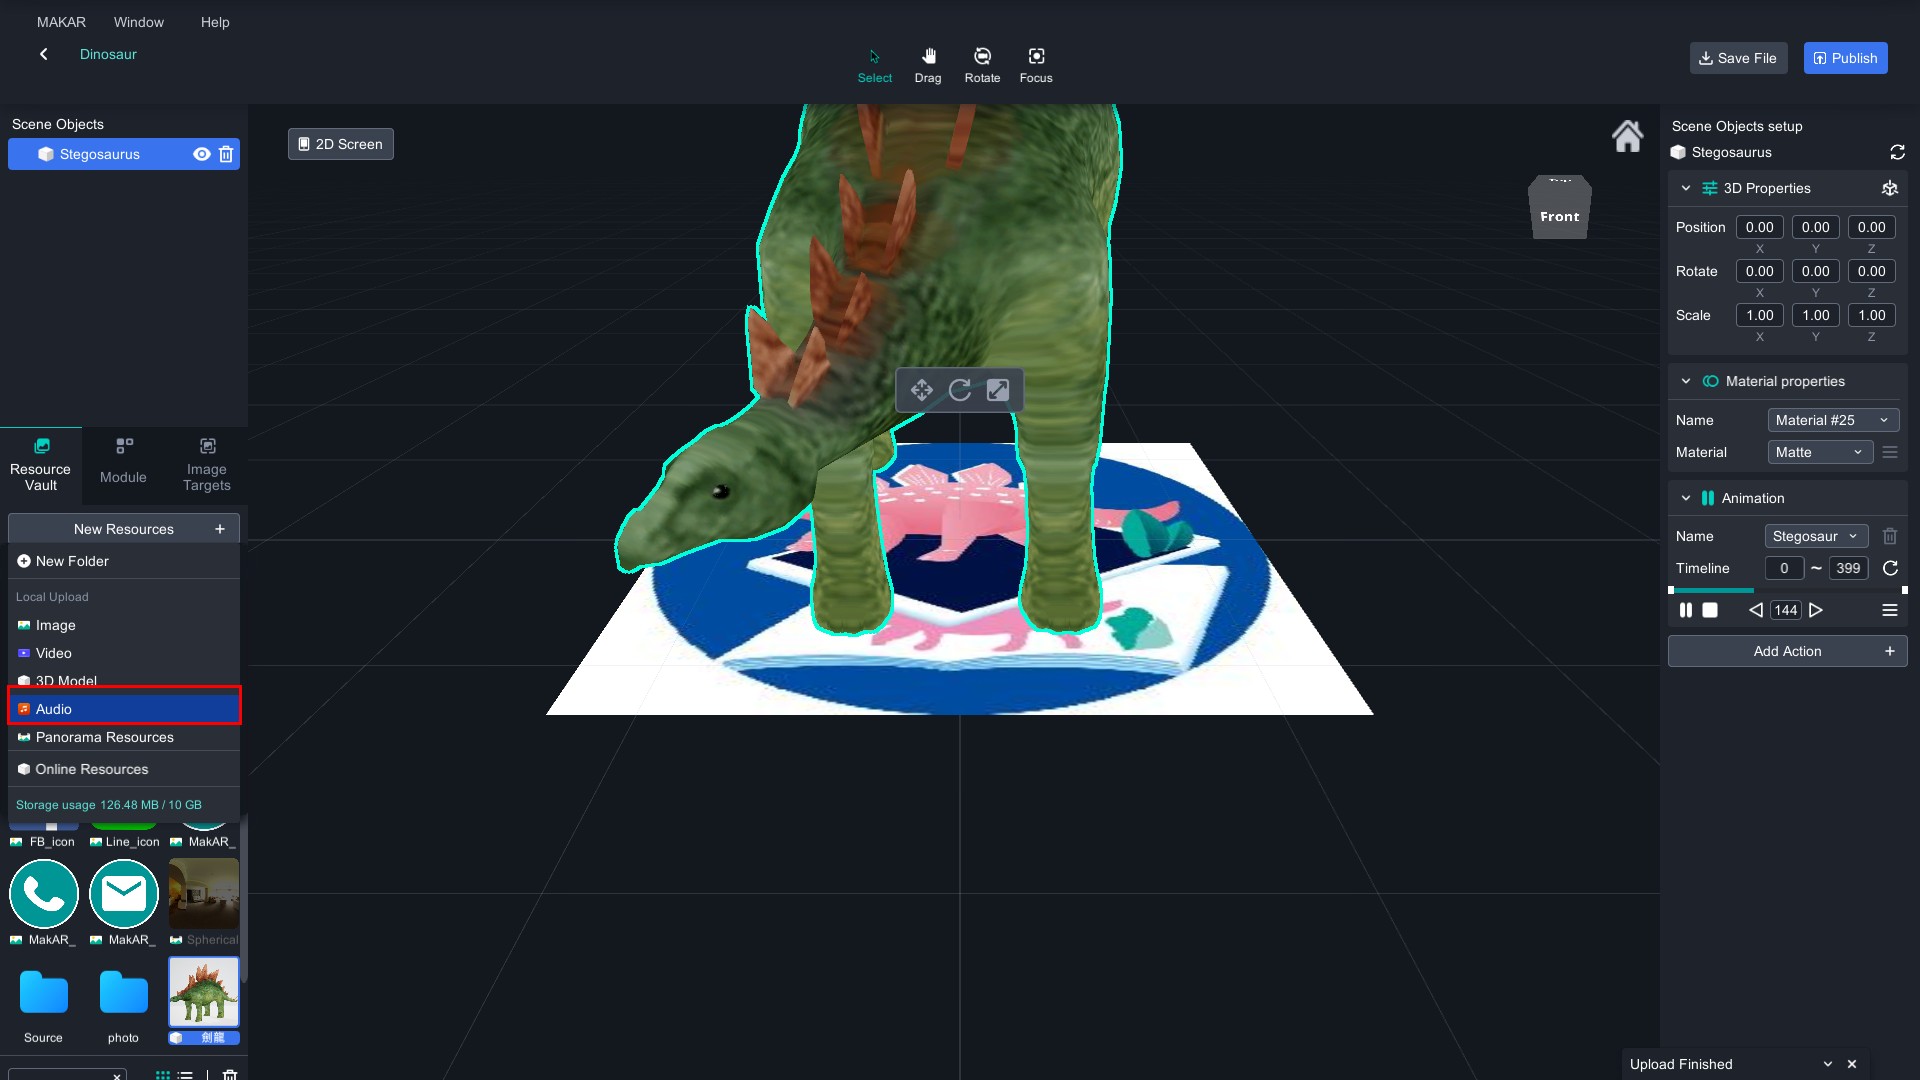
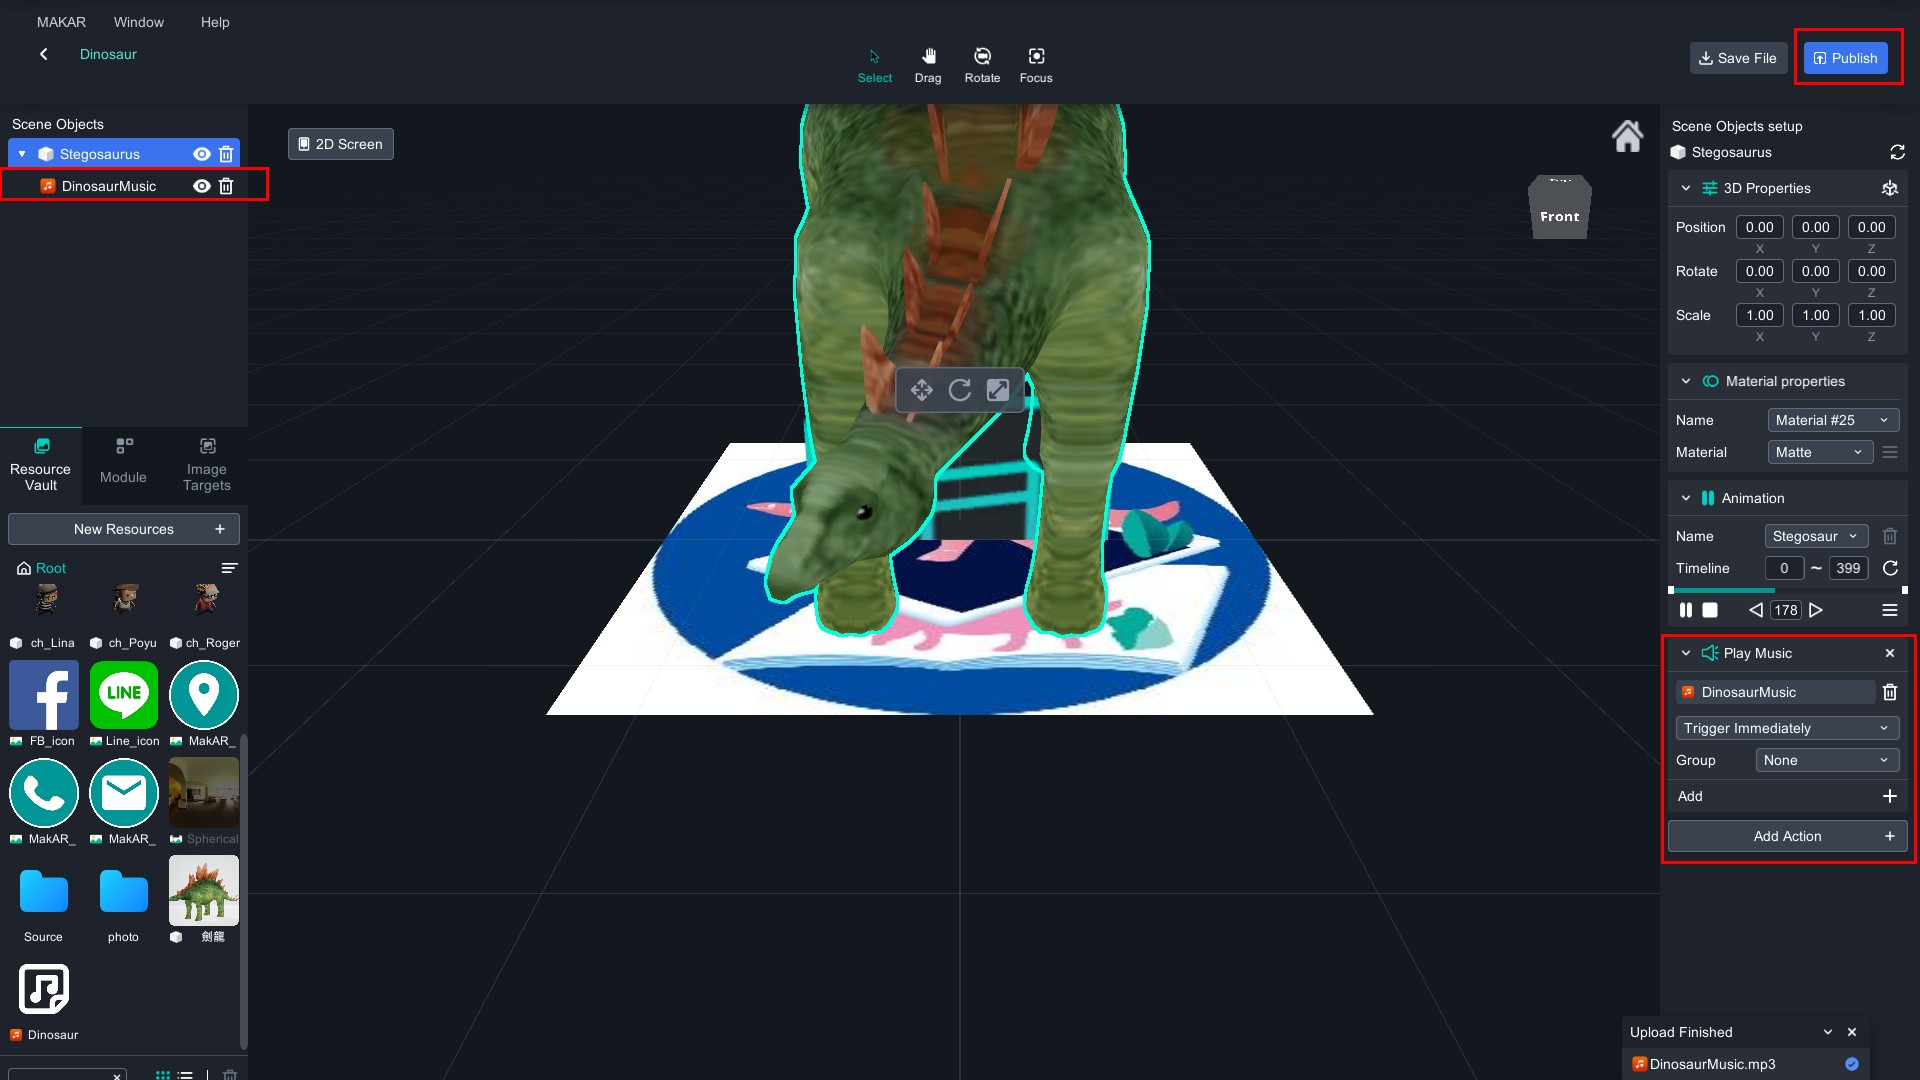
- Click Stegosaurus and play music
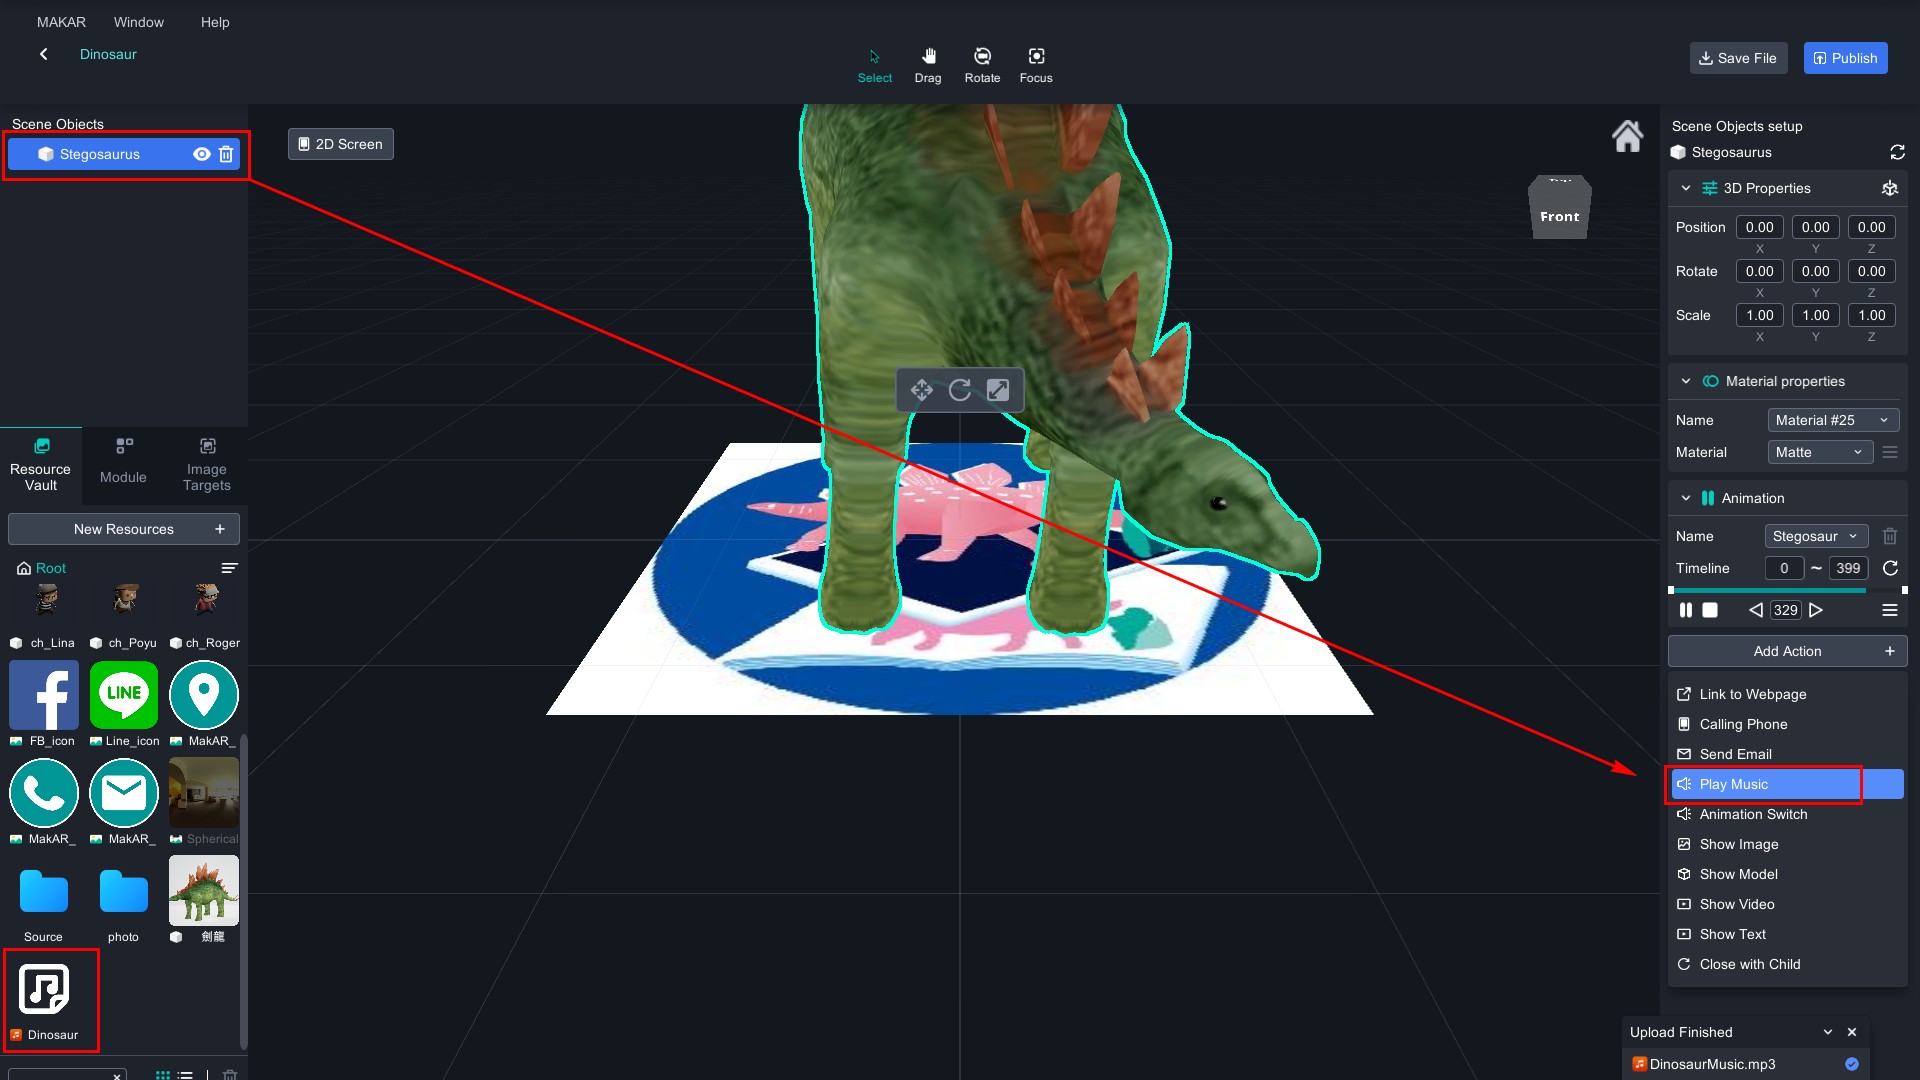
- Choose DinosaurMusic .mp3 and confirm
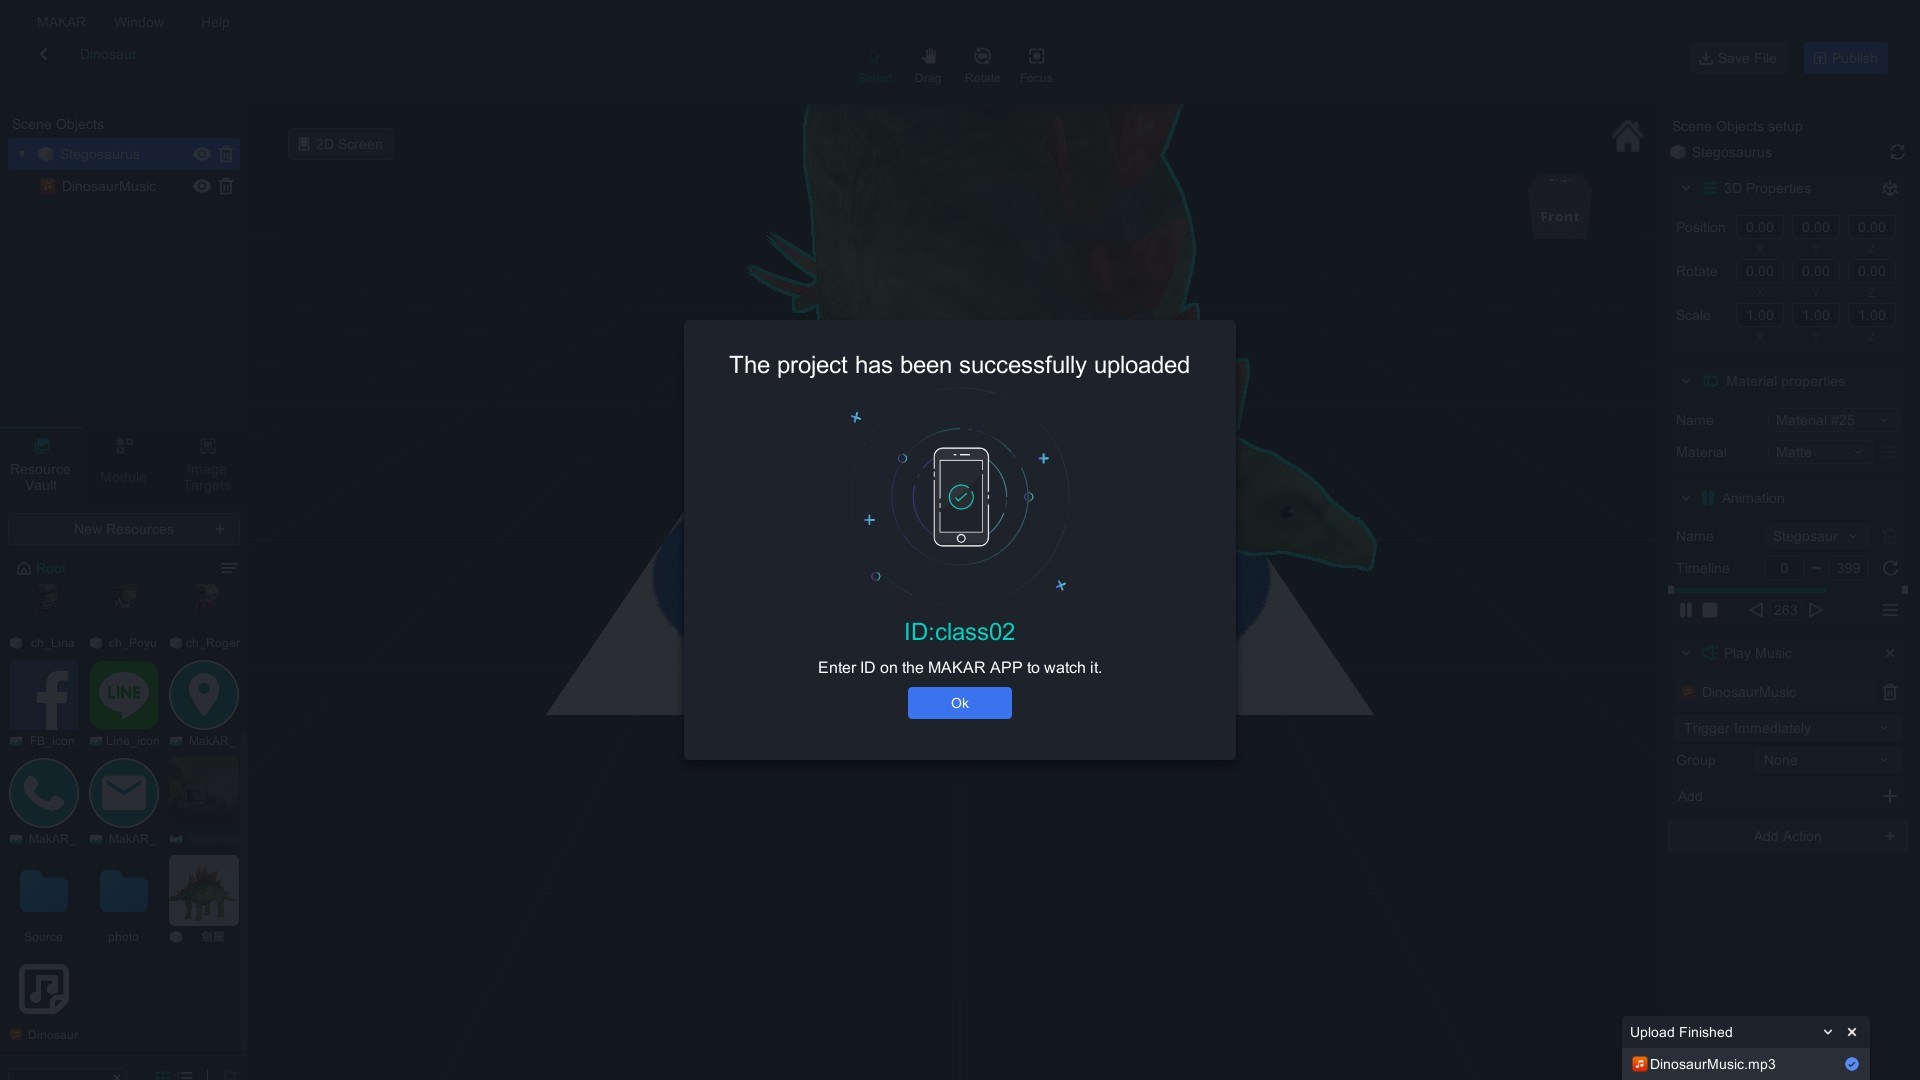
- It's sucessful if you can find out your music resource on Source Objects! Click publish
To Experience
Use your smartphone, enter your ID and start experiencing after scanning on target image.
- Install MAKAR APP
- Click Link to trigger / or scan the QRcode below

- Scan target

- Start your AR experience!
AR Image Recognition-English card
1. Open the App and allow access to your camera
2. Click “Search” and enter MAKAR ID: animalabc
3. Click on the author that project you want to experience


4.Click on the project you want to experience after entering the page. This time we will take Giraffe as an example
5.Click to open the experience


6. Enter the AR camera
7. After the screen appears, scan the target image to watch AR

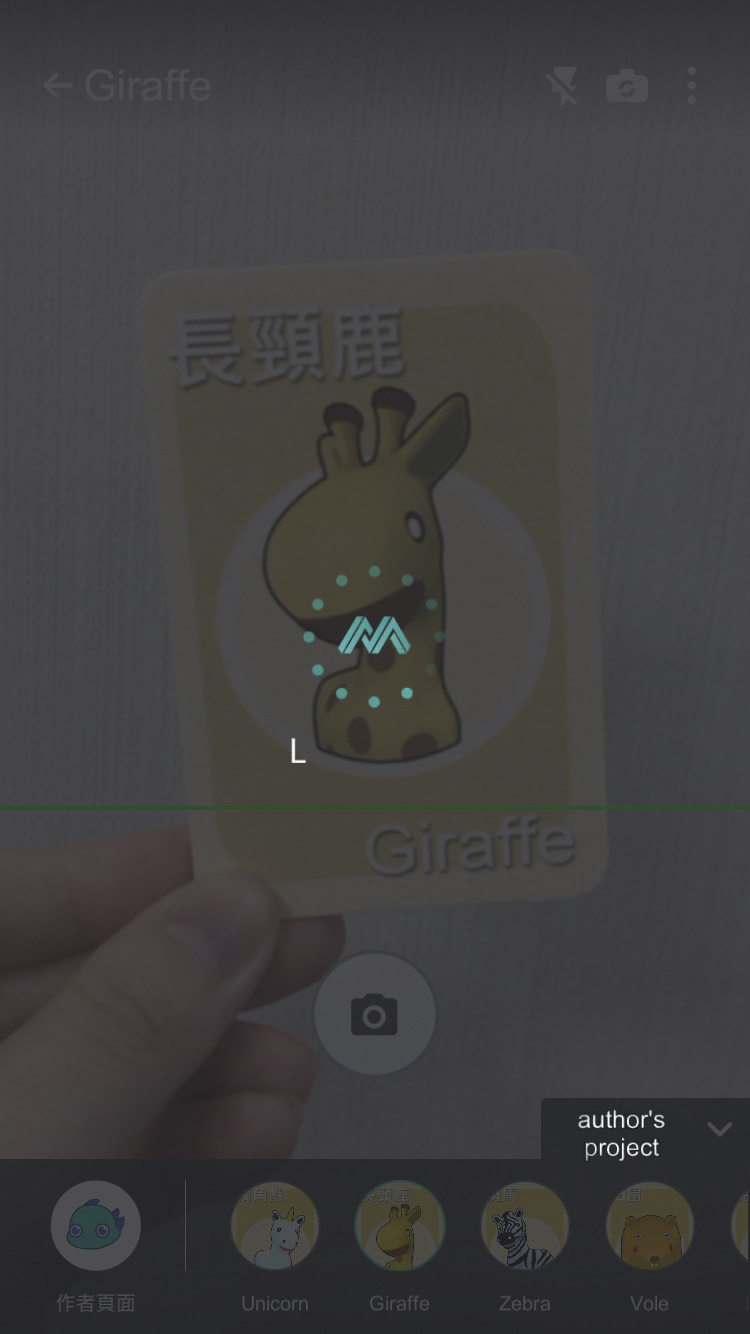

Let’s experience the lovely English card!
Alpaca

Cat

Dog
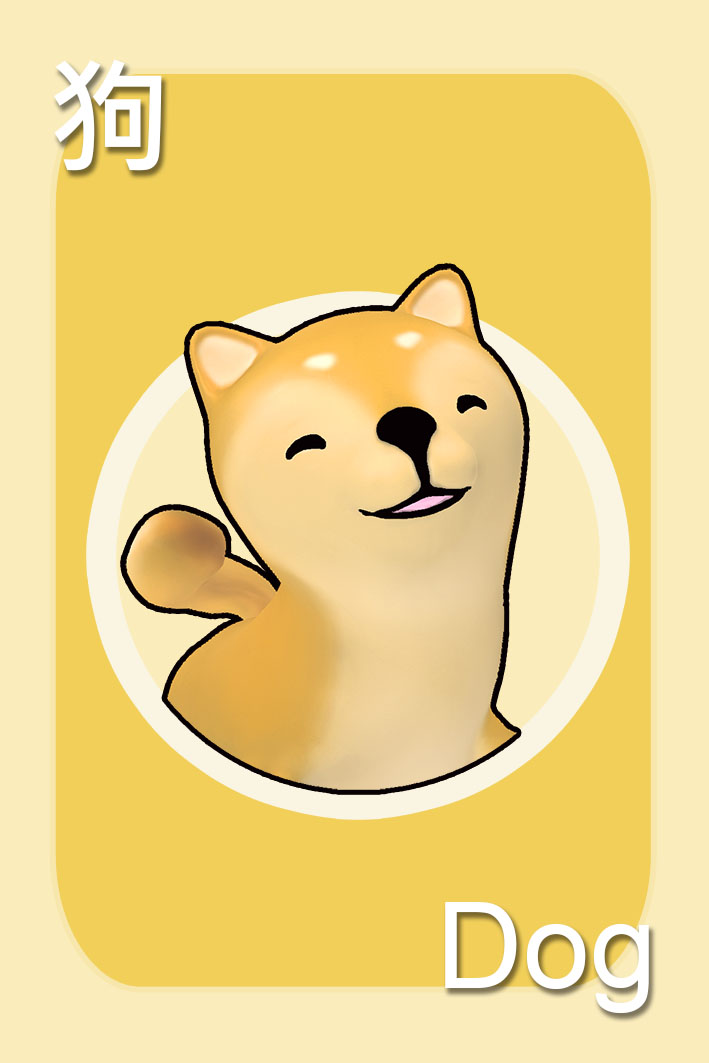
Giraffe

Whale


109 Changhua Pinghe AR Graduation Ceremony AR Shows Teaching Achievements
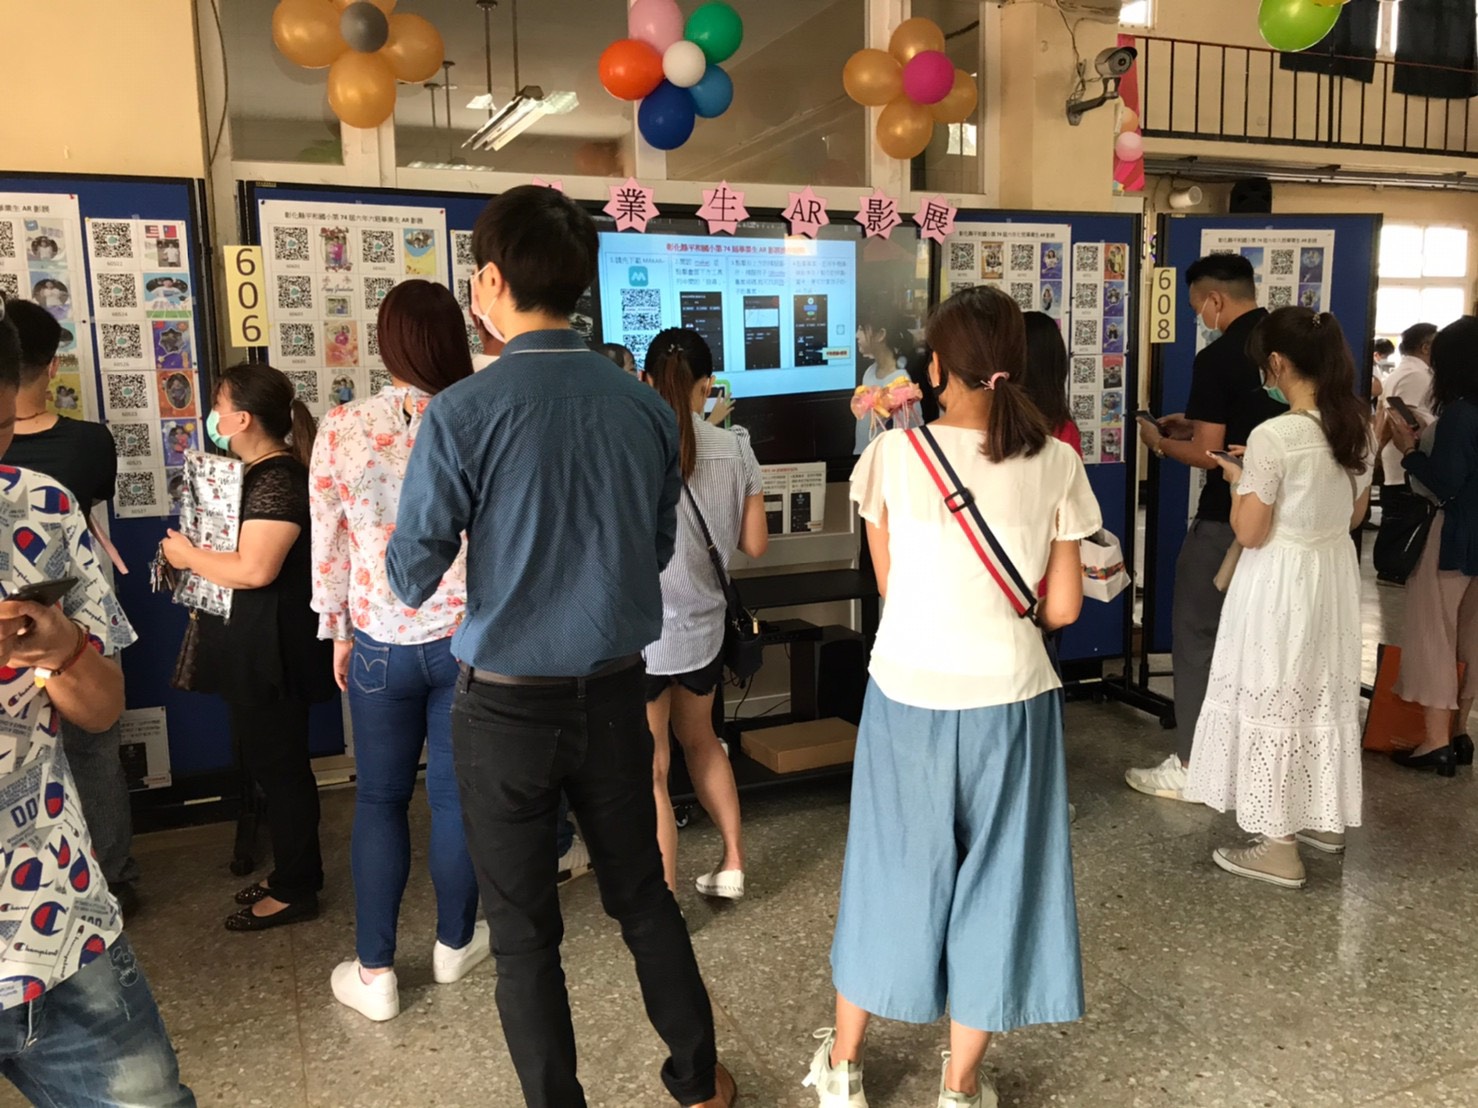
[✨]Graduation ceremony , dreams take off
Changhua Pinghe Elementary School Graduation Ceremony, hoping to break the dream and set off. The school especially hopes that children can display their graduation works with the latest technology AR.

The graduates of Changhua Elementary School not only made their own, but even acted as an instructor. They did not hesitate to explain how to use MAKAR to watch AR's clear explanation and make a film to show! Spontaneous and creative performance to Taiwan education Bring more hope!
Beishi Yanxizi No. 1100712009

| Approval number | Beishi Yanxizi No. 1100712009 |
| Study name | 110 Taipei Teachers e-textbook Innovation and Teaching Research Workshop: Development and Application of PowerDirector's Textbook-AR Augmented Reality |
| Study hours | 3 |
| organizer | Taipei Teachers' Research Center |
| Study object one | 109 school year Taipei teacher e-textbook development teacher and Taipei City teacher |
| Study object two | Open Inter-School Registration |
| Study object three | other |
| Number of students | 0 people every school 0 people |
| Study start date | 2021/7/26 |
| End of study | 2021/7/26 |
| Study unit address | Online meeting room  |
| Study classroom | Online course |
| Study goals | In line with the promotion of the 108 syllabus, promote the application of augmented reality (AR) and virtual reality (VR) to the teaching scene to enhance teachers' innovative teaching mode. |
| Study method | |
| ways of registration | Online registration |
| Selection instructions | 109 school year Taipei teacher e-textbook seed teachers are given priority admission |
| Study undertaker | Lin Qiuwan |
| Undertaker phone | 28616942#236 |
| Implement the plan |
Study Information